Create a computer to computer network (continued) – Sonnet Technologies Aria extreme CardBus User Manual
Page 3
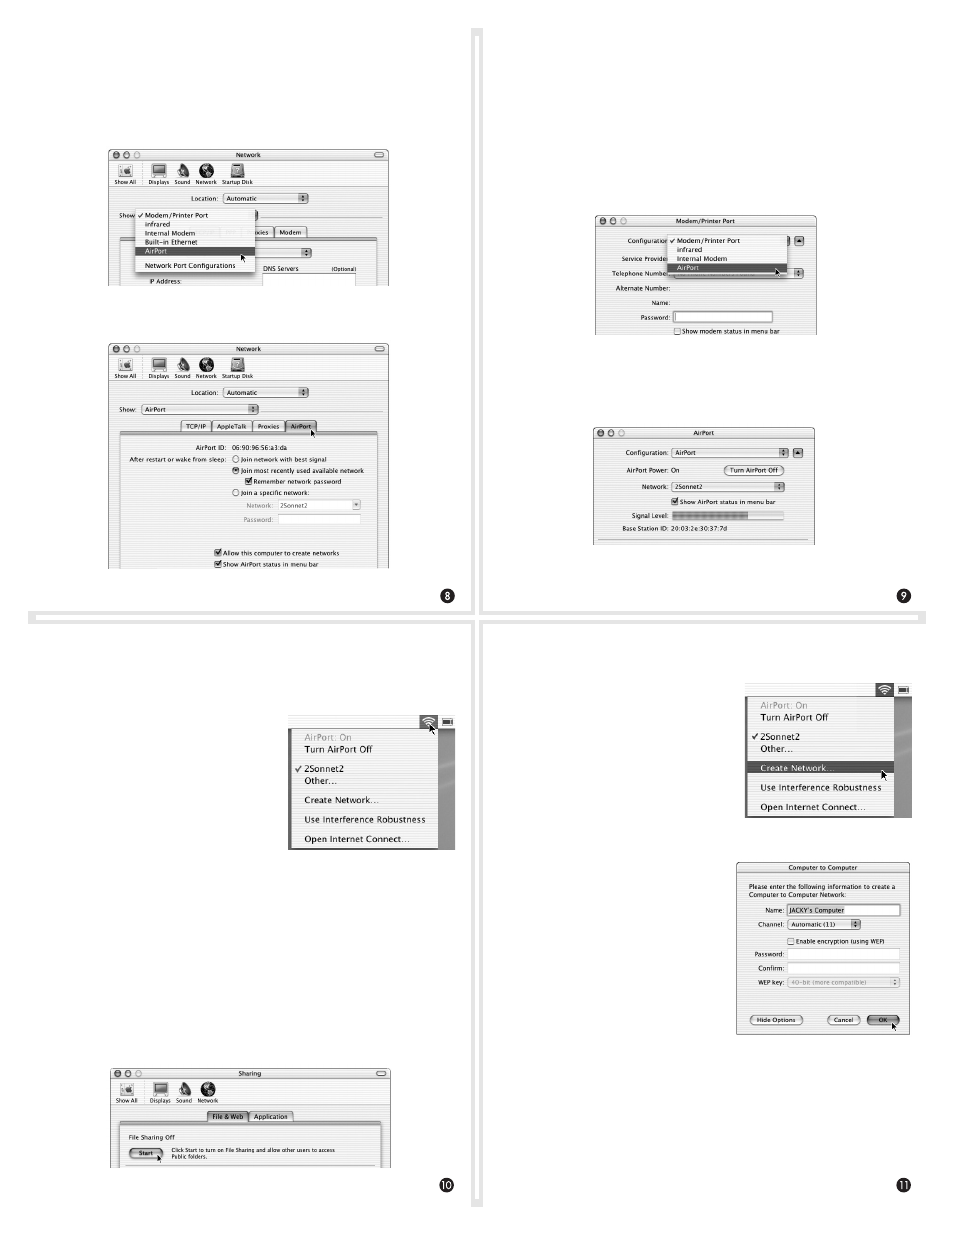
Enable Internet Access Through Aria extreme(continued)
4. Quit the Internet Access application; you should now be able
to access the Internet through the Aria extreme (provided you
are within range of a base station or access point).
5. In the right corner of the menu
bar at the top of the screen, you
will see the AirPort status indica-
tor (Figure 15). This icon indicates
signal strength of your selected net-
work; click on the icon and choose
items to change settings and open
the Internet Access application.
Configure Your PowerBook
Part 4 - Create a Computer to Computer Network
You can create a network of two or more computers and share fi les,
so long as each is equipped with a 802.11b or 802.11g wireless LAN
card, such as the Aria extreme.
1. From the Apple Menu, select System Preferences.
2. Click on the Sharing icon in the middle of the window, and
then click the Start button under “File Sharing Off” (Figure 16).
Figure 15
Create a Computer to Computer Network (continued)
3. Close System Preferences.
4. Click on the AirPort status icon
and select “Create Network…”
(Figure 17).
5. Enter the required information,
including the name you choose
for the Computer to Computer
network, and then click OK
(Figure 18). Note that you must
use the same name and channel
settings for the other computer.
Configure Your PowerBook
Part 3 - Enable Internet Access Using Aria extreme
In order to access the Internet through the Aria extreme, you will
need to change settings in the Internet Connect application.
1. Launch the Internet Connect application (located in the
Applications folder).
2. Click on the Confi guration drop-down menu and select
AirPort (Figure 13).
3. After selecting AirPort, you will see basic information regard-
ing your setup (Figure 14). If it is not checked, click the box
next to “Show AirPort status in menu bar.”
Figure 13
Figure 14
Figure 17
Figure 16
Figure 18
Configure Your PowerBook
Part 2 - Set Network Settings
1. From the Apple Menu, select System Preferences.
2. Click on the Network icon at the top of the window, and then
select AirPort from the Show: drop-down menu (Figure 11).
3. Click on the AirPort tab to reveal and adjust settings (Figure 12).
Figure 11
Figure 12