3 buttons description and operation – General Technologies TA500 SmarTach+COP : Multisystem Engine Analyser User Manual
Page 4
Page 6
Page 5
3.3 Buttons description and operation
3.3.1 Power ON/OFF and Reset button
• When the instrument is OFF, to turn it ON press and hold the ‘Power ON/OFF
/ Reset’ button until the unit turns on (in approximately 1 second).
• When the instrument is ON, to turn it OFF press and hold the ‘Power ON/OFF
/ Reset’ button until the display turns OFF (in approximately 3 seconds).
• When the instrument is ON, press momentarily the ‘Power ON/OFF / Reset’
button to reset the Maximum and Minimum and capture values.
Note: To extend battery life, the TA500 will automatically turn OFF after 3 minutes
of being idle (i.e. no button pressed and no input signal). Turning the unit off
manually, when not in use will prolong battery life.
3.3.2 Ignition System button
• Press the ‘Ignition System’ button to select the ignition system measuring
mode that matches the ignition system used in the engine being diagnosed,
as explained below. The selected setting will be shown on the display.
•
SPW (Spark Plug Wire): Use this setting for all ignition systems equipped
with high voltage spark plug wires (e.g.: Conventional distributor, magneto,
distributorless or waste spark ignition systems).
•
COP (Coil On Plug): Use this setting for ignition systems in which the ignition
coil is mounted near or directly on top of the spark plug.
3.3.3 Engine Cycles button
Engine
Cycles
• Press the ‘Engine Cycles’ button to select the number of cycles for the engine
under measurement. Each time the button is pressed the number of cycles
will change between 2 cycles, 4 cycles, and DIS settings. The selected setting
will show on the display.
• For
SPW (Spark Plug Wire) measurements mode, it can be set to : 2 or 4
cycles or DIS (Distributorless or waste spark ignition system).
• For
COP (Coil on Plug) measurement mode, it can be set to: 2 or 4 cycles.
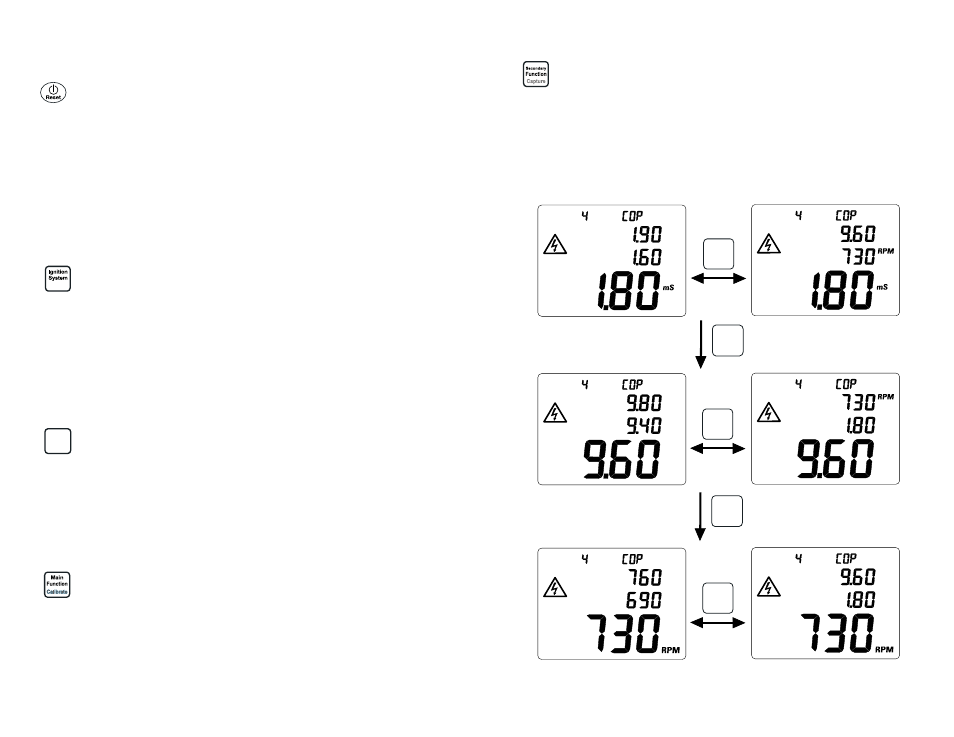
3.3.4 Main Function / Calibrate button
• Press this button to change which measurement is shown in the main (large)
display. There are three measurements to choose from: RPM, spark burn
time, and spark KVolt. Every time this button is pressed momentarily the
measurement changes from one function to the next.
• Press and hold this button for three seconds to start the automatic calibration of
the unit to the
COP module type being measured. While calibrating, the display
will flash “CAL” and will return to normal after the procedure is completed (in
about 3 seconds). Calibration is disable when in
SPW mode.
MAX
MIN
Cycles
Burn
Time
Cycles
KVolt
Peak Voltage
Burn
Time
MAX
MIN
Cycles
KVolt
Spark
Burn Time
Cycles
mS
Spark
MAX
MIN
Cycles
Burn Time
Cycles
KVolt
mS
Peak Voltage
KVolt
Function
Main
Calibrate
Calibrate
Function
Secondary
Capture
Function
Secondary
Capture
Function
Secondary
Capture
Function
Main
Calibrate
Calibrate
3.3.5 Secondary Function / Capture button
• Press this button momentarily to change what is displayed in the two
secondary displays. The are two possible choices: the two measurements
not shown in the main display or the Maximum and Minimum readings of the
main display.
• Pressing and holding this button for three seconds enables ‘Capture mode’,
which measures and holds the maximum readings. To exit this mode press
the ‘Secondary Function / Capture’ button momentarily again.
3.3.6 Main and Secondary Functions display combinations
Fig. 3 - Examples of Main and Secondary Functions combinations