Safety guidelines, Specific information, Portion control – Server SE-xxx EXPRESS User Manual
Page 2
SAFETY GUIDELINES
According to food and safety regulations, most foods
must be stored and/or served at certain temperatures
or they could become hazardous. Check with local food
and safety regulators for specific guidelines.
Be aware of the product you are serving and the
temperature the product is required to maintain.
Server Products, Inc. can not be responsible for
the serving of potentially hazardous product.
NSF International
(National Sanitation Foundation)
lists this pump as: “Not acceptable for
dispensing potentially hazardous foods.”
Stainless steel is one of the best materials for food
serving and storage, but there are many products which
can corrode it. If you notice corrosion beginning on
any stainless steel surface, you may need to change
the cleansing agent, sanitizing agent, or the cleaning
procedures you are using.
• Products containing: acids, alkalines, chlorine,
or salt can corrode stainless steel.
• Sauerkraut and Au Jus sauces corrode stainless
steel. Server Products, Inc. regrets that we can
not honor warranty claims on stainless steel
parts that have been affected by sauerkraut
or Aus Jus.
SPECIFIC INFORMATION
Drop-In Units
Drop-In units can be used either on a counter top surface
or can be dropped into an opening in a counter top.
Model Number
Recommended
Counter Top Opening Size
07000, 07020
8 1/2” x 6 3/8”
07010, 07030
8 1/2” Diameter
07050
8 1/2” x 16 3/8”
07210
8 1/2” x 21 13/16”
07070
8 1/2” x 27 3/16”
07160
8 1/2” X 11”
Parts for 07000 and 07010:
If part information is needed for model numbers
07000 or 07010, prior to Series 97K,
contact Server Products customer service department.
PORTION CONTROL
Portion control is the amount of product which will
dispense from pump with each full push of lever.
The roller, which is attached to the bottom of the lever,
can be adjusted to allow for specific portion control.
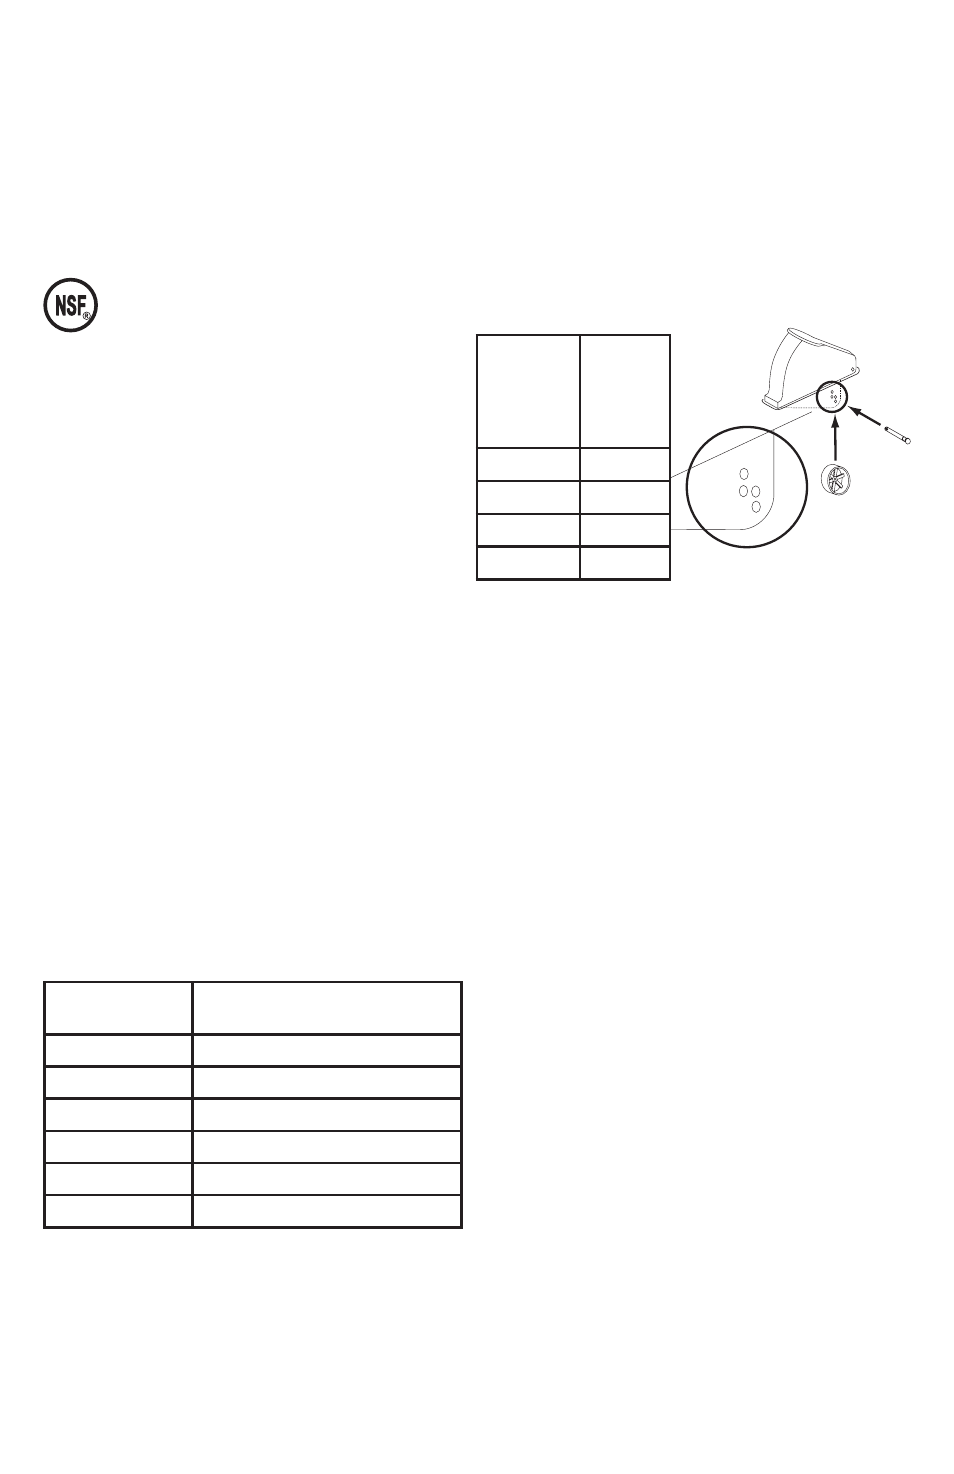
How to Set Portion Control
1
REMOVE LID FROM UNIT.
2
REMOVE ROLLER FROM LEVER BY PULLING
HINGE PIN OUT.
3
DETERMINE WHICH PIVOT HOLES IN LEVER WILL
BE USED TO HOLD ROLLER FOR PORTION
DESIRED PER FULL PUSH OF LEVER.
Portion
Desired
(per full
push of
lever)
Adjust
roller
to pivot
on lever
holes
1 Ounce
A
3/4 Ounce
B
1/2 Ounce
C
1/4 Ounce
D
4
ALIGN CENTER HOLE OF ROLLER WITH SELECTED
PIVOT HOLES ON LEVER.
5
INSTALL HINGE PIN THROUGH SELECTED PIVOT
HOLE ON ONE SIDE OF LEVER, THROUGH CENTER
HOLE OF ROLLER, AND THROUGH COORDINATING
PIVOT HOLE ON OTHER SIDE OF LEVER.
• Push hinge pin through until it securely snaps
into place.
6
INSTALL LID ONTO UNIT.
D
B
C
A