Addonics Technologies ADI2S3GPX1-2E User Manual
Page 2
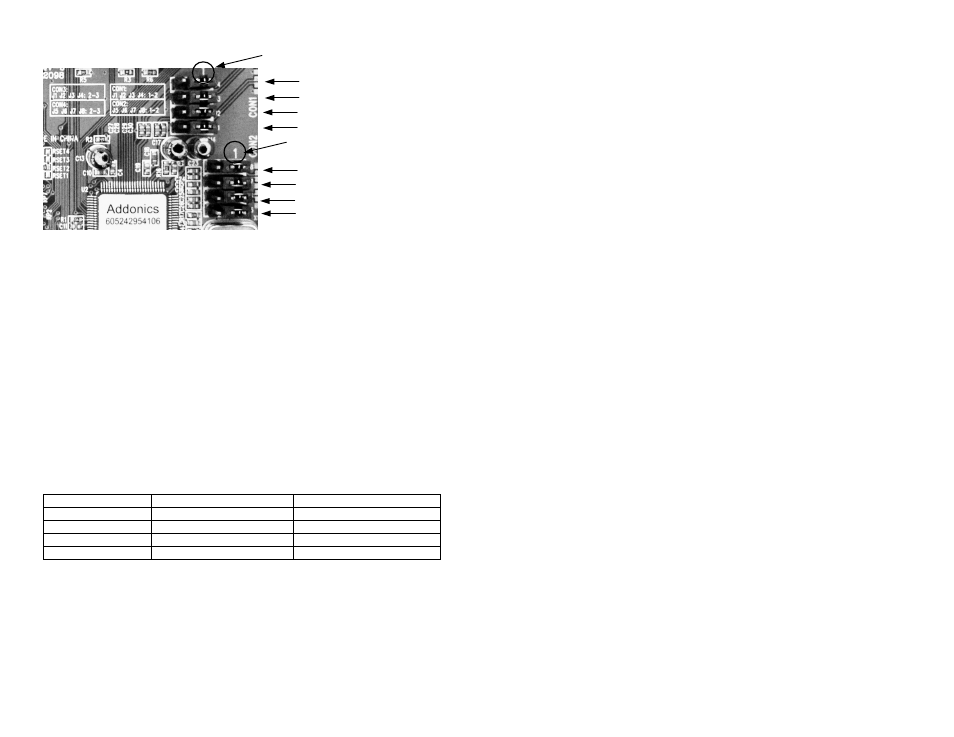
Detailed View of Jumper Pins
To enable CON3 and disable CON1,
transfer jumper to pins 2 & 3 on J1, J2, J3 & J4
To enable CON4 and disable CON2,
transfer jumper to pins 2 & 3 on J5, J6, J7 & J8
Recommendations on using the ADI2S3GPX1-2E
There are two ways of configuring raid sets on the
ADI2S3GPX1-2E
. Use the
RAID BIOS of the controller card which shows up after POST or install the
JMB36X RAID Configurer in Windows to create raid volumes. The JMB36X RAID
Configurer will not run when no devices are attached to the controller.
Using the RAID BIOS to create RAID Volumes
There are four configurations supported:
RAID level/Type
Configurations
Number of disks needed
RAID 0
Disk Striping
2 or 3 or 4
RAID 1
Disk Mirroring
2
RAID 0+1
Disk Striping + Mirroring
4
JBOD
Disk Concatenation
2 or 3 or 4
RAID 0 (Striping)
1. Press Ctrl+J when prompted to enter the RAID BIOS.
2. At the next screen select Create RAID Disk Drive, press Enter.
3. Enter RAID name, press Enter.
4. Use arrow keys
• and •to switch the RAID level to 0-Stripe, then press
Enter.
5. Use arrow keys
• and •to switch the disk, use the “space” key to mark the
selected disk, then press Enter.
6. Use arrow keys
• and • to select chunk size from 4K, 8K, 16K, 32K, 64K
or 128K, then press Enter.
7. Input the RAID size, press Enter.
8. When asked Create RAID on the select HDD (Y/N)?, press Y to accept.
9. At the next screen select Save And Exit Setup, press Enter.
10. When asked Save to disk &Exit (Y/N)?, press Y to exit the RAID BIOS.
RAID 1 (Mirroring)
1. Press Ctrl+J when prompted to enter the RAID BIOS.
2. At the next screen select Create RAID Disk Drive, press Enter.
3. Enter RAID name, press Enter.
4. Use arrow keys
• and •to switch the RAID level to 1-Mirror, then press
Enter.
5. Use arrow keys
• and •to switch the disk, use the “space” key to mark the
selected disk, then press Enter.
6. Input the RAID size, press Enter.
7. When asked Create RAID on the select HDD (Y/N)?, press Y to accept.
8. At the next screen select Save And Exit Setup, press Enter.
9. When asked Save to disk &Exit (Y/N)?, press Y to exit the BIOS.
CONCATENATION (JBOD)
1. Press Ctrl+J when prompted to enter the RAID BIOS.
2. At the next screen select Create RAID Disk Drive, press Enter.
3. Enter RAID name, press Enter.
4. Use arrow keys
• and •to switch the RAID level to JBOD-Concatenate,
then press Enter.
5. Use arrow keys
• and •to switch the disk, use the “space” key to mark the
selected disk, then press Enter.
6. Input the RAID size, press Enter.
7. When asked Create RAID on the select HDD (Y/N)?, press Y to accept.
8. At the next screen select Save And Exit Setup, press Enter.
9. When asked Save to disk &Exit (Y/N)?, press Y to exit the BIOS.
RAID 0+1 (Striping + Mirroring)
1. Press Ctrl+J when prompted to enter the RAID BIOS.
2. At the next screen select Create RAID Disk Drive, press Enter.
3. Enter RAID name, press Enter.
4. Use arrow keys
• and •to switch the RAID level to 01-Stripe+Mirror, then
press Enter.
5. Use arrow keys
• and • to select chunk size from 4K, 8K, 16K, 32K, 64K
or 128K, then press Enter.
6. Input the RAID size, press Enter.
7. When asked Create RAID on the select HDD (Y/N)?, press Y to accept.
8. At the next screen select Save And Exit Setup, press Enter.
9. When asked Save to disk &Exit (Y/N)?, press Y to exit the BIOS.
Pin 1
Pin 1
J4
J3
J2
J1
J8
J7
J6
J5