Diagram 1, Diagram 2 – Perrycraft Aventura Fiberglass Mounting Hardware Kit User Manual
Page 2
INAVTC-UV (2 of 2) 140529
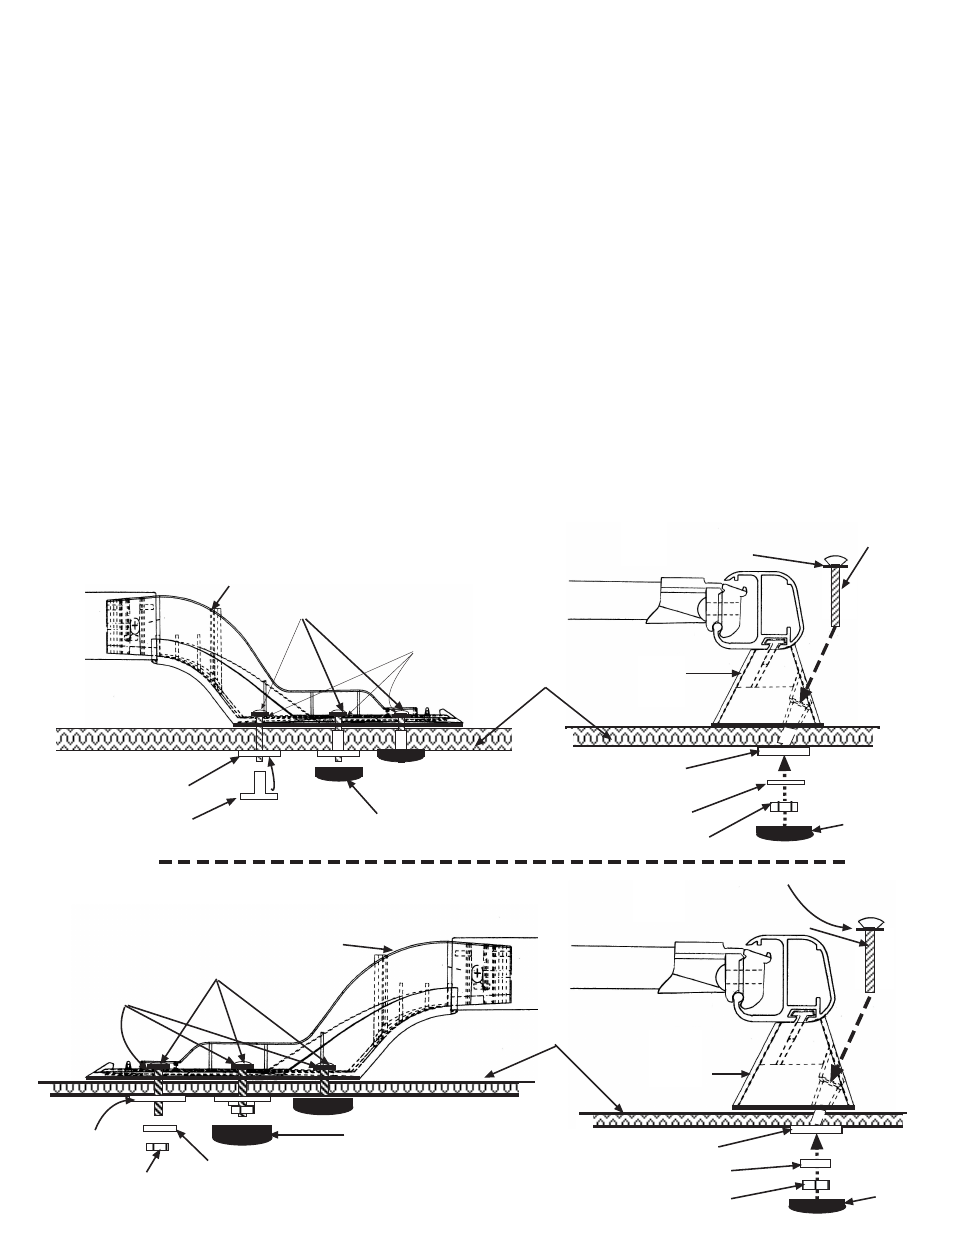
7. Assemble propeller Tee nuts and retaining washers with flange side of washer down and barrel of Tee nut up (see Diagram 1
below). Press barrel of Tee nuts into 9/32” holes until flange is flush with roof panel, excluding center post holes.
8. Insert #10-24x1" pan-head machine screws down through end support mounting holes from top side of cap and thrread into
tee nuts using minimal downward pressure to prevent forcing tee nuts out of holes. Be sure each machine screw has a neoprene
washer under the head. Center Post Installation: Insert #10-24x1 1/4” oval head machine screws through post and cap roof.
Install retainer washer, stainless steel flat washer, NyLok nut, and cover inside cap as detailed in Step 9, illustrated in the drawing
below. Keep in mind that the fasteners on these support posts will mount at an angle, not vertical as with all other fasterners.
IMPORTANT: Do not overtighten any of the fasteners, as excessive screw torque may damage fiberglass layers or core
material and/or force neoprene washers from under screw heads. Use of a liquid thread lock on machine screws is recommended.
Proceed to Step 10 now.
9. Installing outside hollow-core area or a roof thickness under 1/2", or sheet metal roofs without headliners: (Two people
required for this step; See Diagram 2 below)
Insert #10-24x1" pan head machine screws down through end supports, and 1 1/4” oval head machine screws through center
post (when applicable). Place 1 1/8" retainer washer against inside of roof with flange side down, followed by 1/4” Stainless
Steel flat washer and #10-24 lock nut. Tighten securely. Do not overtighten if installing in fiberglass, as excessive screw
torque may damage fiberglass and/or force neoprene washers from under screw heads.
10. Snap black plastic screw covers onto retaining washers (Break away any excessive screw shank flush with top of tee or lock
nut if necessary to enable plastic screw cover to snap on to retainer washer). NOTE: Center post covers may or may not fit
completely flush against inside of cap and/or may be slightly loose fitting. This does not create any functional problem.
Revert to installation instructions that came with roof rack (or rails) for installation procedure of end support covers.
Diagram 1 -
Installing on hollow-core roofs from 1/2” up to 1” thick:
Diagram 2 -
Installing on single-layer roofs up to 1/2” thick or sheet metal
roofs without headliners:
End Support
(Stanchion)
#10-24x1” Pan head screws
Neoprene washers
Neoprene washer
#10-24x1 1/4”
Oval head screw
#10-24x1 1/4”
Oval head screw
Retainer Washer
Retainer Washer
Propeller Tee Nut
Cover
1/4” S. Steel Flat Washer
Cover
#10-24 NyLok Nut
#10-24x1” Pan head screws
Neoprene washers
Center
Post
Note:This screw
installs on an angle,
not straight down!
Note:This screw
installs on an angle,
not straight down!
Retainer Washer
1/4” S. Steel Flat Washer
Cover
#10-24 NyLok Nut
Retainer
Washer
1/4” S. Steel Flat Washer
#10-24 NyLok Nut
Cover
Cap Hollow-Core
Single-layer Material
Center
Post
End Support
(Stanchion)
Neoprene washer