Ch 2c, Setting transmitter operating frequency, Attaching a microphone and adjusting gain – Lectrosonics SM User Manual
Page 10: Locking or unlocking the control panel
SM
Setting Transmitter Operating Frequency
The Operating Frequency of the SM can be displayed
either in MHz or as a two-digit hexadecimal number.
(See Controls and Functions, FREQ Button.) The SM’s
operating frequency can be set with the unit in Standby
Mode or powered up for normal operation. Use the fol
lowing procedure to change the Operating Frequency of
the SM transmitter:
1) If the LCD is displaying something other than the
Frequency Screen, press the FREQ button on the
SM Control Panel to enter this screen.
Note: The default display is in MHz. Pressing
the FREQ button again displays the operating
frequency as a two-digit hexadecimal number
that corresponds the equivalent Lectrosonics
Frequency Switch Setting.
2) While holding the FREQ button, use the Up or
Down arrow buttons to move the operating fre
quency up or down in 100 kHz increments from the
current setting.
Note: The operating frequency displayed on the
LCD wraps as it reaches the upper or lower end
of its range. Thus, if you intend to move the
operating frequency from the lower end of the
range to the upper end, it may be faster to do this
by using the Down arrow until the frequency wraps
to the upper end.
Most Lectrosonics receiv
ers indicate the operating
frequency both in MHz and
644.400
as a two digit hexadecimal
number. This conforms to
Frequency displayed in
MHz
the Lectrosonics tradition
of setting the operating
frequency using two 16-po-
CH 2C
sition rotary switches. The
SM offers the ability to set
Frequency displayed as
two-digit hexadecimal
the operating frequency in
number
a similar manner. Press
ing the FREQ button while the LCD displays the
operating frequency in MHz will change the display
to show the equivalent two-digit hexadecimal fre
quency select switch setting. Simply use the Up or
Down arrow to increase or decrease the operating
frequency.
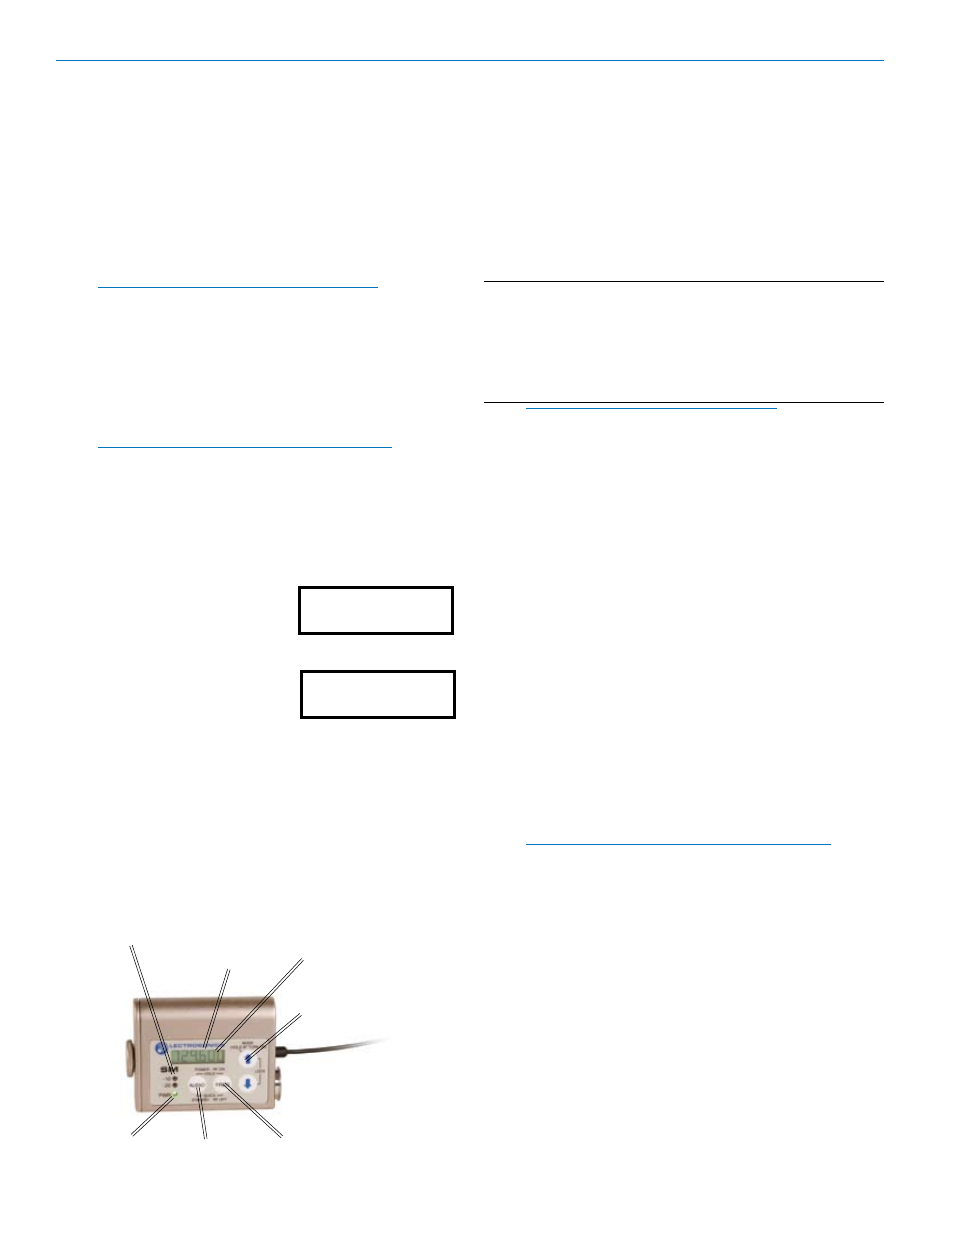
Modulation
LEDs
LCD
Control Panel
AUDIO Button
PWR LED
UP Arrow
FREQ Button
Attaching a Microphone and Adjusting Gain
The front panel Modulation LEDs indicate limiter activ
ity. (See chart below.) Once set, the transmitter’s
audio level setting
should not be used to control the
volume of your sound system or recorder levels. This
gain adjustment matches the transmitter gain with the
microphone’s output level, the user’s voice level and the
microphone’s position. The audio input level can be set
with the unit in Standby Mode or powered up for normal
operation.
Signal Level
-20 LED
-10 LED
Less than -20 dB
Off
Off
-20 dB to -10 dB
Green
Off
-10 dB to +0 dB
Green
Green
+0 dB to +10 dB
Red
Green
Greater than +10 db
Red
Red
Note: Different voices will usually require
different settings of the AUDIO control, so check
this adjustment as each new person uses the
system. If several different people will be using
the transmitter and there is not time to make the
adjustment for each individual, adjust it for the
loudest voice.
1) With the SM powered off, insert the microphone
plug into the Audio Input Jack, aligning the pins and
ensuring that the connector locks.
2) Place the SM in Standby Mode, or if the unit is to
be powered up and adjusted, mute the main sound
system prior to powering up the transmitter.
3) Position the microphone in the location where it will
be used in actual operation.
4) Observe the SM Modulation LEDs while speaking
or singing into the microphone at the same voice
level that will be used during the program. While
holding the AUDIO button, press the Up or Down
arrow buttons until the both the -20 and -10 LEDs
glow green, with the -10 LED occasionally flickering
red (-10 dB to +0 dB Signal Level as shown in the
chart below with only occasional forays into the +0
dB to +10 dB range).
Note: Setting the audio level too high reduces the
dynamic range of if the audio signal. Setting the
audio level too low may cause hiss and noise in
the audio.
5) If the unit was set up in Standby Mode, it will be
necessary to power up the SM and adjust the
remaining components of the audio system prior to
use.
Locking or Unlocking the Control Panel
LECTROSONICS, INC.
10