Identifying basic drill bits, Anatomy of a drill bit, The drill doctor – Drill Doctor 350X User Manual
Page 5: Sharpening process, Aligning the drill bit
www.drilldoctor.com
7
6
www.drilldoctor.com
Identifying Basic Drill Bits
The Drill Doctor is most efficient when used to sharpen a
drill bit’s original point angle. With its standard Diamond
Sharpening Wheel it will sharpen high-speed steel, cobalt,
TiN-coated, carbide and masonry drill bits.
The Model 350X has been designed and engineered to
sharpen the most common drill point types:
Standard Point
This general-purpose point (nor-
mally 118°) is used for drilling
softer materials like cold rolled
steel, aluminum, and wood.
Masonry Bits
Masonry bits have a carbide
insert at the point and are used
for drilling materials like cement,
brick, and ceramic.
Anatomy of a Drill Bit
Chisel
Edge
It is important to understand that
each bit has a Chisel Edge, a Cut-
ting Edge, a Heel, a Relief Angle,
and a Leading Edge. (The Lead-
ing Edge will be important in bit
alignment.)
Cutting
Edge
Heel
Relief
Angle
When viewing a well-sharpened
bit from the end, the entire sur-
face from the Cutting Edge to the
Heel will have a finely ground
surface without ridges or indenta-
tions. The Heel will always be
lower than the Cutting Edge; this
is called positive relief.
Cutting Edge
Heel
Leading
Edge
The Drill Doctor
®
Sharpening Process
The sharpening process includes 2 easy procedures:
1.
Aligning the bit in the Chuck.
2.
Sharpening the bit.
Aligning the Drill Bit
This makes sure that the Drill Doctor creates the right
geometry. It also sets the bit so that only a small amount
of the tip is taken off during sharpening.
(See page 12-13 to align and sharpen a masonry drill bit.)
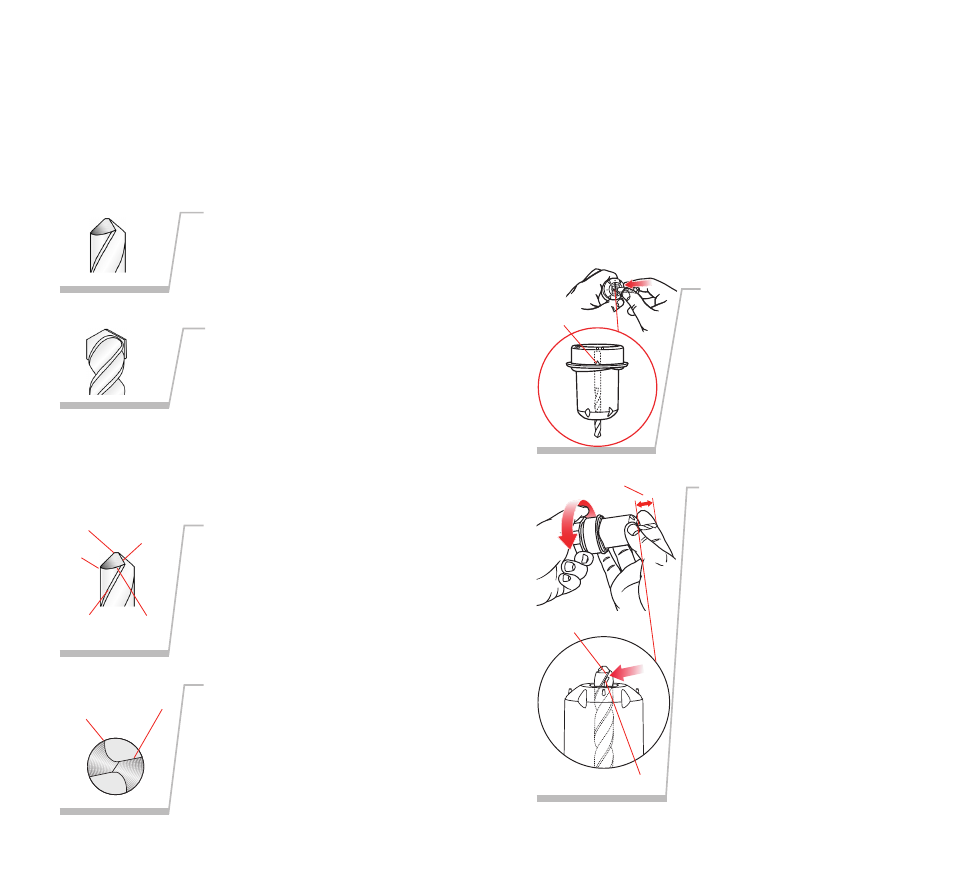
Insert bit in Chuck.
Hold the Chuck with the
White Triangle facing up.
Insert the bit into the front of
the Chuck, leaving 1/2" of bit
sticking out the front.
2.
Tighten Chuck slightly.
Tighten the Chuck by turning
the Chuck Knob clockwise
just to the point where the bit
is snug but can still be slid in
and out. The Chuck should
not be completely tightened
until we set the bit depth for
sharpening in the next step.
Rotate the drill bit in the
Chuck so that the Leading
Edge of the flute is against
the Alignment Finger. This
aligns the bit for accurate
sharpening.
Note: A good test to see if the
Chuck is tightened the cor-
rect amount is to make sure
it moves when you pull on it
with your fingers, but will not
fall out when you turn the
Chuck upside down.
Leading Edge
1.
White Triangle
1/2”
Alignment Finger