Analog Way Orchestra2 User Manual
Page 4
Please check the User manual and our website for further information:
www.analogway.com
Version: 4.00 - 04/24/2014
Code: 140104
All Analog Way products have a 3 year warranty on parts and labor, return to factory, but do not include faults resulting
from user negligence, any unauthorized modifications, electrical surges, mishandling (drop/crush), and/or any other
damage caused by misuse.
Please note: The included carrying case and protective foam is not covered under warranty.
• LAYERS:
Backgrounds, frames, PIPs, and logos are all considered layers.
To work with a layer, press the
BACKGROUND LIVE
,
BACKGROUND FRAME
,
ADD PIP
or
ADD LOGO
button.
In the Source Preview section, select the source you wish to assign to that layer. It will appear on the Preview output
of your slave device. Press
TAKE
to go live on your Main output.
Selected objects can be moved or resized with the help of the joystick.
Any selected object can be cleared by pressing the
CLEAR
button twice (to clear multiple layers, press
CLEAR PIPS
,
CLEAR LOGOS
or
CLEAR ALL
, twice).
Source parameters of the selected layer can be accessed via the options on the last line of the tactile screen or via the
5
th
knob.
• THE TAKE BUTTON:
The
TAKE
button will bring everything you have configured, from your Preview output to your Main output.
The Orchestra² T-Bar makes the same transition, but you can manually control the progress of the effect.
The
TAKE CUT
button allows you to override all transition effects with a cut effect.
Finally, the
STEPBACK
button will help you to revert your main output to its previous screen state. Press the
STEPBACK
button and press
TAKE
to do this.
• PRESET MEMORIES:
Each time you configure a screen (background, PIPs, logos), you can save it to a Preset Memory for future use, then call
it back at any time.
To do this, configure a screen with all the desired elements, and press the
SAVE TO MEMORY
button.
In the Preset Memory section, choose the memory slot you wish to save to by pressing a button (#1 to #8).
To recall that memory and use it, press the
LOAD FROM PRESET
button, press a Preset Memory button and press
TAKE
.
TIP: Pressing the PAGE button while selecting a Preset Memory (#1 to #8), will select a memory page, each containing 8
memory slots (64 in total).
• OFF-LINE PROGRAMMING:
Define your Show while you have no hardware device connected to the ORC50. You can configure screens and define
presets in advance and recall them later.
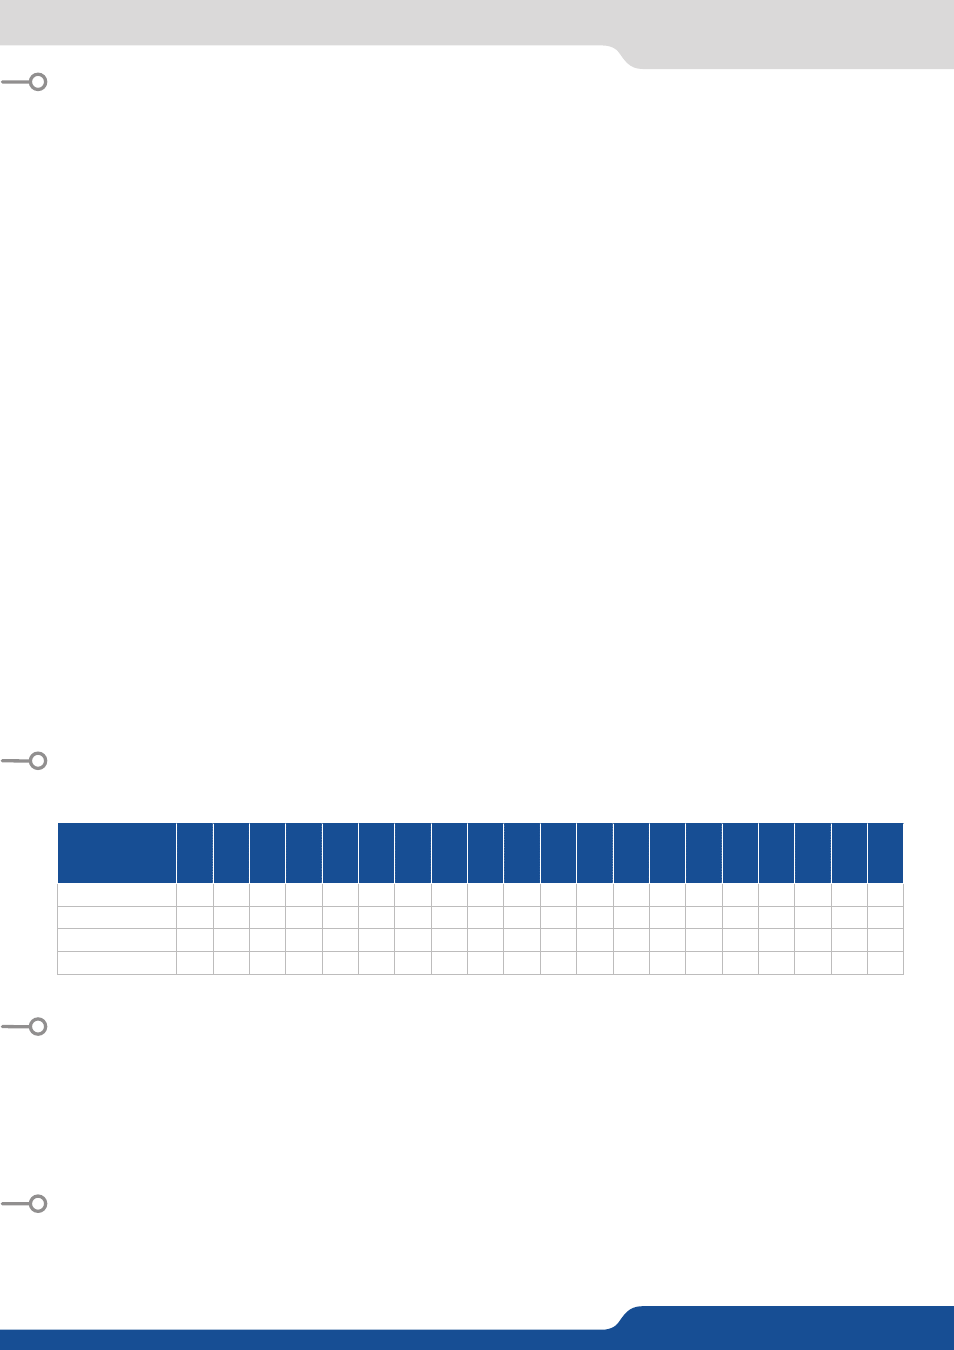
Control Mode
DVX8044
EK
S500
EK
S400
OPS300
OPS200
SMX200
SMX100
PLS300
PLS200
SVU300
SVU200
STE200
STE100
SQD200
EK
S550
SP
X450
SMX250
PLS350
QMX150
Q
VU150
Seamless Mixer
x
x
x
x
x
x
x
x
x
x
x
x
x
Seamless Matrix
x
x
x
x
x
x
x
x
x
x
x
Quadravision
x
x
x
Soft Edge Blending
x
x
x
The Orchestra² can control the following Seamless Switchers:
FRONT PANEL DESCRIPTION
MANAGING WITH THE ORCHESTRA²
WARRANTY
GOING FURTHER WITH THE ORCHESTRA²