Analog Way Orchestra2 User Manual
Page 3
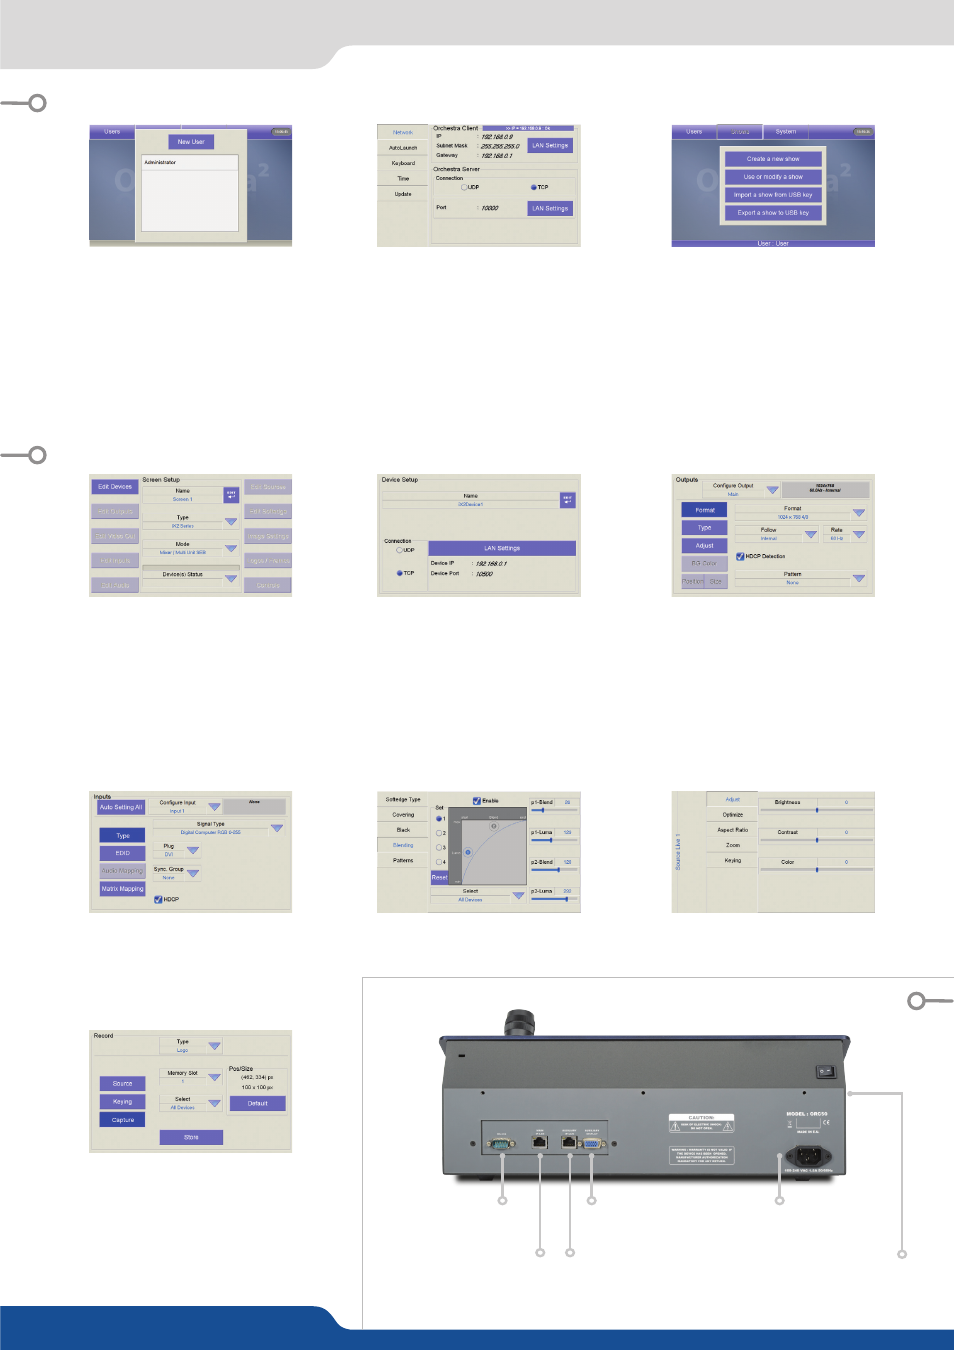
USER CONFIGURATION:
On startup, the Orchestra² tactile screen will display the
User page. The first time you use the Orchestra², you will
have to create a new user.
1.
Press the New User button on the tactile screen
2.
Name the new user as required and press the
OK
button to validate your choice. Press
OK
to skip
password creation.
3.
On the User page, choose the user you just created,
and press the
OK
button. The Orchestra² will display its
default menu screen.
SYSTEM CONFIGURATION:
The Orchestra² System Configuration page lets you
adjust properties like the IP address of the Orchestra².
1.
Press System on the tactile screen. The Network
Configuration tab will be displayed.
2.
Select the Lan Settings option, rotate the
corresponding knobs to change the IP address of
the Orchestra² (IP1,2,3,4) or press the
button to restore the address to 192.168.0.9.
Press the
OK
button to validate
3.
Press
OK
again to Exit the system page.
SHOW CONFIGURATION:
When starting with the Orchestra², you will need
to create a new show.
1.
Press the Shows button on the tactile screen
then “Create a New Show” button.
2.
The Orchestra² will display the Show Edit Name
screen, you can now enter a new name. Choose
a name for your show, then press the
OK
button
to validate your choice.
3.
The Orchestra² will display a blank show page.
SCREEN SETUP:
1.
Select a Screen in the Screen section of the Orchestra²
by pressing one of the six available buttons. The Screen
page will appear on the Orchestra² tactile screen.
2.
Press Screen Setup on the tactile screen.
3.
On the
and mode. Press Edit to rename your screen.
4.
Press Edit Devices. Add Device. Using the tactile
screen, Configure the communication settings of the
device that the ORC50 will control.
5.
Press the
OK
button to validate your changes. The
Orchestra² will begin connecting to the configured
device.
6.
Press the
OK
button to return to the Screen Setup
page.
OUTPUT CONFIGURATION:
1.
In the Screen Setup page, press Edit Outputs and
select the output, Main or Preview, you wish
to adjust, then configure the output format
(resolution), output rate, output type required.
2.
Press Pattern, and select an available pattern
to check your output settings on screen. Press
Pattern again, and select None to revert to your
image on screen.
3.
Press the
OK
button to return to the screen
setup page.
INPUT CONFIGURATION:
1.
In the Screen Setup page, press Edit Input, you can
manually configure the type of plug, the signal type or
press the
AUTO SETTING ALL
button, for an automatic
setup of your inputs.
2.
Press
OK
button.
SOFT EDGE SETUP:
Please refer to the Soft Edge Setup Chapter of the
User manual.
IMAGE SETTINGS:
In the screen setup page, to access source image
settings, press the
IMAGE SETTINGS
button
.
LOGOS & FRAMES CONFIGURATION:
1.
In the screen setup page, press the
LOGOS/FRAMES
button.
2.
Select a source you wish to use as a logo or frame.
3.
Choose the memory slot to save the Logo/Frame into,
edit size, position with the joystick, and the keying
settings by rotating the approriate knobs.
4.
Press
STORE
to store your logo or frame.
DC 100-250 VAC
2A 50-60Hz
RJ-45 connector:
Connect
the Orchestra² to 10/100
Ethernet LAN using this fe-
male RJ-45 connector: used
to control switcher
RJ-45 - Auxiliary:
Not in use
Auxiliary display output:
Clone of the tactile screen
Mounting Bar:
For installation
RS-232:
Serial port
(not in use)
SETTING UP THE ORCHESTRA²
CONFIGURING THE SHOW
REAR PANEL DESCRIPTION