Setting up the axion2, Configuring the show, Rear panel description – Analog Way Axion2 User Manual
Page 3
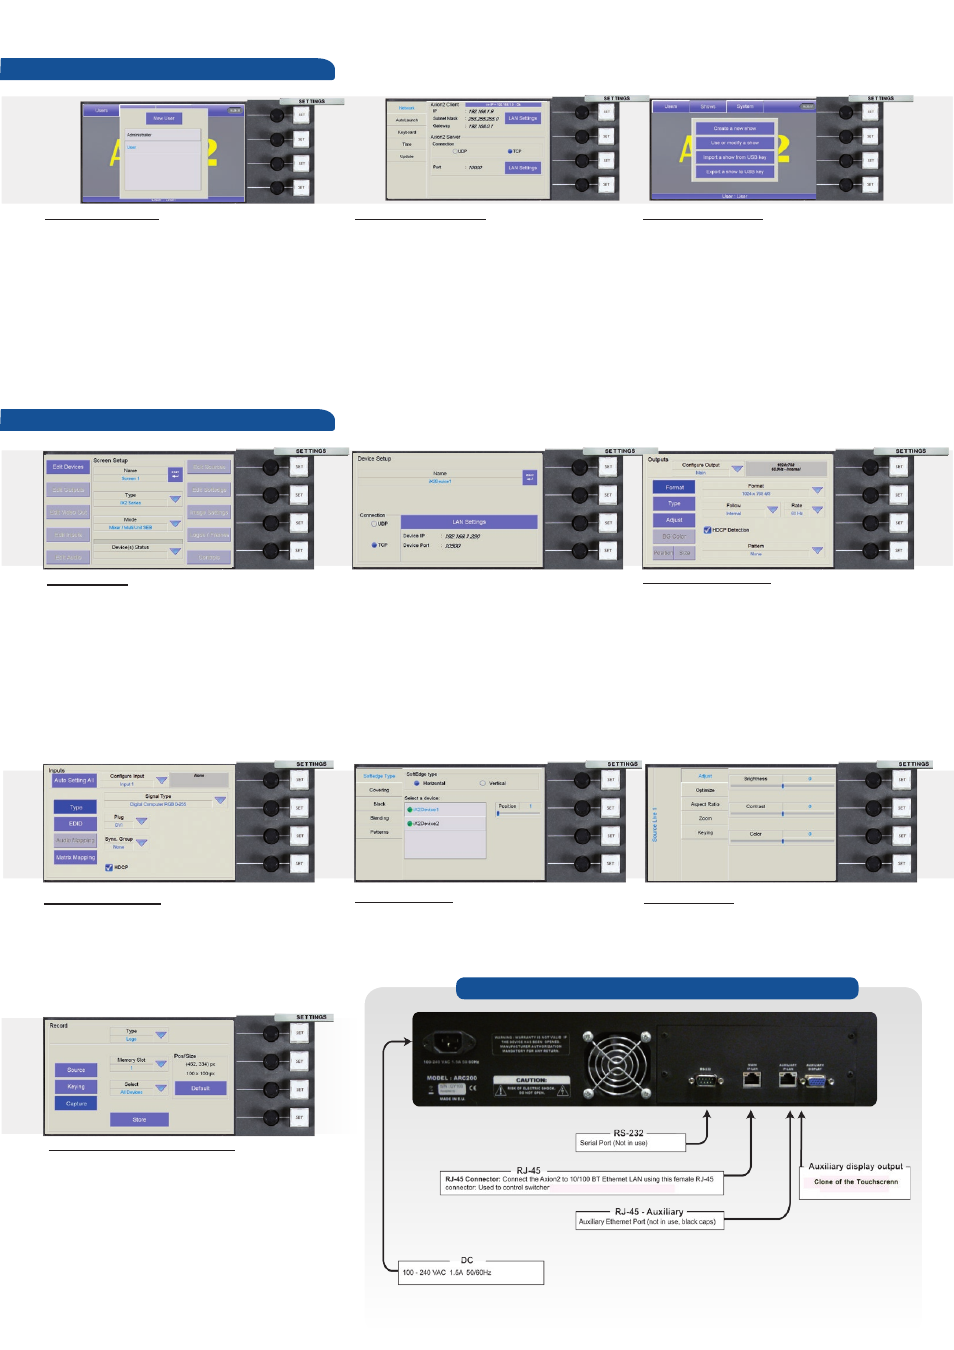
Setting up the Axion2
User configuration:
On startup, the
Axion2 tactile screen will display the
User page. The first time you use the
Axion2, you
will have to create a new user.
1/ Press the New User button on the tactile screen
2/ Name the new user as required and press the
OK
button to validate your choice. Press
OK
to skip
password creation.
3/ On the User page, choose the user you just
created, and press the
OK
button. The
Axion2 will
display its default menu screen
.
System configuration:
The
Axion2 System Configuration page lets you
adjust the IP address of the
Axion2.
1/ Press
System on the tactile screen. The
Axion2 will display the IP configuration page of
the System menu.
2/ Select the Lan Settings option, rotate the
corresponding knobs to change the IP address
of the
Axion2 (IP1, IP2, IP3, IP4) then press the
OK
button to validate.
3/ Press
OK
again to Exit the system page.
Show configuration:
When starting with the
Axion2, you will need to
create a new show.
1/ Press the Shows button on the tactile
screen then “Create a New Show” button.
2/ The
Axion2 will display the Show Edit
Name screen, you can now enter a new name.
Choose a name for your show, then press the
OK
button to validate your choice.
3/ The
Axion2 will display a blank show page.
Configuring the show
Screen setup:
1/ Select a Screen in the Screen section of the
Axion2
by pressing one of the six available buttons. The
Screen page will appear on the
Axion2 tactile screen.
2/ Press Screen Setup on the tactile screen.
3/ On the Screen Setup, press Edit to rename your
screen, select the slave device type and mode.
4/ Press Edit Devices. Add Device / Communication
Type / LAN settings / OK. The tactile screen will display
a page which will let you choose the device you want
the
Axion2 to control, select the communication
port type the device is connected to, and change
LAN settings
.
5/ Press the
OK
button to confirm if LAN settings
have been entered and match those of the slave
device. The
Axion2 will connect to the device.
6/ Press the
OK
button to return to the Screen
Setup page.
Output configuration:
1/ In the Screen Setup page, press Edit
Outputs and select the output, Main or
Preview, you wish to display on, then select
the output format (resolution), output rate,
output type required.
2/ Press Pattern, and select an available
pattern to check your output settings on
screen. Press Pattern again, and select None
to revert to your image on screen.
3/ Press the
OK
button to return to the screen
setup page.
Input configuration:
1/ In the Screen Setup page, press Edit Inputs (you
can manually configure each input by selecting it or
press the Auto Setting All button, for an automatic
setup of your inputs.
2/ Press
OK
button.
Soft Edge setup:
Please refer to the Soft Edge Setup chapter
in the user manual to setup a Soft Edge
presentation.
Image settings:
In the screen setup page, to access source
image settings, press the IMAGE SETTINGS
button
.
Logos & Frames configuration:
1/ In the screen setup page, press the LOGOS/
FRAMES button.
2/ Select a source you wish to use as a logo or
frame.
3/ Choose the memory slot to save the Logo/
Frame into (#1 to #8), edit size and position with the
joystick, and the Luma Key settings by rotating the
approriate knobs.
4/ Press STORE to store your logo or frame.
Rear Panel Description