Edid minder, Pvt rgb d plus (edid) • setup guide, cont’d, Using preset mode – Extron Electronics PVT RGB D Plus (EDID) Setup Guide User Manual
Page 2: Using learn mode
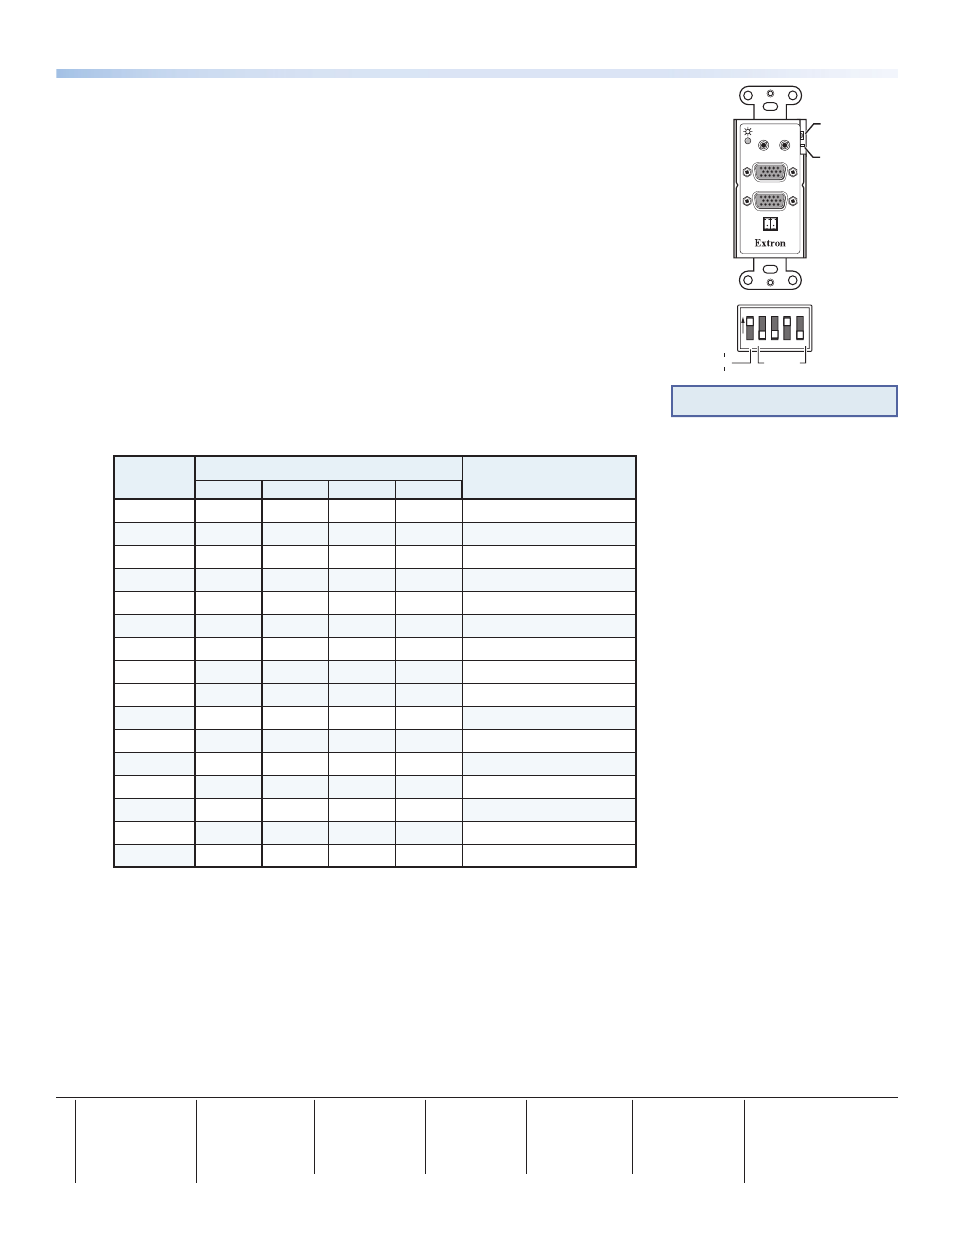
EDID Minder
The EDID Minder has two modes; a preset mode and a learn mode.
Preset mode allows selection of pre-programed EDID rates, as shown in the table below.
Learn mode enables the displays specific EDID information to be recorded and emulated
by the input wallplate.
To use the EDID Minder mode in preset or learn Mode, follow the instructions below.
Using Preset mode
1.
If already installed, disconnect any sources and displays from the front panel and
remove the wallplate from the wall.
2.
On the rear panel, set DIP switch 1 to the 50 or 60 kHz setting as desired.
Set DIP switches 2 to 5 accordingly, to match the desired EDID rate (see table below).
3.
Connect the video source to the “Computer In” VGA connector and a local display
device to the “Monitor Out” port.
4.
Restart the video source and display devices. Verify the image, making any
changes to the EDID settings as needed.
5.
When the image is correct, re-install the wallplate. Re-connect and restart the source and display devices.
Preset
Number
Switch setting
Resolution
2
3
4
5
0
Off
Off
Off
Off
Learn mode
1
Off
Off
Off
On
800 x 600
2
Off
Off
On
Off
1024 x 768 (default)
3
Off
Off
On
On
1280 x720
4
Off
On
Off
Off
1280 x 768
5
Off
On
Off
On
1280 x 800
6
Off
On
On
Off
1280 x 1024
7
Off
On
On
On
1360 x 768
8
On
Off
Off
Off
1366 x 768
9
On
Off
Off
On
1400 x 1050
A
On
Off
On
Off
1440 x 900
B
On
Off
On
On
1600 x 1200
C
On
On
Off
Off
1680 x 1050
D
On
On
Off
On
1920 x 1080
E
On
On
On
Off
1920 x 1200
F
On
On
On
On
N/A
Using Learn mode
1.
Disconnect any sources from the front panel and remove the wallplate from the wall.
2.
On the rear panel, set all the DIP switches to off (down).
3.
Temporarily connect the main display device (the projector) to the “Monitor Out” port.
4.
On the front panel, the learn LED is lit solid green. Press and release the Learn button.
5.
The LED flashes red when in learn mode, then returns to solid green when complete.
6.
Re-install the wallplate and reconnect the source device.
Connect a local display device to the “Monitor Out” port as needed.
7.
Reconnect the projector to the PoleVault switcher. Restart the source and display devices.
Extron
USA - West
Headquarters
+800.633.9876
Inside USA / Canada Only
+1.714.491.1500
+1.714.491.1517 FAX
Extron
USA - East
+800.633.9876
Inside USA / Canada Only
+1.919.863.1794
+1.919.863.1797 FAX
Extron
Europe
+800.3987.6673
Inside Europe Only
+31.33.453.4040
+31.33.453.4050 FAX
Extron
Asia
+800.7339.8766
Inside Asia Only
+65.6383.4400
+65.6383.4664 FAX
Extron
Japan
+81.3.3511.7655
+81.3.3511.7656 FAX
Extron
China
+400.883.1568
Inside China Only
+86.21.3760.1568
+86.21.3760.1566 FAX
Extron
Middle East
+971.4.2991800
+971.4.2991880 FAX
68-1823-50
Rev B
10 10
COMPUTER IN
AUDIO
IN
OUT
MONITOR OUT
IR OUT
S G
EDID Learn
Status LED
EDID Learn
Button
EDID
Selection
60
Hz
50
1 2 3 4
ON
5
NOTE This setting is for 1024x768@60 Hz,
preset 2 (factory default)
2
PVT RGB D Plus (EDID) • Setup Guide, cont’d