Extron Electronics Replacing Button Labels User Manual
Extron Electronics Hardware
Extron Electronics, USA
1230 South Lewis Street
Anaheim, CA 92805
USA
714.491.1500
Fax 714.491.1517
Extron Electronics, Europe
Beeldschermweg 6C
3821 AH Amersfoort
The Netherlands
+31.33.453.4040
Fax +31.33.453.4050
Extron Electronics, Asia
135 Joo Seng Road, #04-01
PM Industrial Building
Singapore 368363
+65.6383.4400
Fax +65.6383.4664
Extron Electronics, Japan
Kyodo Building
16 Ichibancho
Chiyoda-ku, Tokyo 102-0082 Japan
+81.3.3511.7655
Fax +81.3.3511.7656
www.extron.com
68-1167-01
Rev. A
06 05
TEXT
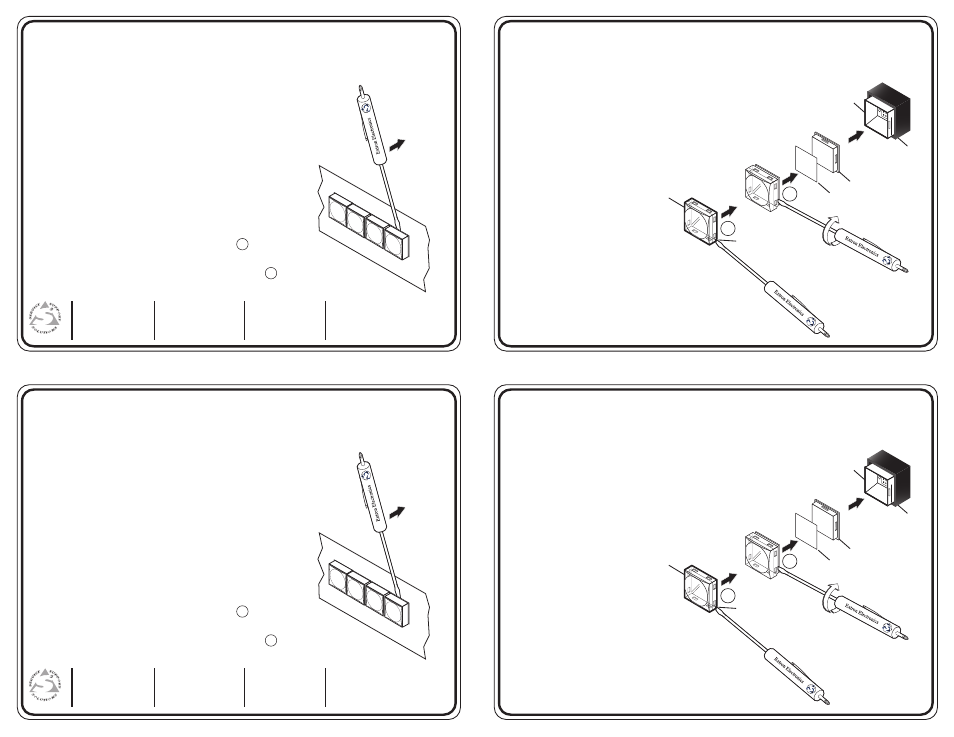
Separate the two-
piece button here at
the corner.
Pry the two
pieces apart.
Diffuser
Plunger
Base
Button Label
Clear Lens
Notch
Pry the button
from the base.
2b
2a
Attention: This product is made with new high tension button caps.
Replacing Button Labels, cont’d
Replacing Button Labels
Follow these steps to relabel the button:
1.
Remove the button assembly from the device.
The button assembly consists of a clear lens cap, the label,
and a white diffuser. See the diagram on the opposite
side of this instruction card.
Insert a small, flat-bladed screwdriver, such as an
Extron Tweeker, between the button’s base
and the diffuser to gently pry the button assembly
off from the button plunger, as shown to the right.
2.
Locate the small corner notch on the lens
cap and slide the screwdriver between the lens
cap and the diffuser. See illustration on the
opposite side of this instruction card.
Using a rotating motion of the screwdriver ( ),
carefully pry the two pieces apart.
3.
Replace the label with the new button label.
4.
Reverse steps 2 and 1 to reinstall the button to the product.
2b
2a
Extron Electronics, USA
1230 South Lewis Street
Anaheim, CA 92805
USA
714.491.1500
Fax 714.491.1517
Extron Electronics, Europe
Beeldschermweg 6C
3821 AH Amersfoort
The Netherlands
+31.33.453.4040
Fax +31.33.453.4050
Extron Electronics, Asia
135 Joo Seng Road, #04-01
PM Industrial Building
Singapore 368363
+65.6383.4400
Fax +65.6383.4664
Extron Electronics, Japan
Kyodo Building
16 Ichibancho
Chiyoda-ku, Tokyo 102-0082 Japan
+81.3.3511.7655
Fax +81.3.3511.7656
www.extron.com
68-1167-01
Rev. A
06 05
TEXT
Separate the two-
piece button here at
the corner.
Pry the two
pieces apart.
Diffuser
Plunger
Base
Button Label
Clear Lens
Notch
Pry the button
from the base.
2b
2a
Attention: This product is made with new high tension button caps.
Replacing Button Labels, cont’d
Replacing Button Labels
Follow these steps to relabel the button:
1.
Remove the button assembly from the device.
The button assembly consists of a clear lens cap, the label,
and a white diffuser. See the diagram on the opposite
side of this instruction card.
Insert a small, flat-bladed screwdriver, such as an
Extron Tweeker, between the button’s base
and the diffuser to gently pry the button assembly
off from the button plunger, as shown to the right.
2.
Locate the small corner notch on the lens
cap and slide the screwdriver between the lens
cap and the diffuser. See illustration on the
opposite side of this instruction card.
Using a rotating motion of the screwdriver ( ),
carefully pry the two pieces apart.
3.
Replace the label with the new button label.
4.
Reverse steps 2 and 1 to reinstall the button to the product.
2b
2a