Installing the replacement wires – Extron Electronics Replacing the AC Power Cord with Flexible Conduit User Manual
Page 2
68-2423-01
Rev. B
04 13
Extron USA Headquarters
+1.800.633.9876 (Inside USA/Canada Only)
Extron USA - West: +1.714.491.1500
FAX: +1.714.491.1517
Extron USA - East: +1.919.850.1000
FAX: +1.919.850.1001
© 2013 Extron Electronics — All rights reserved. All trademarks mentioned are the property of their r
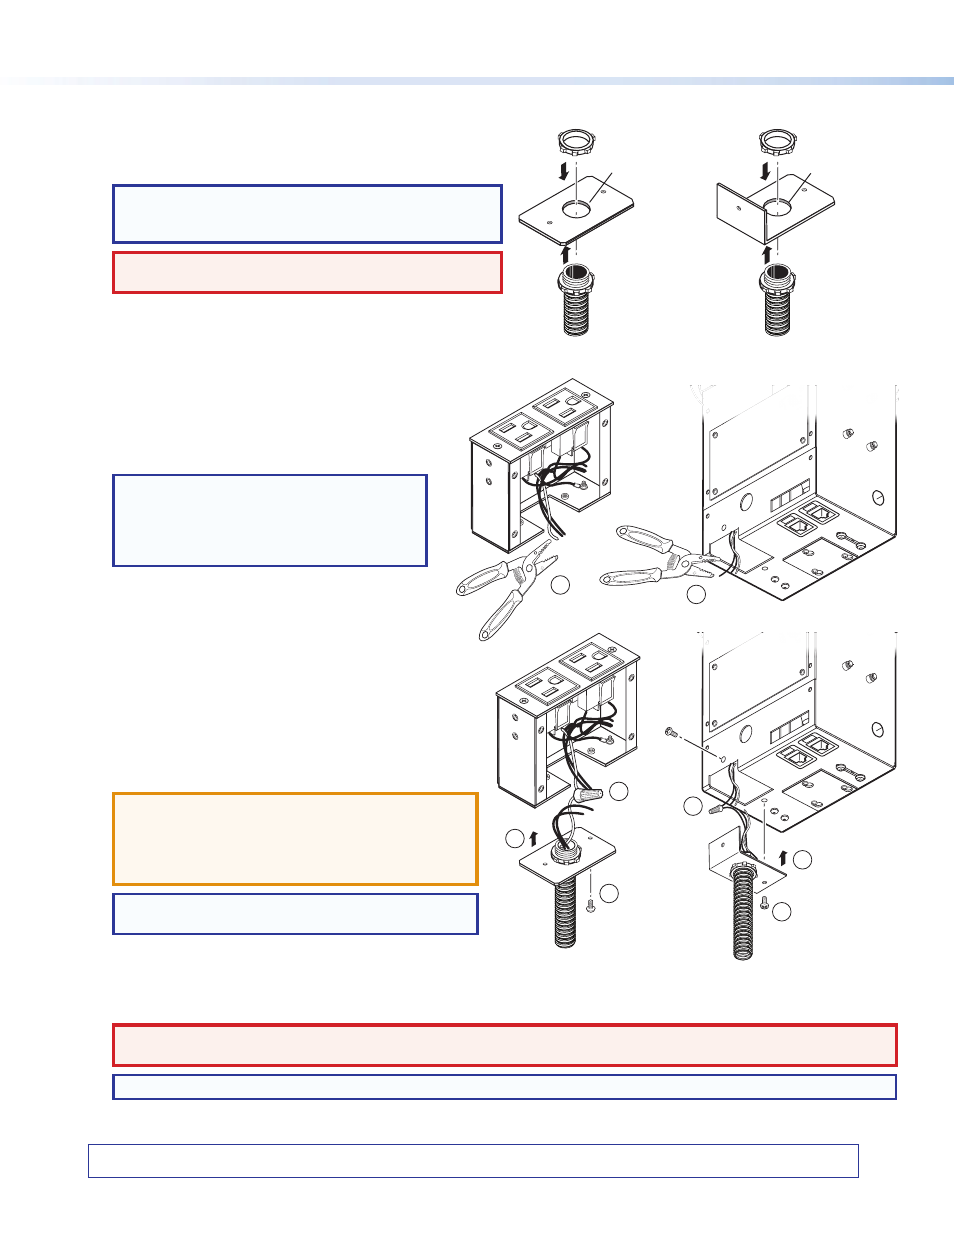
2.
Take the replacement wires and twist together the two
supply (white) wires (one from the power module or
HSA and one from the conduit assembly), the two return
(black) wires, and the two ground (green) wires. Twist a
wire nut (not provided) onto each twisted pair.
3.
Place the power input plate assembly on the base of
the power module or HSA, gently tucking the power
cables and wire nuts into the enclosure. Use tie wraps if
necessary.
ATTENTION:
If inserting the replacement wires into
an HSA enclosure, be careful not to damage the
wires when closing the lid of the HSA. Close the lid
carefully and make sure that it does not contact the
wires inside the enclosure.
NOTE:
If necessary, reorient the conduit nut and
wires for the best fit.
4.
Secure the power input plate, using the screws.
6.
Remove power from the AC distribution (junction) box.
WARNING:
Ensure power is removed from the UL-listed AC distribution box before connecting the power wires and
conduit. Hazardous voltages are present in the AC distribution box.
NOTE:
Ensure the AC distribution box is rated for and equipped with a 15-amp circuit breaker.
7.
Wire the free end of the AC power wires and conduit into the AC distribution box.
Installing the Replacement Wires
1.
Cut and strip the green, black, and white wires in
the power module or HSA at the necessary length.
NOTE:
The length of the stripped wires
should allow for connection with the
replacement wires (see step 2) and for
fitting into the power module or HSA
enclosure (see step 3).
1
2
4
3
2
4
3
Assembling the Flexible Conduit and Power Input Plate
1.
Insert the threaded conduit fitting into the power input plate
(see image at right for dimensions). The power input plate
contains a 1/2 inch trade size knockout.
NOTE:
Make sure the length of the conduit and wires
extends from the power module or HSA location to the
AC distribution box.
WARNING:
Ensure power is removed from the UL-listed
AC distribution box.
2.
Fasten a conduit nut (not provided) on the threaded conduit fitting.
3.
Insert replacement wires through the conduit. Pull the wires out of the
conduit assembly to the length of approximately 3 inches.
ш 0.875" ш (22.2mm)
Conduit
Conduit Fitting
Conduit Nut
Conduit
Conduit Fitting
ш 0.875" ш (22.2mm)
Conduit Nut
Power Input Plate
(power module)
Power Input Plate
(HSA)
1
5.
For the power module, secure the side plate in place, using the Phillips head screws.