Edid configuration, Recording a display edid, Using a pre-programmed or user-recorded edid – Extron Electronics MTP 15HD RS Series User Guide Rev. A User Manual
Page 19: Using a pre-programmed or, User-recorded edid
MTP 15HD RS Series • Installation and Operation
15
EDID Configuration
The MTP 15HD RS transmitter can either record EDID from a display device, or a
pre-programmed EDID can be selected using the rotary and DIP switches.
Recording a Display EDID
1.
Turn the rotary switch to position 0.
NOTE: The vertical frequency DIP switch has no effect in this mode.
2.
Connect the display device to the local monitor output connector.
NOTE: The MTP 15HD transmitter should be supplying the necessary 5 VDC to
power on the display. However, to ensure that EDID is being transmitted,
power on the display.
3.
When ready to record to memory, press and release the recessed record button (see
c
on
on page 6) to begin the recording process. The Record LED (see
b
on
on page 6) will flash red rapidly during recording, then return to solid green
after recording is completed. At this time, the display can be disconnected. Connect the
source device to the input connector.
4.
Power on or restart the source device if necessary.
Using a Pre-Programmed or User-Recorded EDID
1.
If you have not already done so, connect the source device to the MTP 15HD transmitter.
Do not power on the source device at this time.
2.
Set the front panel DIP switch (see
d
on
on page 6) to the required frequency
(50 or 60 Hz).
3.
Set the rotary dial (see
e
on page 6) to the required position (see the table
in figure 12). Positions 1 through E are factory installed. Position 0 is for user-recorded
EDID information. Position F passes the EDID from the display connected to the loop-out
directly back to the input.
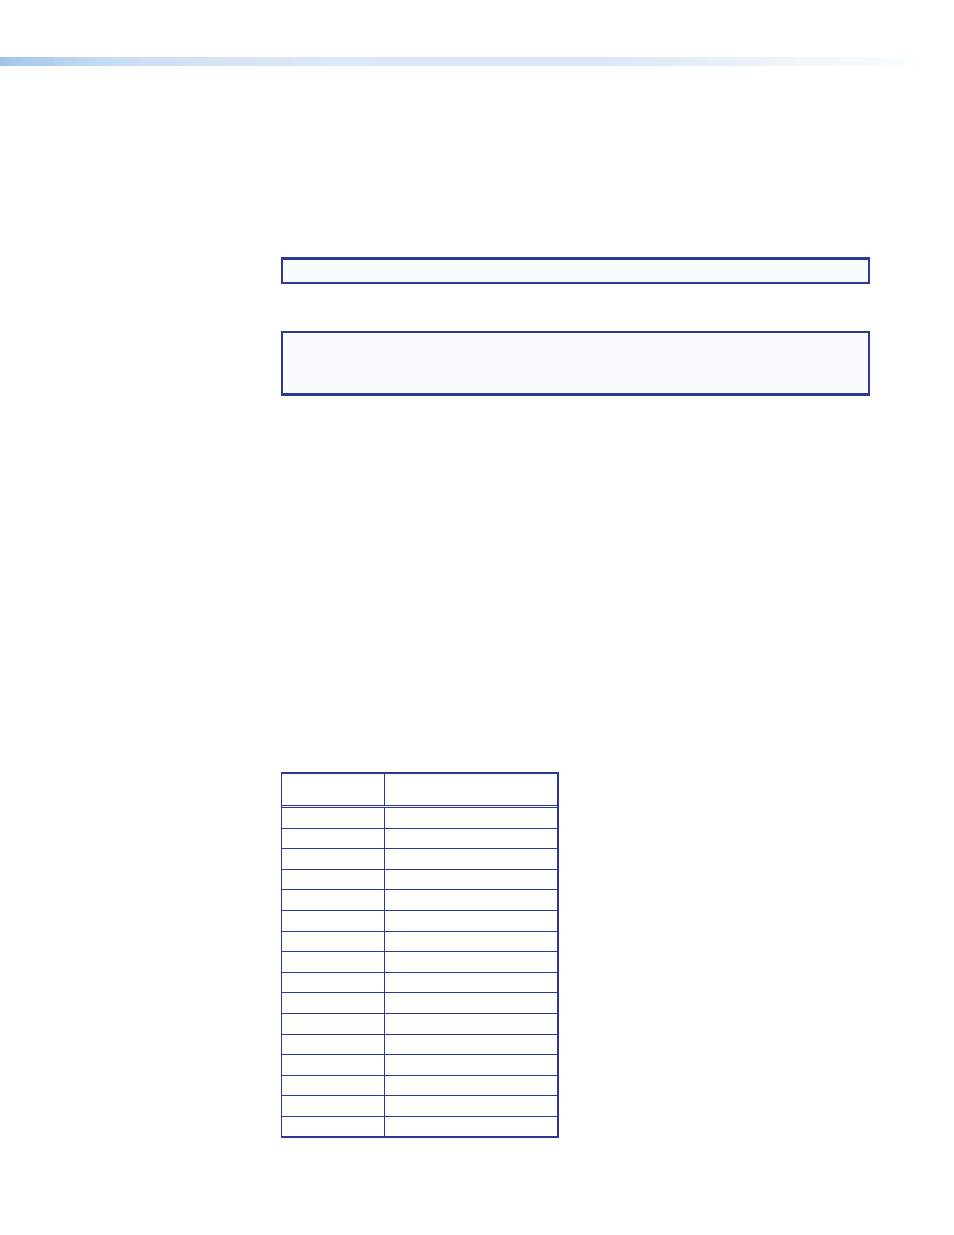
Rotary Switch
Position
Resolution
0
User-recorded EDID
1
800x600
2
1024x768 (default)
3
1280x720
4
1280x768
5
1280x800
6
1280x1024
7
1360x768
8
1366x768
9
1400x1050
A
1400x900
B
1600x1200
C
1680x1050
D
1920x1080
E
1920x1200
F
Local monitor pass-through
Figure 12.
EDID Settings Table