Jmp 9600 • setup guide, Front panel controls and indications – Extron Electronics JMP 9600 Setup Guide User Manual
Page 3
3
l
Dual Redundant AC Power Input connectors —
Connect standard IEC power cords between one rear panel AC Power Input
connector and a 100 to 240VAC, 50-60 Hz power source.
WARNING
: Physically disconnect both power cables from the player before opening the case for servicing.
NOTE
: • Although the unit performs reliably while running on a single AC power supply, doing so defeats the dual-
redundant power supply feature.
• Connect the dual power cords to either uninterruptible power sources or to power sources that are completely
independent of each other.
m
Dual Redundant AC Power Input switches — Toggle both AC Power Input switches to the on ( ) position.
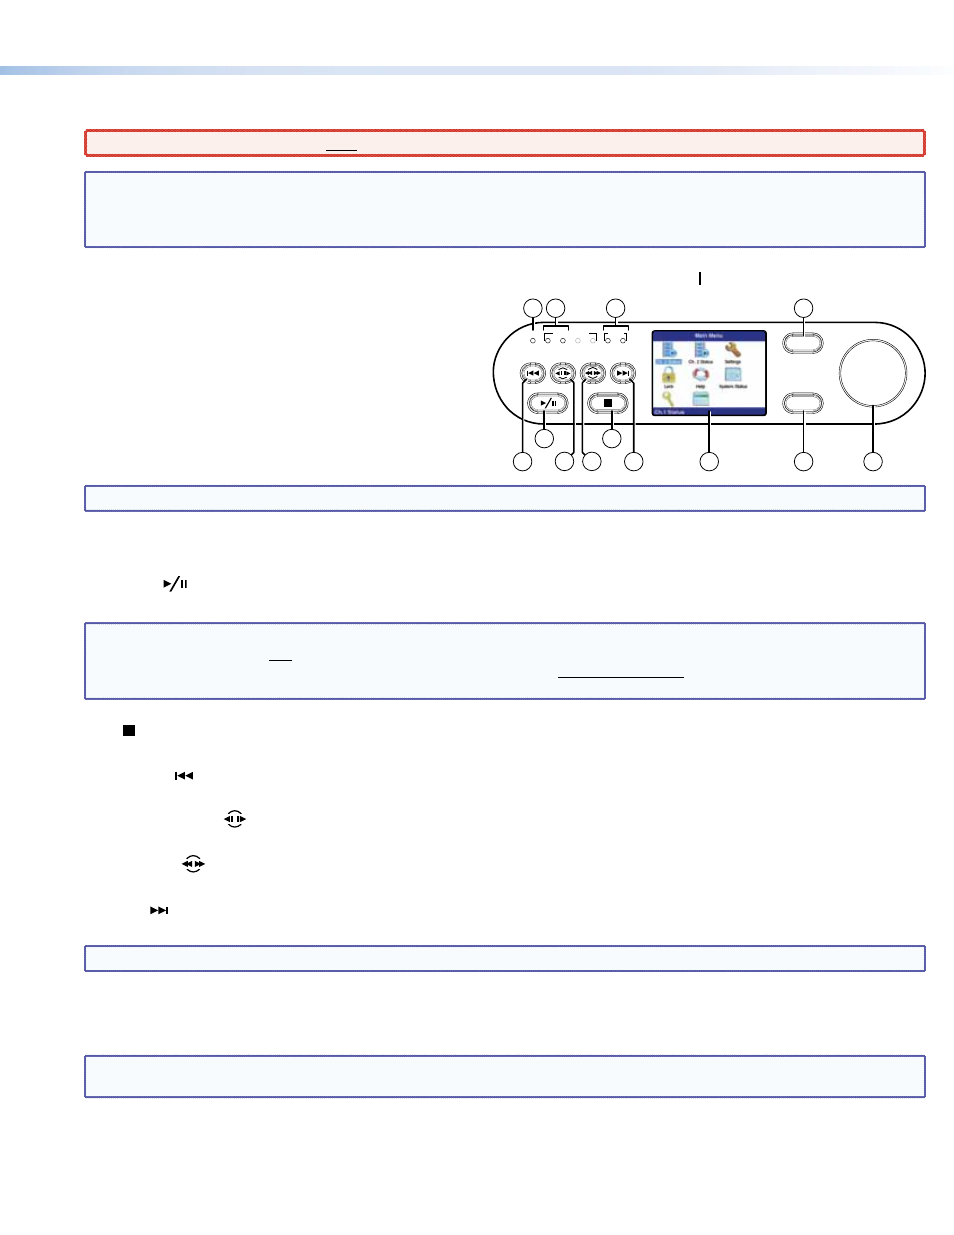
Front Panel Controls and Indications
n
Video LED — This LED blinks when the player is in Play
mode or Pause mode.
o
Disk Drive 1 and 2 LEDs —
These LEDs flash when the
associated hard disk is active. When you are transferring a
large file or playing a high bit rate file the LEDs flash more
frequently. It is common, under heavy load, for the LEDs to
appear to be continuously lit.
NOTE
: The Disk 3 and Disk 4 LEDs are reserved for possible future applications and are not currently implemented.
p
LAN 1 and 2 LEDs — These LEDs flash when the associated Ethernet connection is active. When you are transferring a large file
the LEDs flash more frequently. It is not uncommon, under heavy load, for the LEDs to appear to be continuously lit.
q
Play/Pause (
) button — Press this button to start the currently selected playlist or clip (DCP) file or pause a currently playing
presentation while leaving the image displayed.
NOTE
: Clips must conform to the Digital Cinema Initiative (DCI) DCP file format requirements (although encryption and
watermarking are not currently supported). A clip is selected by choosing the associated *.cpl.xml file from the front
panel (see “
”). Multiple DCP clips of the same format can be combined into playlists to
define their playback sequence, which can also be selected from the front panel.
r
Stop ( ) button — Press this button to stop the currently playing presentation. When you press Play again, the presentation
starts over from the beginning.
s
Previous clip (
) button — Press this button to load the previous clip in the playlist file. The button has no function if no
playlist file has been loaded (using the menu controls).
t
Frame mode button (
) — Press this button and then rotate the encoder knob (item
z
) to step frame-by-frame, backwards
and forwards through the active clip while the player is in play mode.
u
Shuttle mode (
) button — Press this button and then rotate the encoder knob (item
z
) To “shuttle” backwards and forwards
through the active clip, at a rate controlled by the encoder knob.
v
Next clip (
) button — Press this button to load the next clip in the playlist file. The button has no function if no playlist file
has been loaded (using the menu controls).
NOTE
: The previous clip, frame, shuttle mode, and next clip features are not supported for 48 Fps clip files.
w
LCD screen and confidence monitor — The LCD displays the user interface (the menu and submenu system shown in the drawing
above) for local control. The screen can also display live output 1 or output 2 video. The alpha-blend feature allows you to
display a mix of the user interface and output video simultaneously.
NOTE
: Channel 2 Status is displayed in the main menu and available for selection only in 2-channel output mode and
2-channel locked output mode, both of which can be selected in the Settings > Video submenu.
x
Previous button — Press this button to return to the previously displayed menu or page.
y
Enter button — Press this button to initiate or activate a selected function.
z
Encoder knob — Rotate this knob to navigate the menu system. Rotate this knob when frame mode and shuttle mode are
selected to operate those features.
1
2
3
4
1
2
VIDEO
DISK DRIVE
PREV
ENTER
LAN
19
20
22
21
24
14
16
15
17
23
26
25
18
JMP 9600 • Setup Guide