Extron contact information, Preliminar y, Extender akm maap installation guide, cont’d – Extron Electronics Extender AKM MAAP User Manual
Page 2
Extender AKM MAAP Installation Guide, cont’d
2
PRELIMINAR
Y
Extender AKM MAAP • Installation Guide
7.
Connect video, audio, and power cables to each device (MAAPs, input/output devices, and Extender)
as explained in the documentation that accompanied each device.
8.
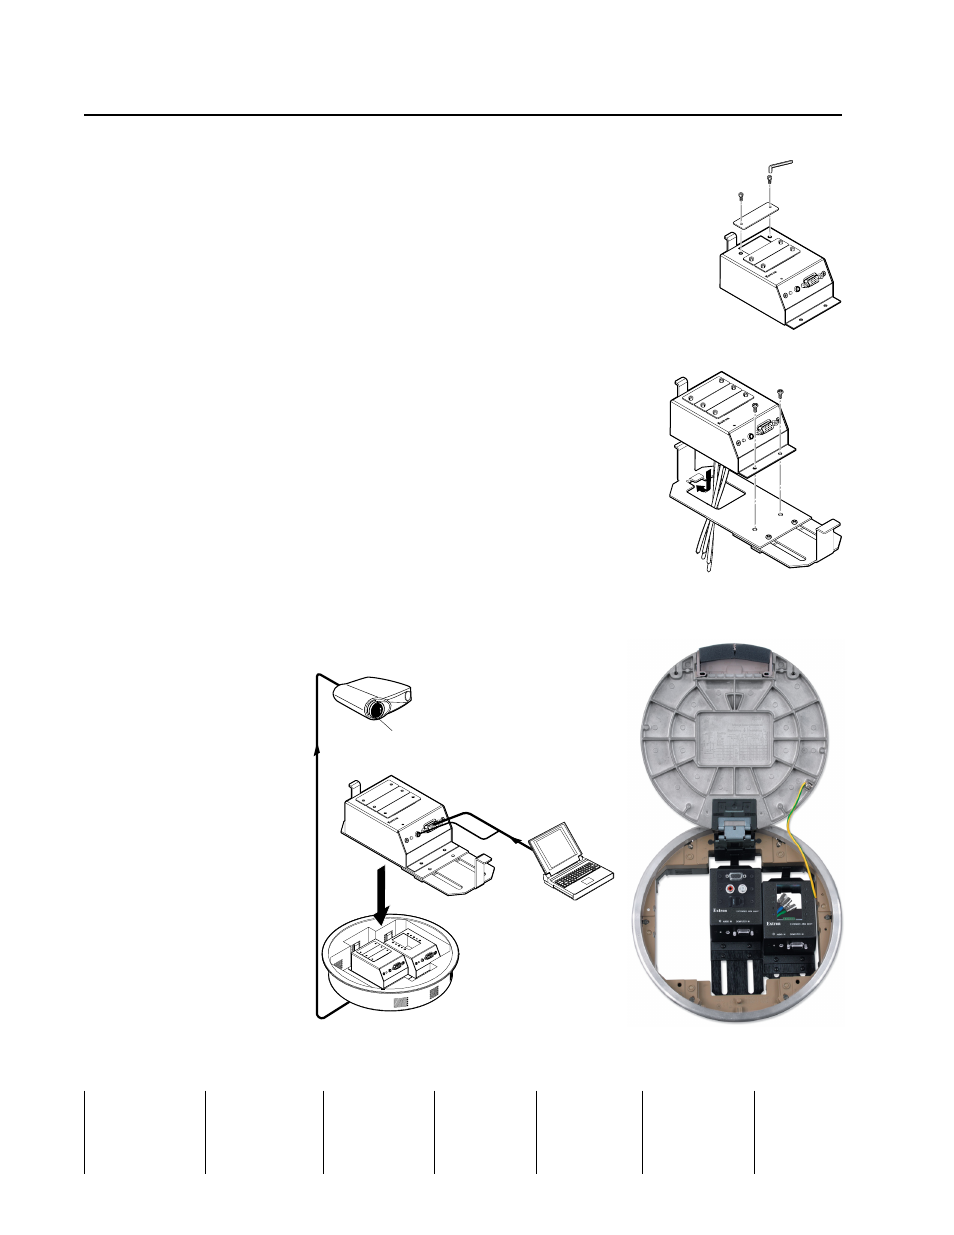
Attach the MAAPs to the faceplate.
a.
Place the MAAP module or faceplate on/through the top of the main enclosure.
b.
Use the included socket head cap screws and Allen wrench to secure the MAAP to the faceplate.
See the illustration at right.
c.
Repeat steps a and b until all the MAAPs have been installed.
9.
Power up the output devices, the Extender, and the input devices, and test the system.
See “Pre-installation testing/troubleshooting” in the Extender Series User’s Manual for details. All the
devices should be powered on and working properly. If not, check the cabling and switch settings and
make adjustments as necessary.
10.
When testing and adjustments are completed, remove power from all input devices, output devices,
and the Extender; and disconnect input cables from the Extender and MAAPs.
11.
Lower the main enclosure onto the upper mounting plate and slide it backwards so the
tab on the upper mounting plate is inserted into the slot in the lower rear of the
enclosure. See the illustration at right.
C
Take care not to damage the cables during this procedure, and make sure no cables
are caught between the enclosure and the mounting plate.
12.
Align the two holes in the enclosure’s front flange with the corresponding holes in the
upper mounting plate, and fasten the enclosure securely to the plate using the two
remaining Phillips pan head screws.
Mounting the Extender AKM MAAP Assembly into the Floor Box
Follow this procedure to mount the Extender AKM MAAP assembly into the Ackermann floor box.
1.
Slide the lower mounting plate towards the Extender AKM MAAP main enclosure to make the assembly as compact as possible.
2.
Orient the Extender AKM MAAP assembly for proper insertion into the floor box. The front of the Extender and the MAAPs’
connectors must be accessible from the front of the floor box.
3.
Lower the Extender AKM
MAAP assembly and cables
into the floor box.
4.
Insert the upper mounting
plate’s tab (at the rear of the
assembly) into the slot in
the wall of the floor box.
5.
Pull the lower mounting
plate forward, expanding
the assembly until the front
tab is inserted into the
corresponding slot in the
floor box.
6.
Tighten the Phillips pan
head screws to secure the
mounting plates and nut
bar. See the illustrations at
right for examples of the
completed installation.
7.
Restore power to all
devices.
EX
TE
ND
ER
AK
M M
AA
P
CO
MP
UT
ER
IN
AU
DIO
IN
#4 - 40
Socket Head
Cap Screws
EX
TE
ND
ER
AK
M M
AA
P
CO
MP
UT
ER
IN
AU
DIO
IN
Extron
Extender AKM MAAP
Line Driver
Laptop
Projector
EXTENDER AKM
MAAP
COMPU
TER IN
AUDIO IN
All trademarks mentioned in this guide are the properties of their respective owners.
© 2009 Extron Electronics. All rights reserved.
Extron Contact Information