Dsc 301 hd • setup guide (continued), Front panel overview, Setting the front panel locks (executive modes) – Extron Electronics DSC 301 HD Setup Guide User Manual
Page 2: Configuring the dsc 301 hd, On-screen display (osd) menu system, Extron, Using the osd menu to configure the dsc 301 hd
DSC 301 HD • Setup Guide (Continued)
2
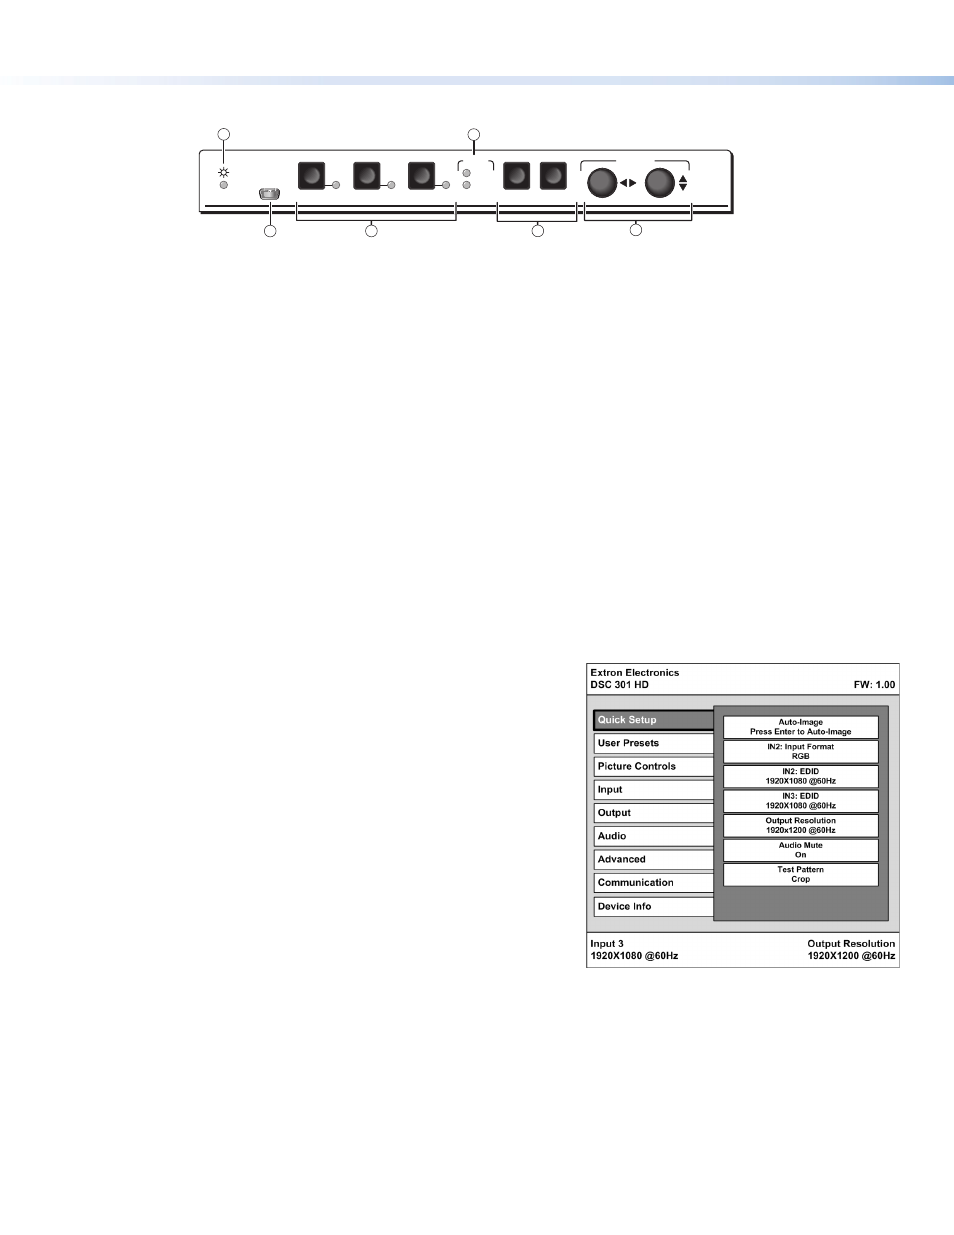
Front Panel Overview
ADJUST
DSC 301 HD
CONFIG
1
3
2
HDCP
MENU
ENTER
INPUT
OUTPUT
Extron
ADJUST
DSC 301 HD
CONFIG
1
3
2
HDCP
MENU
ENTER
INPUT
OUTPUT
Extron
4
2
3
6
5
1
a
Status LED — This LED lights amber when there is power but no signal, and green when power and signal are both present.
b
Front panel mini USB configuration port — Connect a control system or computer to this mini USB port (cable not supplied), for
device configuration, control, and firmware upgrading.
c
Input selection buttons and LEDs (1-3) — Select/switch inputs; LEDs indicate which input is active (current input lights green).
d
HDCP content LEDs — These LEDs indicate HDCP status for input and output signals;
• Light green when an input or output signal is HDCP encrypted.
• Remain unlit when a current input or HDMI output is not HDCP encrypted.
• Flash amber when the video output has been disabled (such as when in sync mute of screen saver mode).
e
Menu navigation buttons (Menu, Enter) — These buttons allow navigation through the OSD menu system of the DSC 301 HD.
f
Adjust knobs — These are used with the menu navigation buttons to adjust the device settings and picture controls.
Setting the Front Panel Locks (Executive Modes)
The DSC 301 HD has three modes of front panel security lock that limit the operation of the unit from the front panel.
Executive mode 0 (disabled) — The front panel is fully unlocked. This is the default setting.
Executive mode 1 (enabled) — The front panel is completely locked. Can only be enabled and disabled using SIS commands, or
Extron Configurator software. See the online DSC 301 HD User Guide or the rear page of this guide for SIS commands.
Executive mode 2 (enabled) — The front panel is locked except for input switching.
Configuring the DSC 301 HD
DSC 301 HD devices can be configured through a host connected via RS-232 or USB and using Extron Configurator software or Extron
Simple Instruction Set (SIS) commands (see rear page for a selection of basic commands).
On-Screen Display (OSD) Menu System
The scaler has an OSD menu consisting of nine submenus that can be accessed
using the front panel Menu and Enter buttons. The Communication menu and the
Device Info menu are read-only menus. The menus are:
• Quick Setup • User Presets • Picture Controls • Input • Output
• Audio • Advanced • Communication • Device Info.
To use any menu:
1.
Press the Menu button to access the main menu.
2.
Rotate either Adjust knob to cycle through to the desired menu.
3.
Press the Enter button to access the submenu.
4.
Rotate either Adjust knob to cycle through the submenu to the
desired option.
5.
Press the Enter button to adjust a submenu variable.
Using the OSD menu to configure the DSC 301 HD
z
Use the Quick Setup menu to Auto-Image the current input, set video input format, input EDID settings, set output resolution,
audio mute and video test patterns.
z
Use the User Presets menu to save the picture control adjustments to each input for later manual recall.
z
Use the Picture Controls menu to adjust the image horizontal and vertical position and size, the brightness and contrast
settings, the color and tint levels, and the detail settings as needed.
z
Use the Input menu to perform an Auto-Image on the current input, set the video input format and film mode, horizontal and
vertical start, the number of active horizontal pixels and vertical lines, set the total pixels and phase, set HDCP authorization to on or
off, and set the EDID for the current input.
z
Use the Output menu to set output resolution, set the HDMI output format, set HDCP notification, and set the Accu-RATE Frame
Lock™ (AFL™) to on or off.