Ambient temperature, Accuracy – Analytical Industries GPR-7500 AIS Trace PPM Hydrogen Sulfide Analyzer User Manual
Page 11

Advanced Instruments, Inc.
11
pressure on the sensor will alter the output of the sensor and unless the sensor is calibrated under the same
analysis conditions, a significant error in measurements will occur.
For positive sample pressure applications, the sample pressure must be regulated by using a pressure
regulator. The sample pressure between 5-30 PSIG offers a good compromise between delivering a
reasonable gas flow (1-2 SCFH) and the ease of controlling the sample flow by using the integral flow
control valve. Any blockage of the sample vent line will cause an increase in the pressure at the sensor thus
causing erroneous readings. If sample is to be vented into a pipe above atmospheric pressure, a pressure
regulator set at 0.5 PSIG must be installed to maintain constant pressure on the sensor. For vent pressure
above0.5 PSIG, consult factory for proper selection of electronics.
Ambient Temperature:
The rate at which H
2
S molecules diffuse into the sensor is controlled by a
Teflon membrane otherwise known as an ' H
2
S diffusion limiting barrier'. All diffusion processes are
temperature sensitive, therefore, the fact that the sensor's electrical output will vary with temperature is
normal. Under typical applications, this variation is relatively constant and the measurement accuracy
remains within the published specifications over the recommended operating rage of temperature. The
accuracy of +5% or better over an operating temperature range e.g., 5-45
o
C can be obtained. The
measurement accuracy will be the highest if the calibration and sampling are performed at similar
temperatures (a temperature variation of 10 ºC may produce an error of >+/-2% of full scale).
Accuracy:
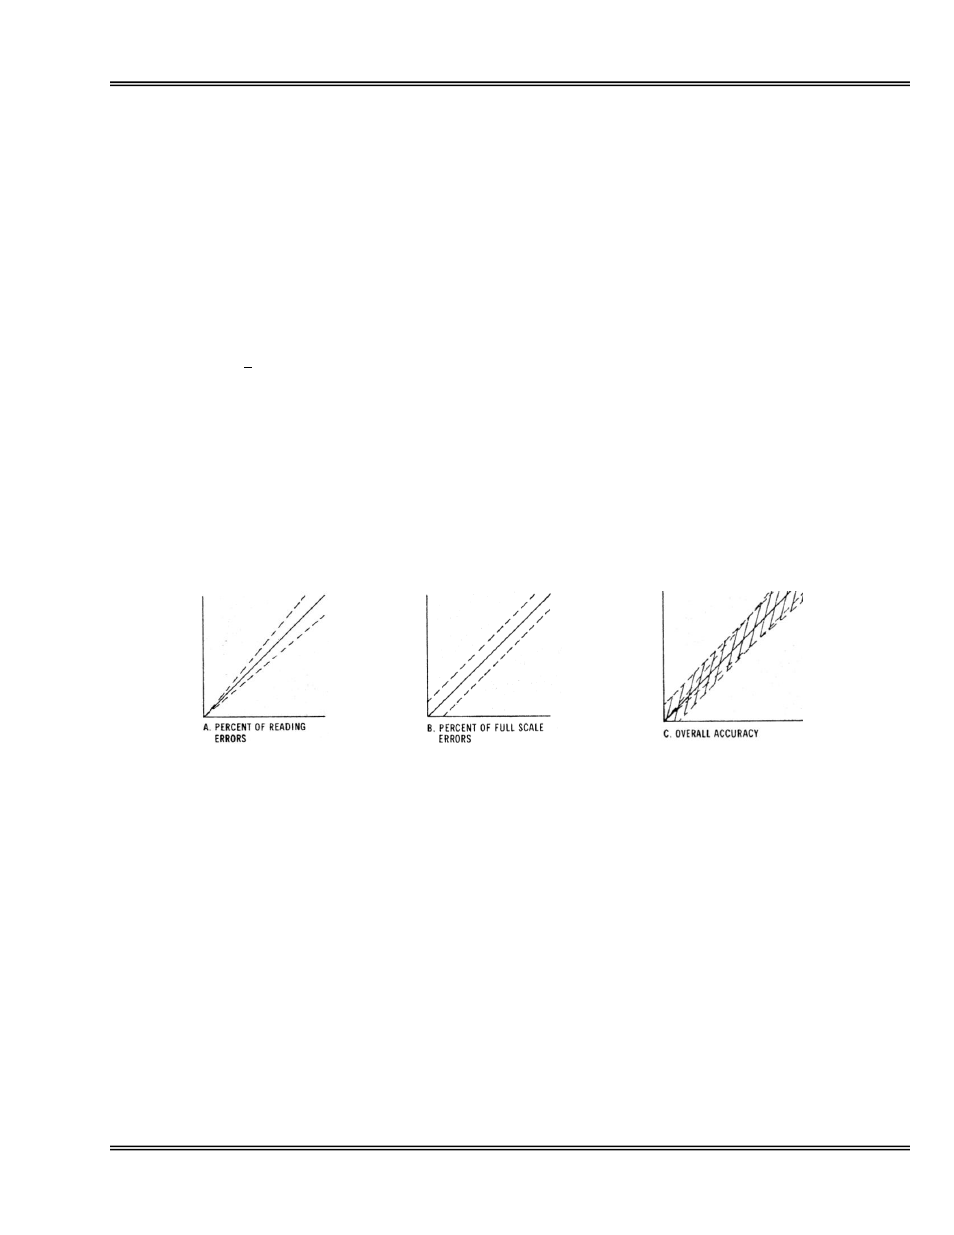
In light of the above parameters, the overall accuracy of an analyzer is affected by two types
of errors, 'percent of reading errors', illustrated by Graph A below and the 'percent of full scale errors',
illustrated by Graph B. The percent of reading error is contributed by incorrect calibration procedure whereas
the percent of full scale error is contributed by tolerance in components and the measurement device. These
errors are 'spanned out' during calibration, especially when span calibration is done close to the top end of
the measuring range followed by a zero calibration.
Graph C illustrates these 'worse case' specifications that are typically used to develop an overall accuracy
statement of < 1% of full scale at constant temperature or < 5% over the operating temperature range. The
QC testing error at the factory is typically < 0.5% of full scale.
Example 1: Graph A, percent of reading error, this error is more pronounced when a span adjustment is
carried out at the lower end of the scale, e.g., when span calibration is done by 20 PPM span gas on a 100
PPM full scale range, any error at 20 PPM span gas would be multiplied by a factor of 5 (100/20) when
making measurements close to 100 PPM. Conversely, an error during a span adjustment close to the top
end of the range, e.g., at 100 PPM would reduce the error proportionately for measurements near the
bottom end of the range.
Graph B represents a constant error over the entire measuring range. This error is generally associated with
the measuring e.g., LCD and or calibrating devices, e.g., current simulator or current/voltage measuring
devices.
Graph C shows the overall accuracy of the measurement.
