English, Stop, Installation without deck plate – Pfister F-046-SYKK User Manual
Page 3
ENGLISH
ENGLISH
6
7
8
INSTALLATION WITHOUT DECK PLATE
9
STOP
Go To Step 10
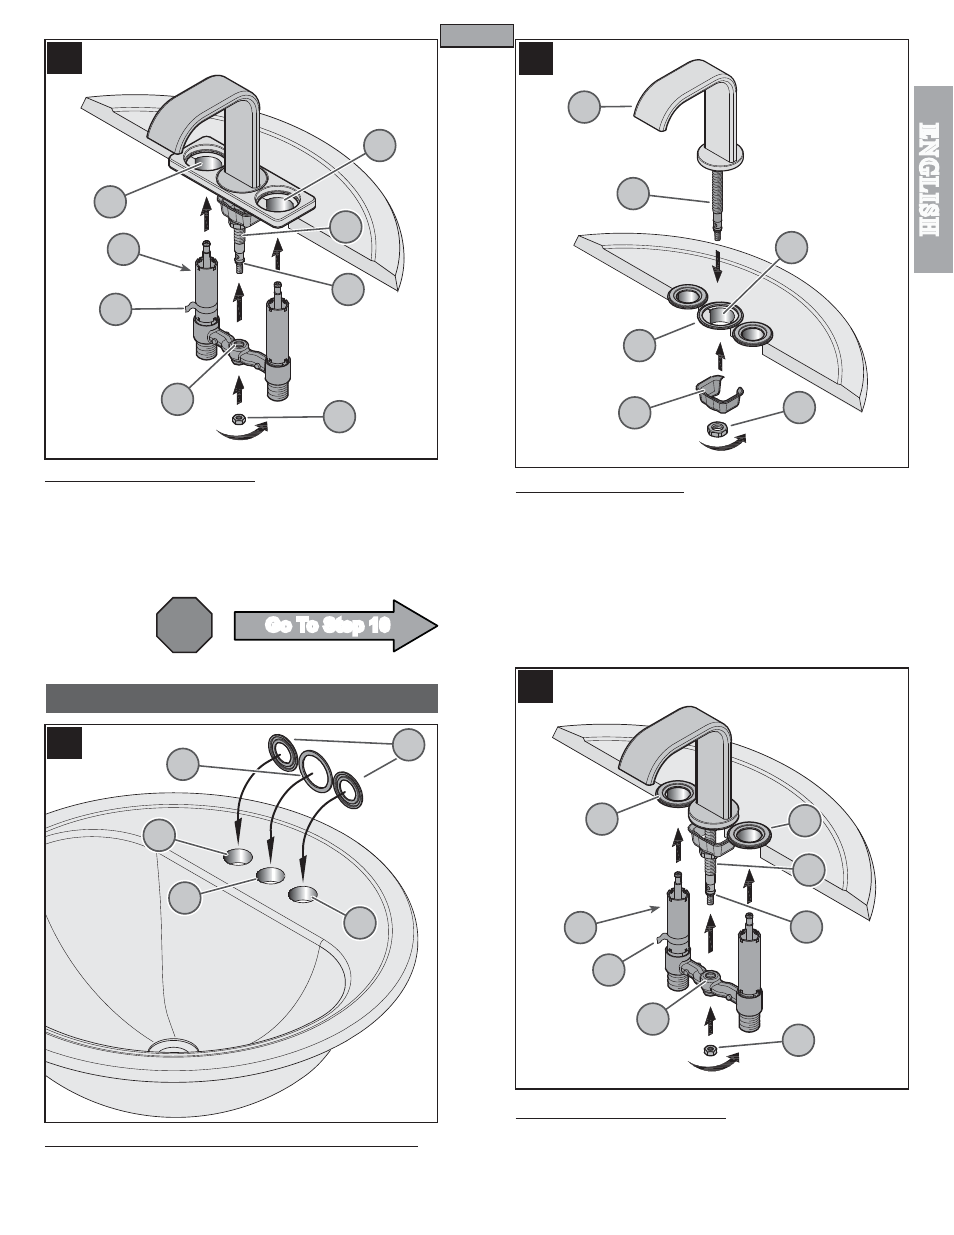
6 UNDERBODY INSTALLATION
From underneath, insert Underbody (6A) through Mounting Holes (6B), with shank
labeled with Red Tag (6C) on left side. Align Socket (6D) onto Spout Shank (6E), push
Underbody (6A) up until the top of Socket (6D) reaches the Spout Shank Stop (6E). Be
careful not to damage the O-Ring Seal (6F). Attach Locknut (6G) and tighten loosely
until Underbody (6A) is assembled to the Spout Shank (6E).
7 MOUNTING RINGS & SPOUT GASKET INSTALLATION
If desired, place a small bead of plumber’s putty to the underside of Mounting Rings
(7A). Place Mounting Rings (7A) onto the Outer Sink Holes (7B). Place Spout Gasket
(7C) onto the Center Sink Hole (7D).
8 SPOUT INSTALLATION
Insert Spout Shank (8A) through Spout Gasket (8B) and Center Sink Hole (8C). From
underneath sink, place Thrust Washer (8D) onto Spout Shank (8A) and tighten with
Mounting Nut (8E). Before final tightening, be sure Spout (8F) is centered and facing
forward.
Caution: Do not over tighten!
9 UNDERBODY INSTALLATION
From underneath, insert Underbody (9A) through Mounting Rings (9B), with shank
labeled with Red Tag (9C) on left side. Align Socket (9D) onto Spout Shank (9E), push
Underbody (9A) up until the top of Socket (9D) reaches the Spout Shank Stop (9E). Be
careful not to damage the O-Ring Seal (9F). Attach Locknut (9G) and tighten loosely
until Underbody (9A) is assembled to the Spout Shank (9E).
3
6A
6E
6B
7B
7C
7D
7B
6F
6G
7A
6C
6D
6B
8A
8F
8B
8C
8E
8D
9A
9C
9D
9G
9E
9F
9B
9B