3B Scientific Teltron Electron Diffraction Tube S User Manual
Page 4
3B Scientific GmbH ▪ Rudorffweg 8 ▪ 21031 Hamburg ▪ Germany ▪
www.3bscientific.com
Subject to technical amendments
© Copyright 2013 3B Scientific GmbH
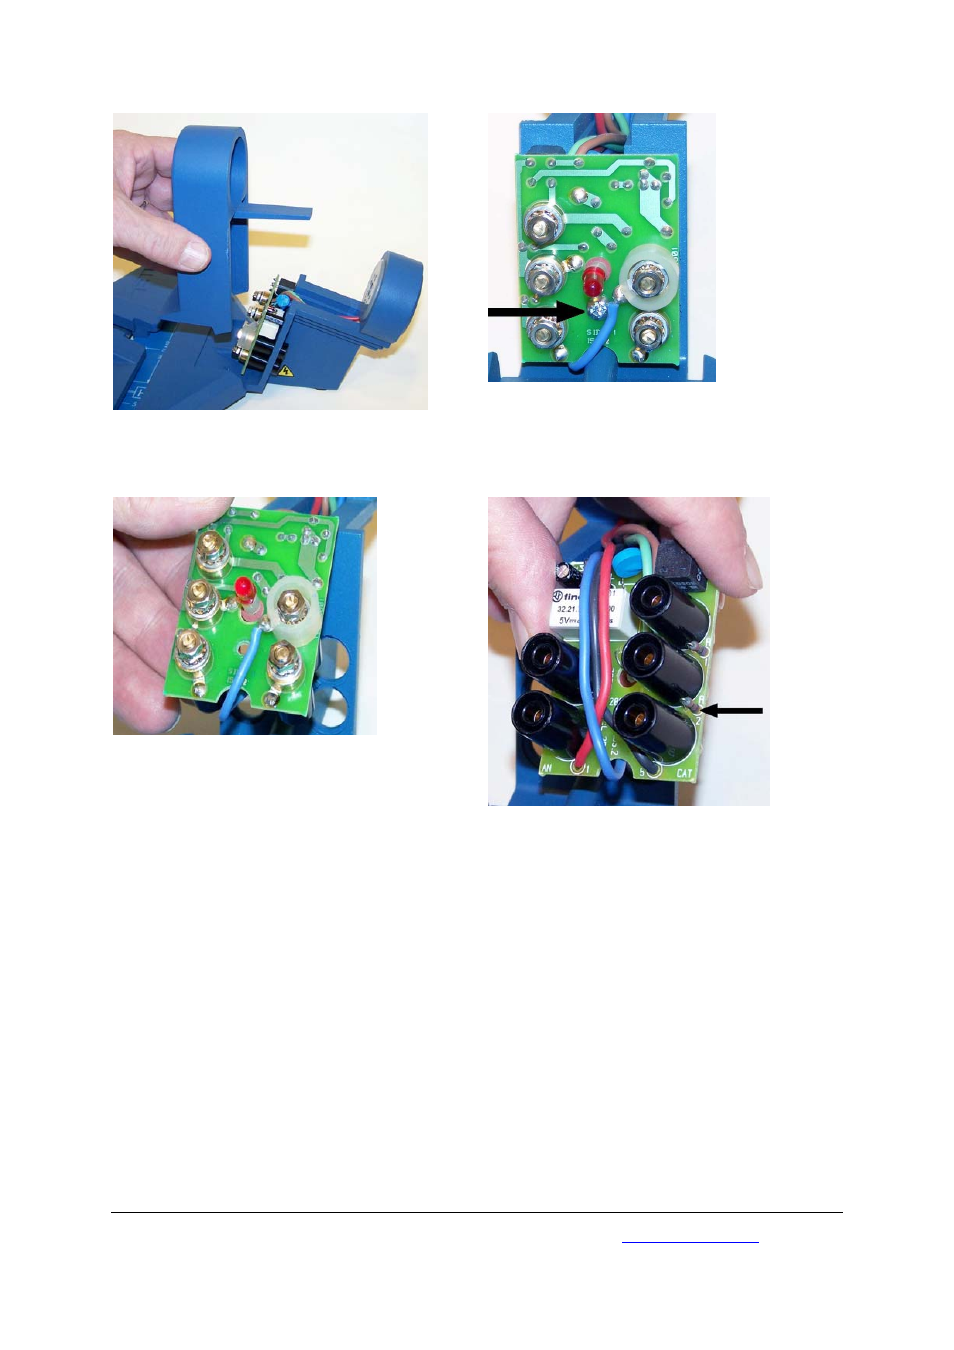
3) Carefully pull the guide pillar up at an angle,
making sure that the LED is not damaged.
4) Undo the screws holding the printed circuit
board. Be careful, because the screw is inside a
spacer ring, which you must not lose.
5)
Carefully pull the board forwards and lift the
terminal sockets out of their guides.
6) Unsolder resistor R2 (33 kΩ) and replace it
with the supplied 390-kΩ resistor.
7) Put the circuit board back in place and secure
it with screws. First push the screw through the
hole and slip the spacer over the screw before
tightening.
8) Be especially careful when inserting the guide
pillar again to make sure that the LED does not
get bent over. You should get the base in place
first and check the positioning of the LED, then
press the bar down and snap it into place.
9) Use screws to secure the guide pillar from
below.
- Piezoelectric Charge Source (2 pages)
- Animal cell model (36 pages)
- Internal organs Chart (16 pages)
- Digital Input Box (12 pages)
- Digital Input Box (2 pages)
- Experiment Set - On the Trail of Flavour Enhancers Brand new and topical-versatile in classroom situations (48 pages)
- Pascal’s Pressure Sphere (6 pages)
- Pascal’s Pressure Sphere (1 page)
- Heat Equivalent Apparatus (6 pages)
- Heat Equivalent Apparatus (24 pages)
- 3B Deluxe Portable Massage Table - Blue (2 pages)
- Radiation of Heat__Thermopile (12 pages)
- Radiation of Heat__Thermopile (2 pages)
- Capillary Tubes Apparatus (2 pages)
- Basic Experiment Board (230 V, 50__60 Hz) (24 pages)
- Model of female breast (30 pages)
- Digital Teslameter with Probe (230 V, 50__60 Hz) (4 pages)
- Brain with Arteries on Base of Head, 8 part (20 pages)
- Functional Physiological Skeleton Model - Frank - Hanging Stand (1 page)
- Physiological Skeleton Model - Phil - Hanging Stand (20 pages)
- Teltron Optical Equivalent to Debye-Scherrer Interference (2 pages)
- Teltron Luminescence Tube D (4 pages)
- Teltron Triode D, Helium-filled (4 pages)
- Human Blood Circulation Chart (16 pages)
- Power Function Generator (230 V, 50__60 Hz) (4 pages)
- Power Function Generator (115 V, 50__60 Hz) (24 pages)
- Laser Diode for Debye-Sears Effect, Red (5 pages)
- Lung Model with larynx, 7 part (16 pages)
- The Human Skeleton Chart, front (16 pages)
- Solar Energy Basic Kit (2 pages)
- Solar Energy Basic Kit (12 pages)
- 1002996 (2 pages)
- 1000731 (1 page)
- Basic Mechanics Kit (2 pages)
- Teltron Dual Beam Tube S (6 pages)
- Resusci Anne CPR Torso (73 pages)
- Leclanche Cell (2 pages)
- Human Pulse Sensor Box (24 pages)
- Human Pulse Sensor Box (4 pages)
- Advanced Thermodynamics Kit (3 pages)
- 1008528 (1 page)
- Life size Muscle Torso, 27 part (60 pages)
- Launcher S (12 pages)
- Launcher S (2 pages)
- Torso Chart (16 pages)