Prokit's Industries MT-3120 User Manual
Page 4
2A Mini Autorange Clamp Meter
user manual
12
- Input impedance: 10M
Ω
- Overload protection: 200mV range: 250V DC or rms AC, 2V-600V ranges:
600V DC or 600V rms AC.
- Max. input voltage: 600V rms AC
- Frequency range: 40 to 200Hz
- Response: average, calibrated in rms of sine wave
NOTE:
At small voltage range, unsteady readings will appear before the test leads
contact the circuit. This is normal because the meter is highly sensitive. When
the test leads contact the circuit, the true reading will be shown.
3.2.3 DC Voltage
Range Resolution
Accuracy
200mV 0.1mV
2V 0.001V
±(0.8% of rdg + 2digits)
20V 0.01V
200V 0.1V
600V 1V
±(1.0% of rdg + 2digits)
- Input impedance: 10M
Ω
- Overload protection: 200mV range: 250V DC or rms AC, 2V-600V ranges:
600V DC or 600V rms AC.
- Max. input voltage: 600V DC
NOTE:
At small voltage range, unsteady readings will appear before the test leads
contact the circuit. This is normal because the meter is highly sensitive. When
the test leads contact the circuit, the true reading will be shown.
2A Mini Autorange Clamp Meter
user manual
13
3.2.4 Resistance
Range Resolution
Accuracy
200
Ω 0.1Ω
2k
Ω 0.001kΩ
20k
Ω 0.01kΩ
200k
Ω 0.1kΩ
2M
Ω 0.001MΩ
±(1.2% of rdg + 2digits)
20M
Ω 0.01MΩ
±(2.0% of rdg + 5digits)
- Open circuit voltage: 0.25V
- Overload protection: 250V DC or rms AC
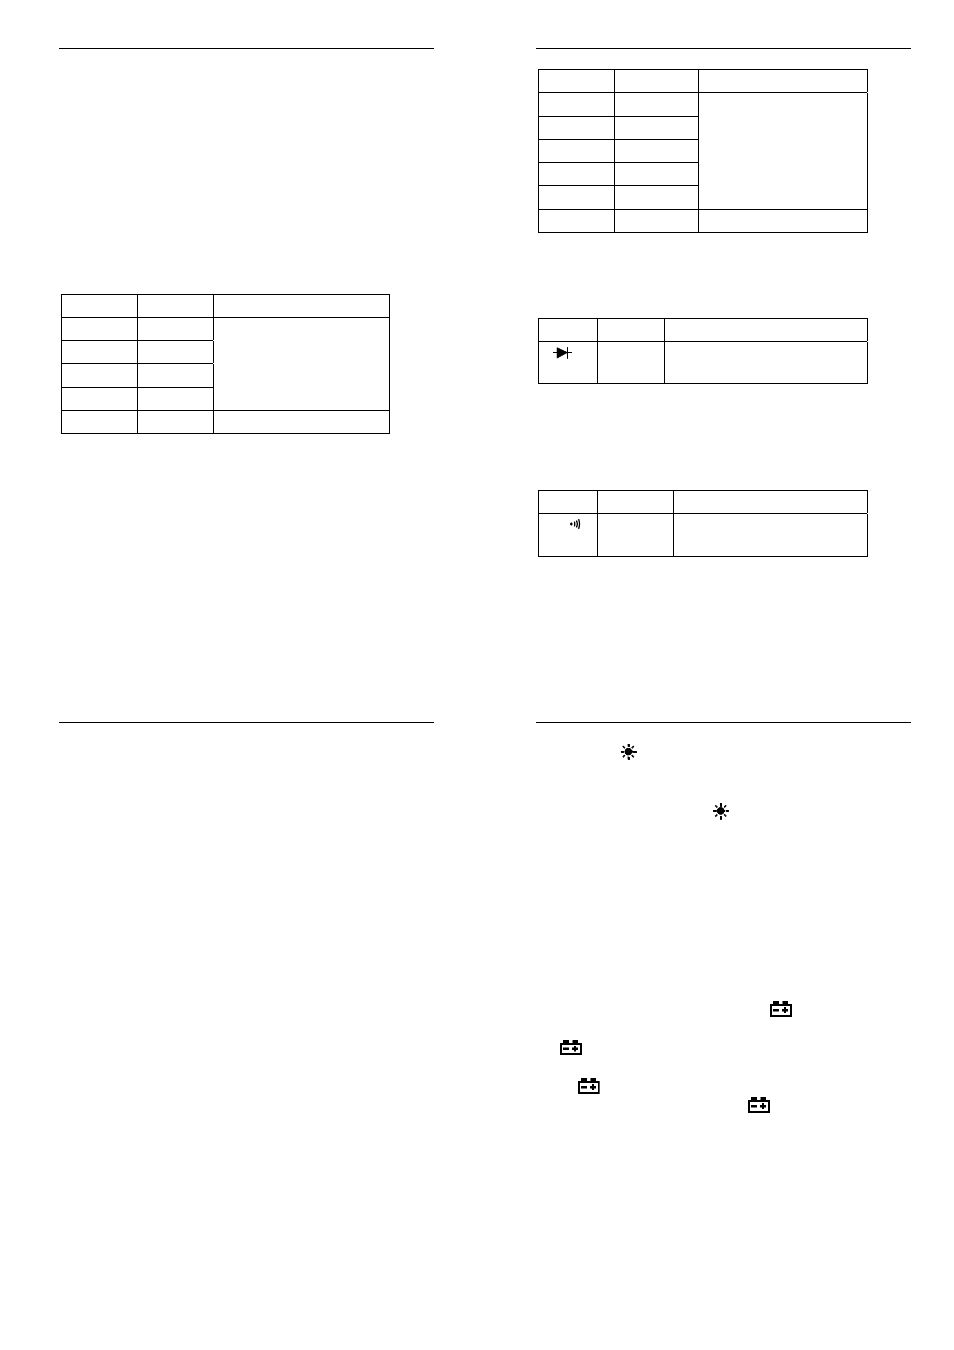
3.2.5 Diode
Range Resolution
Function
0.001V
displaying approximate forward voltage
of diode
- Forward DC current ~ 1mA
- Reversed DC voltage ~ 1.5V
- Overload protection: 250V DC or rms AC
3.2.6 Continuity
Range Resolution
Function
0.1
Ω
Built-in buzzer will sound, if resistance
is lower than 60
Ω.
- Open circuit voltage ~ 0.45V
- Overload protection: 250V DC or rms AC
2A Mini Autorange Clamp Meter
user manual
14
4. OPERATION INSTRUCTION
4.1 HOLDING READINGS
4.1.1 Press the “HOLD” button to hold the readings while taking measurement
and the value on the display will be held.
4.1.2 Press the “HOLD” button again to release the READING HOLD function.
4.2 SWITCHING RANGES
4.2.1 When the meter is turned on, it is at the auto range mode for measuring
current, voltage, resistance, capacitance and frequency.
4.2.2 Press the "RAN" button for manual range mode. The range will go up one
level at each press and return to the lowest level when the highest level is
reached.
4.2.3 Press the "RANGE" button for two or more seconds to return to the auto
range.
4.2.4 When measuring the maximum or minimum value, press the "RAN" button,
the meter will recover the normal working condition.
4.3 SWITCHING MAXIMUM VALVE
4.3.1 At the voltage and current range, press the “MAX” button to switch to
maximum value measurement.
4.3.2 Press the “MAX” button again, the meter will recover the normal working
condition.
4.4 SWITCHING FUNCTIONS
4.4.1 Press the "SEL" button to switch between AC and DC measurement at the
voltage ranges.
4.4.2 Press the "SEL" button to switch among diode and continuity ranges.
2A Mini Autorange Clamp Meter
user manual
15
4.5 BACK LIGHT AND CLAMP LIGHTING BULB
4.5.1 Press the ”
” button for two or more seconds to switch on the back light
if the light in the environment is too dim for taking reading, which will last for
15 seconds.
4.5.2 To turns off the light, press the “
” button for two or more seconds again
to off the back light.
4.5.3 At the current range, when the back light is switch on, the clamp lighting
bulb will brighten up.
NOTE:
- LED, which requires a larger working current, is the main source of back light.
Although the meter is equipped with a timer set at 15 seconds (i.e. the back
light will be off automatically after 15 seconds), frequent use of the back light
will shorten the life of the batteries. Therefore, do not use the back light
unless necessary.
- When the battery voltage is ≤3.6V, the symbol “
”(battery low)will appear
on the LCD. When the back light is on, even if the battery is ≥3.6V, the
“
” may appear because of its large working current which will cause the
voltage to drop. (The accuracy of the measurement cannot be assured when
the “
“symbol appears.) In this case, no need to replace the batteries yet.
Normally, the batteries can last until the “
” appears when the back light
is not being used.
4.6 AUTO POWER OFF
4.6.1 If there is no any operation within any fifteen minutes after power is on,
meter will auto power off.
4.6.2 Turn the rotary selector or press any button to resume operation of the
meter under the auto power off mode.
4.6.3 At the same time when power on, if press the”HOLD” button, auto power off
disable.