A3 b c, Dm f – Peerless-AV HLG440-RCA-Q10 - Installation User Manual
Page 5
ISSUED: 06-29-11 SHEET #: 125-9220-4 07-31-12
Visit the Peerless Web Site at www.peerlessmounts.com
For customer care call 1-800-729-0307 or 708-865-8870.
5 of 6
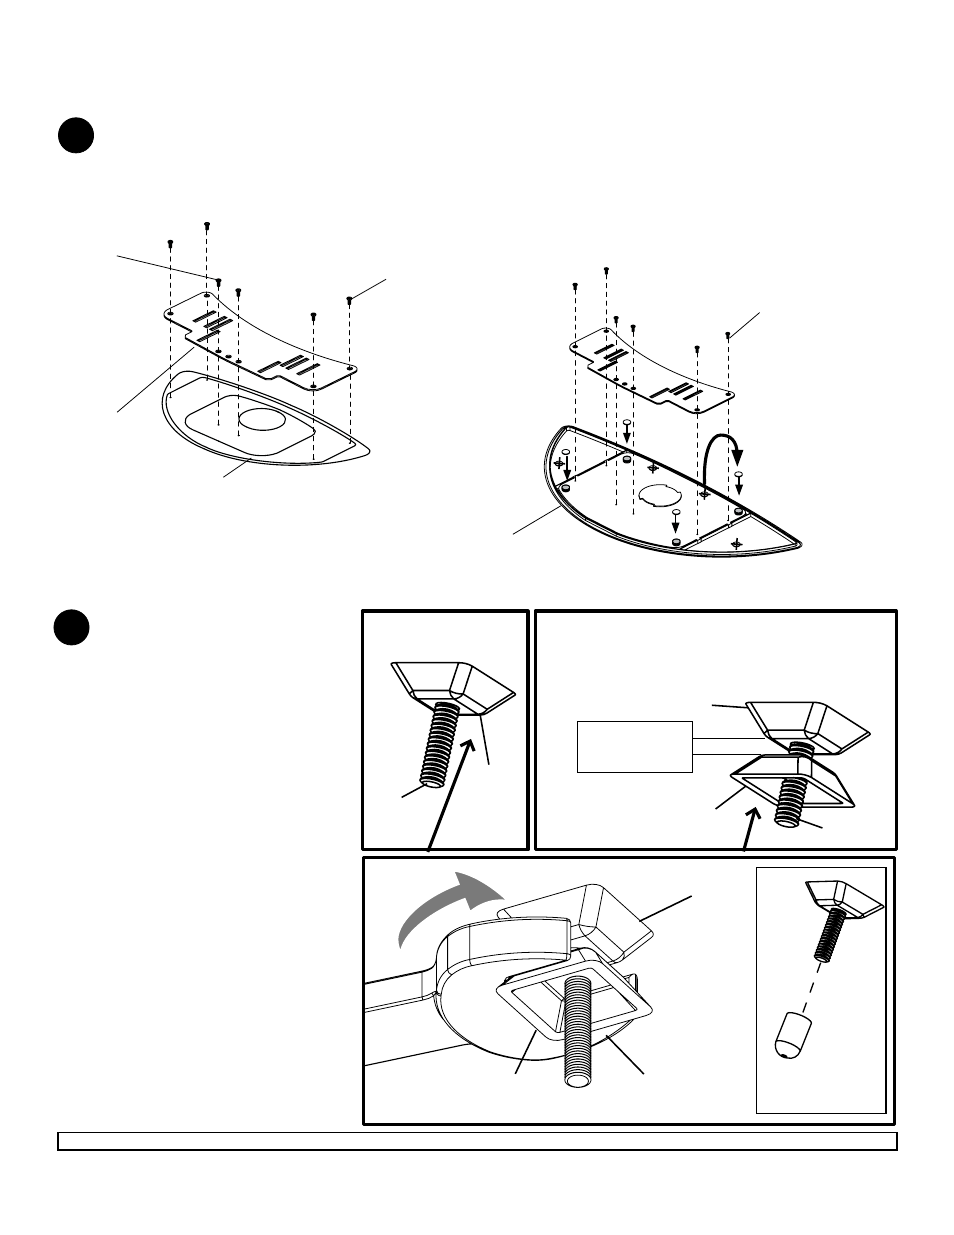
Attach lock-down plate (
A) to bottom of display base
using four 10-32 X 3/8" undercut flat head screws
(
B) and two #10 X 3/8" undercut flat head self drilling
screws (
C).
Refer to display base stand hole pattern on page 3.
DISPLAY BASE STAND
A
3
B
C
DISPLAY BASE STAND
Attach lock-down plate to bottom of display base
using six 10-32 X 3/8" undercut flat head screws
(
B) Refer to lock-down plate/ display base stand
hole pattern on page 4.
Note: Remove existing outside rubber feet from
display base and position them on top of inner
rubber feet as shown.
Attaching lock-down plate
RCAJ42L750
Attaching lock-down plate
RCAJ32L750
C
e
D
FIG 4.1
Mounting Lock down Slope Nuts
Detail 3
tIGHteNING
SLoPe NUt (G)
F
5/8" oPeN BoX
WReNCH
tIGHteNING
SLoPe NUt (F)
D
M
F
Detail 1
Detail 2
F
Hand tighten slope nuts (
F) onto
two of the 1/4-20 x 1 3/4" screw
bolt (
D) until snug against bottom of
table as shown in Detail 1.
Thread another slope nut (
F)
upside-down, about two turns from
first slope nut (
F) as shown in
Detail 2.
Insert a 5/8
"
open box wrench
between both slope nuts (
F) and
tighten
as shown in detail 3.
After slope nut is secure remove
bottom slope nut and add plastic
cap (
e) as shown in figure 4.1.
Repeat with remaining
1/4-20 x 1 3/4" screw bolt (
D).
4
BottoM oF DeSK
BottoM oF DeSK
Note: Avoid jamming both slope nuts (G) together,
doing so may make it difficult to remove slope nut
used for tightening.
After slope nut is secure remove bottom slope nut.
LeAVe SPACe
IN BetWeeN
SLoPe NUtS