B&B Electronics VESP211 Series - Quick Start Guide User Manual
Quick start guide, Model: vesp211
PN9178R2_VESP211_5012 QSG
P#xxxx_Vlinx_VESR4x4_Serial Server_2511qsg
Install/Connect the Hardware
Quick Start Guide
Install/Run Vlinx Manager
Configure the Serial Server
General Setup
Enter a name for the serial server. This name will
show up in the serial server list in Vlinx Manager.
Change the login password if desired.
Enter The Network Settings
The serial server is configured at the factory to get an
IP address automatically (DHCP). If a DHCP server is
not available on your network, it will default to
169.254.102.39.
If a static IP is desired, uncheck the box “I want DHCP
to setup the network”. Enter the static IP, Subnet
Mask, and default Gateway information.
Setup the Serial Port Communications
Select the communications mode – RS-232, RS-422,
RS-485 (2-wire), RS-485 (4-wire)
Select the communications parameters (Baud Rate,
Data Bits, Stop Bits, Parity and Flow Control) for your
serial device
Setup the Serial Port Network Protocol
Select the type of network protocol you want to use:
TCP, UDP, VCOM or Paired Mode.
TCP: select whether the serial server will operate as a
Client or Server, then configure the required IP
address, port numbers and other related parameters.
UDP: configure the IP addresses, ports and other
related parameters for the devices you want to receive
data from and send data to.
VCOM: configure the serial port to act as a virtual
COM port on the PC. You must also add the VCOM
driver to the PC using the “Add VCOM” button in Vlinx
Manager.
Paired Mode: configure the serial server to be paired
with another serial server, configure it as either the
client or the server in the pair and set up the IP
address, port numbers, etc.
Setup Advanced parameters as necessary for your
application Click on the “Advanced” button to setup
serial and network timers and packet delimiters.
Save your configuration to the serial server
The device will re-boot after saving the settings.
2
Model: VESP211
USB to Serial Device
Mount the serial server using the panel mount tabs, or the
optional DIN rail mount adapters (model DRAD35)
Connect the AC power supply (included)
Connect to the network (using a standard Ethernet cable):
Connect the serial device (using the appropriate cable for
your model):
RS-232 with DB9: straight-through for DCE device, null
modem for DTE device
RS-232/422/485 with terminal blocks
Install Vlinx Manager
Insert the Vlinx manager software CD into the computer.
The install program should automatically run.
Follow the prompts to install the software
Run Vlinx Manager
:
ClickStart>Programs>B&BElectronics>Vlinx>VlinxSerial
Server Manager>Serial Server Manager
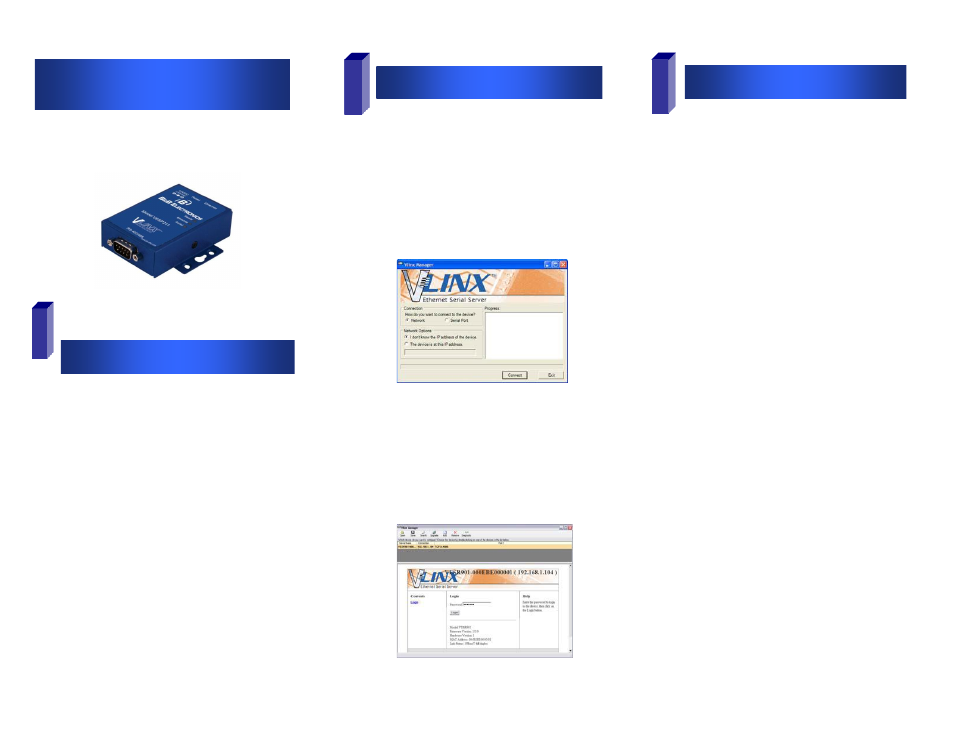
The Discovery page opens
Select Network.
If you know the IP address, select:“The device is at this
address”, and type in the address.
If not, select “I don’t know the IP address of the device”.
Click on the Connect button. Vlinx Manager will search
for any serial servers on the network.
Login to the Serial Server
Select the serial server from the list.
Login to the device. (factory password is blank. Just
click Login). The General setup page will appear.
Unpack your serial server from the shipping container.
Verify that all included items are present.
VlinxVESP211 module
CD with Vlinx Manager software and user’s manual
AC power supply
This quickstart guide
1
3