B&B Electronics 3PCIOU4 - Quick Start Guide User Manual
Quick start guide
Documentation Number 3PCI-MIPort -0712qsg
PN6411-rev002
1
2
3
4
5
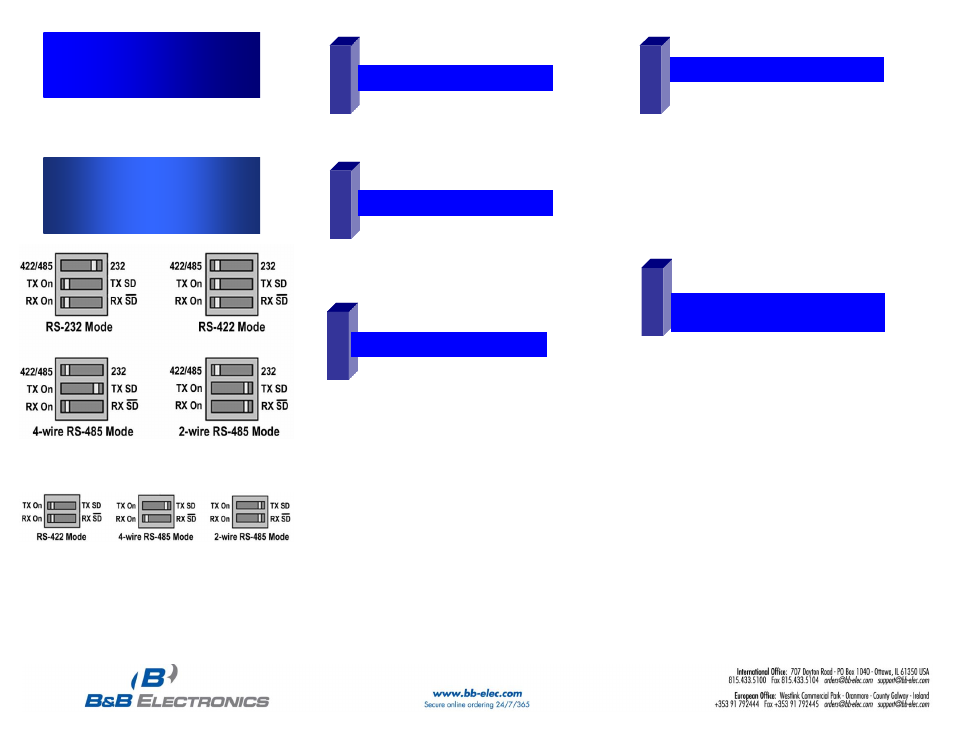
RS-232/422/485 DIP Switch Settings
RS-422/485 DIP Switch Settings
MIPort
™ Universal PCI Cards
Models: 3PCIU2, 3PCIU4, 3PCIU8
3PCIOU1, 3PCIOU2, 3PCIOU4
Model: ES1A
Quick Start Guide
□
Caution: Ensure your PC is powered OFF before
installing the MIPort™ PCI Card.
□
Caution: Use ESD Precautions for safe handling.
□
Configure the serial mode for each port. DIP Switch
settings are shown on the left. Refer to the manual for
detailed information.
□
Install the MIport™ in a PCI Expansion Slot.
□
MIPort™ Universal PCI Card
□
Printed version of this Quick Start Guide
□
CD ROM containing software and a comprehensive manual
□
Depending on model, a cable and/or expansion slot bracket
may be included. Refer to the MIPort Datasheet.
□
ALOG100/ALOG110 module.
C
C
h
h
e
e
c
c
k
k
P
P
a
a
c
c
k
k
a
a
g
g
e
e
C
C
o
o
n
n
t
t
e
e
n
n
t
t
H
H
a
a
r
r
d
d
w
w
a
a
r
r
e
e
I
I
n
n
s
s
t
t
a
a
l
l
l
l
a
a
t
t
i
i
o
o
n
n
D
D
r
r
i
i
v
v
e
e
r
r
I
I
n
n
s
s
t
t
a
a
l
l
l
l
a
a
t
t
i
i
o
o
n
n
S
S
e
e
t
t
t
t
i
i
n
n
g
g
D
D
a
a
t
t
a
a
R
R
a
a
t
t
e
e
/
/
R
R
T
T
S
S
C
C
o
o
n
n
t
t
r
r
o
o
l
l
□
In Windows, open the System Properties dialog box.
□
On the Hardware Tab, select Device Manager.
□
Expand the Ports List (COM & LPT), double click
the name of the port you want to configure.
□
On the Port Properties dialog box, click the Port
Settings tab.The dialog box will display the current
settings for bits per second, data bits, parity, stop bits
and flow control.
□
Click Advanced. The Advanced Port Settings dialog
box will appear. Under RTS Control, click Normal for
RS-232 Mode and RS-485 Mode for RS-485 Mode.
RTS Control can be in either mode for RS-422.
□
Read this entire section before continuing.
□
Boot the PC.
□
Insert the driver CD. The CD contains drivers for
Windows 98, ME, NT 4.0, 2K, 2003 Server, XP, Vista, and
Linux 2.4
□
Wait until the new hardware is detected and follow the
instructions in the Add New Hardware Wizard.
NOTE: Drivers are contained on the CD. Do not have
Windows attempt to locate them on the Windows Web
Site.
NOTE: A dialog box may appear stating that the
drivers do not contain the Windows XP Logo. Select
“Continue Anyway.”
NOTE: Drivers will be installed for the card AND each
port on the card. DO NOT ABORT OR CANCEL
INSTALLATION BEFORE ALL PORTS ARE
INSTALLED.
T
T
e
e
s
s
t
t
i
i
n
n
g
g
t
t
h
h
e
e
M
M
I
I
p
p
o
o
r
r
t
t
P
P
C
C
I
I
c
c
a
a
r
r
d
d
s
s
R
R
S
S
-
-
2
2
3
3
2
2
See Chapter 9 and Appendix C of the manual for more
details.
□
Create loopback plugs or short TD and RD on RS-
232 connector for each port. See step 8 for pinout.
□
Install and run Comtest (included with the CD).
□
Open the COM number that was created in step 3
for each port and send data.
□
If you are able to receive data, installation is
complete. If not, double check the installation.