Right side, Both sides, Right rear installation diagram – High Lifter Lift Kit for Honda Rubicon 500 (01-14) User Manual
Page 5
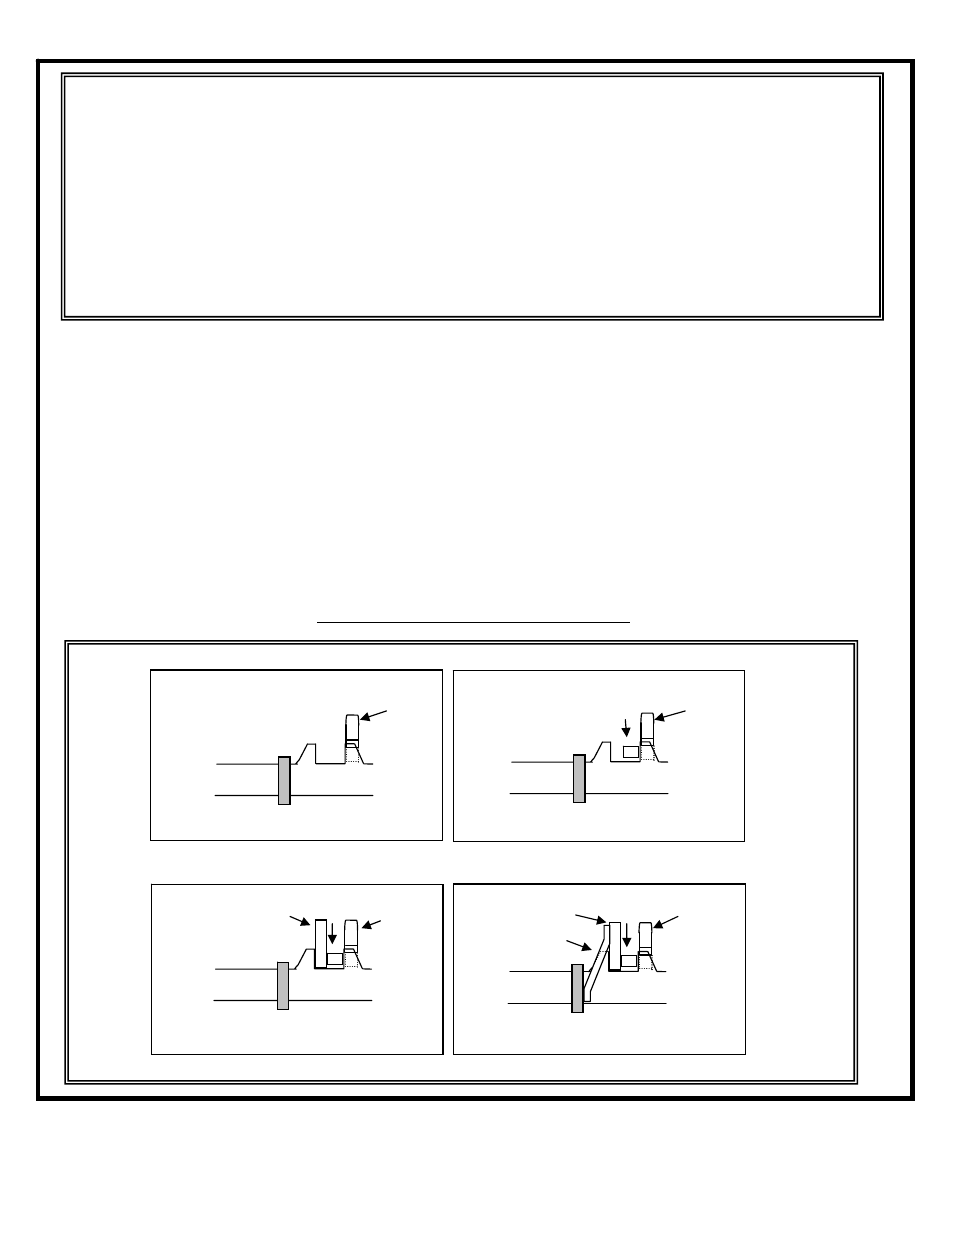
Right Side
1) Place bracket “J” on the right outside of the shock mount (notch up).
2) Place spacer “E” on the inside of the shock mount.
3) Place bracket “I” between spacer “E” and the inside of the shock mount, (to the left of spacer “E”
and to the right of the inside wall of the shock mount).
4) Secure this with the stock OEM bolt.
5) Place bottom of shock (bottom shock eyelet) between brackets “J” and bracket “I”, securing this
with a 10x45mm Bolt. Install bolt from right to left.
6) Place end of bracket “H” to the differential housing using the OEM bolt.
7) Tighten all bolts to manufacturer’s torque specifications, on BOTH THE LEFT AND
RIGHT SHOCK MOUNT!
Both Sides
Tighten all bolts to manufacturer’s torque specifications.
Lower and remove jack.
Check for clearance problems or misalignment.
Right Rear Installation Diagram
1
2
J
E J
Notch Up
Notch Up
3
4
I E J
I E J
Notch Up
H
Notch Up
- Fender Kit for Honda Rubicon 500 (00-04) (2 pages)
- Looney Tuned Dual Exhaust for Kawasaki Teryx (08-10) (3 pages)
- Outlaw Clutch Kit for Suzuki Vinson 500 (02-06) (2 pages)
- Outlaw Clutch Kit for Yamaha 450 Rhino (06-09) (2 pages)
- DynoJet Jet Kit for Kawasaki Prairie 650 (2002) (2 pages)
- Lift Kit for Honda Foreman 450 (98-01) (9 pages)
- DynoJet Jet Kit for Polaris Scrambler (98-09) (2 pages)
- Outlaw Clutch Kit for Arctic Cat 550 H1 EFI 4x4 (2009) (2 pages)
- Outlaw Clutch Kit for Yamaha 700X Big Horn Crew (10-14) (2 pages)
- Outlaw Clutch Kit for Polaris 800 RZR "S, RZR "4" (10-13)" (2 pages)
- Lift Kit for Arctic Cat 1000 ATVs (8 pages)
- Dalton Pro Mudrunner Clutch Kit for Can-Am Outlander_Renegade 800 HO, 800 R (06-12) (5 pages)
- DynoJet Jet Kit for Yamaha YFZ 450 (04-05) (2 pages)
- Crushlok Wheels 12” & 14” Installation (5 pages)
- Outlaw Clutch Kit for Honda 500 Rubicon Springs Only (2 pages)
- Outlaw Super Duty Extreme Clutch Kit for Arctic Cat 650 Mud Pro H1 4x4 (10-11) (2 pages)
- Lift Kit for Kawasaki Bayou 400 2x4, 4x4 (93-99) (5 pages)
- DynoJet Jet Kit for Yamaha Rhino 660 (04-07) (2 pages)
- Lift Kit for Yamaha Grizzly 660 (02-07) (6 pages)
- Lift Kit for Yamaha Grizzly 660 (02-07) (3 pages)
- Outlaw Clutch Kit for Polaris 700 Sportmsan Non-EFI (05-06) (2 pages)
- Outlaw Clutch Kit for Arctic Cat 500i Auto (06-09) (2 pages)
- DynoJet Jet Kit for Suzuki Vinson 500 (02-07) (2 pages)
- Lift Kit for Polaris Mid-Size RANGER - Signature Series (9 pages)
- DynoJet Jet Kit for Yamaha Big Bear 400 (07-12) (2 pages)
- DynoJet Jet Kit for Can-Am Outlander 400 HO (04-08) (2 pages)
- Outlaw Clutch Kit for Honda 500 Foreman 2x4_4x4 (05-11) (2 pages)
- Outlaw Super Duty Extreme Clutch Kit for Arctic Cat 700 EFI (06-08) (2 pages)
- Outlaw Clutch Kit for Polaris 500 Sportsman HO (01-05) (2 pages)
- Outlaw Clutch Kit for Arctic Cat 500i Auto (01-05) (2 pages)
- Outlaw Super Duty Extreme Clutch Kit for Can-Am Bennche Spire 800 (10-14) (2 pages)
- Lift Kit for Polaris Ranger 700 (3 pages)
- Outlaw Clutch Kit for Polaris 800 RZR "S (2009)" (2 pages)
- Max Clearance Lower Arched Radius Bars for Arctic Cat 1000 Wildcat (6 pages)
- Outlaw Clutch Kit for Yamaha 700 Rhino (2008) (2 pages)
- DynoJet Jet Kit for Suzuki King Quad 300 (92-99) (2 pages)
- Lift Kit for Yamaha Timberwolf 250 (95-99) (4 pages)
- Radiator Relocation Kit for Polaris Rangers - Black Color Hood (19 pages)
- Lift Kit for Honda Rancher 420 SRA Only (07-13) (5 pages)
- Outlaw Clutch Kit for Arctic Cat 550 H1 Prowler EFI 4x4 (09-11) (2 pages)
- Outlaw Super Duty Extreme Clutch Kit for Polaris 800 RZR (08-09) (2 pages)
- DynoJet Jet Kit for Arctic Cat 400 2x4 (99-01) (2 pages)
- Outlaw Clutch Kit for Polaris 500 Sportsman HO Carb (06) & (08-12) Non-EBS (2 pages)
- Lift Kit for Arctic Cat 500i (02-04) (3 pages)
- DynoJet Jet Kit for Yamaha Grizzly 350 Auto IRS (07-11) (2 pages)