Grounding instructions, Before you invert, Height setting: adjust the main shaft – Activeforever Teeter Hang Ups Contour Power Inversion Table User Manual
Page 2: Ankle comfort dial: find your setting, Prepare to mount
BEFORE YOU INVERT
make sure that the table rotates smoothly to the fully
inverted position and back (Figure 1), and that all fasteners are secure. Make sure the user
settings described below are properly adjusted for your unique needs and body type. Take
your time finding your proper settings and remember them. Check these settings every time
prior to using the equipment.
Height Setting: Adjust the Main Shaft
The height settings are labeled on the Main Shaft in both inches and centimeters.
• Loosen the De-Rattler Knob.
• Pull out the height selector locking pin with your right hand while sliding the Main
Shaft
with your left (Figure 2).
• Slide the Main Shaft until the last setting you can read is equal to your height. e.g.
If you’re 5’10” (178 cm) the last numbers you’ll be able to read will be 5’10” (178 cm).
• Release the height selector locking pin so that it fully engages in a hole. If you choose,
re-tighten the De-rattler knob.
Ankle Comfort Dial: Find Your Setting
• The Ankle Comfort Dial can rotate into a High or Low setting (Figure 3). There is a
one inch height difference between the settings. The setting you select will vary by the
type of shoes you wear and your ankle type. Try inverting in both settings to determine
which one is most comfortable for you.
• The Ankle Comfort Dial should be set so the ankle clamps are secure around the
smallest part of the ankles (with minimal distance between the ankle clamp and the top
of your foot), this will reduce sliding on the Table Bed while inverted.
Prepare to Mount
•
ALWAYS
wear securely tied lace-up, flat soled shoes, such as a normal tennis shoe.
•
DO NOT
wear boots, any thick soled, high-top style or any shoe that extends above
the anklebone. This type of footwear could interfere with properly securing your ankles.
1.2
R
Figure 2
Figure 1
GROUNDING INSTRUCTIONS
• This product must be grounded. If it should malfunction or break down, grounding provides a path
of least resistance for electric current to reduce the risk of electric shock. This product is equipped
with a cord having an equipment-grounding conductor and a grounding plug. The plug must be
plugged into an appropriate outlet that is properly installed and grounded in accordance with all
local codes and ordinances.
DANGER
- Improper connection of the equipment-grounding conductor can result in a risk of
electric shock. Check with a qualified electrician or serviceman if you are in doubt as to whether
the product is properly grounded. Do not modify the plug provided with the product - if it will not
fit the outlet, have a proper outlet installed by a qualified electrician.
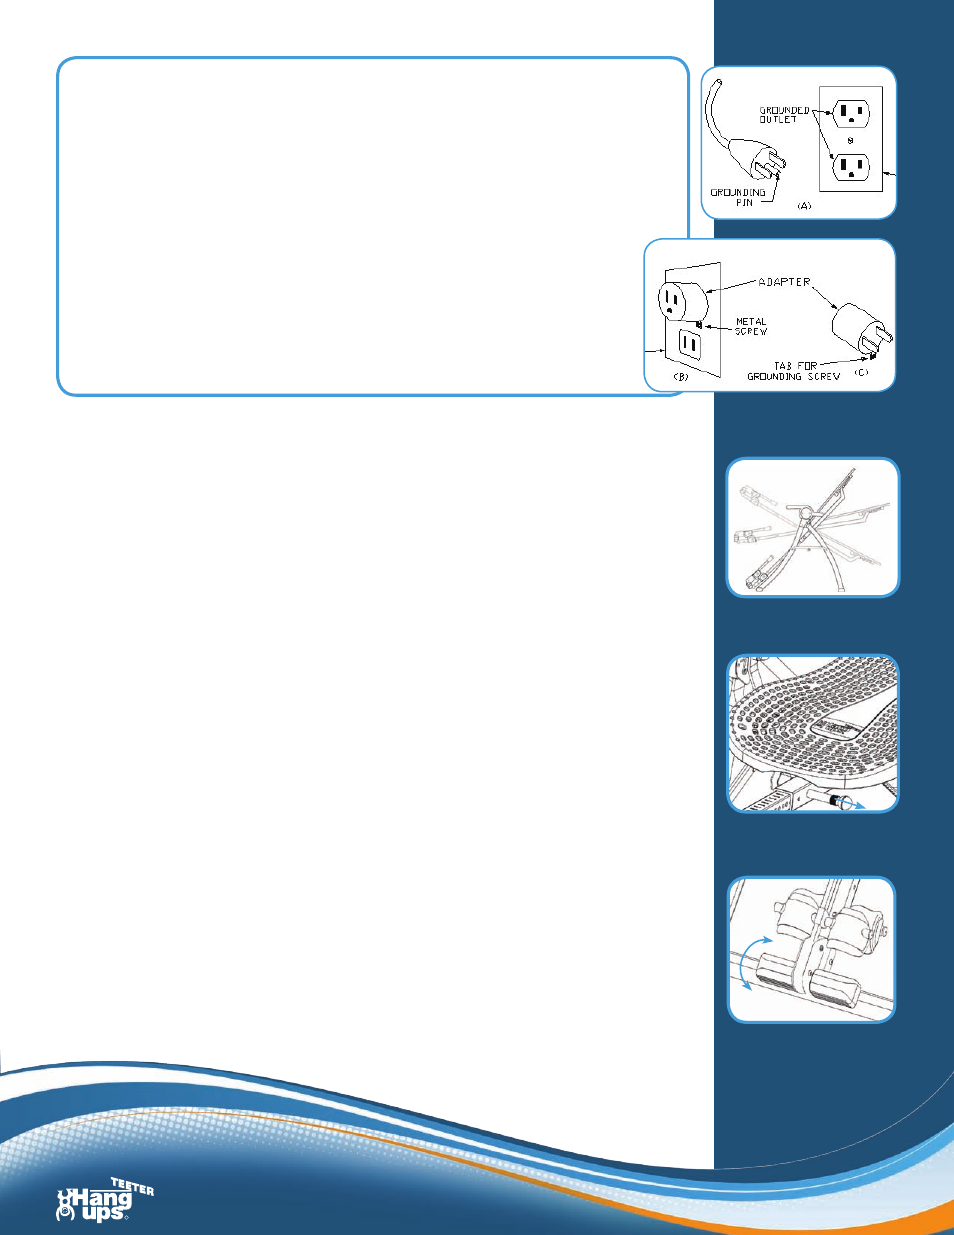
• This product is for use on a nominal 120-V circuit, and has a grounding plug that looks
like the plug illustrated in Figure A1. A temporary adapter that looks like the adapter
illustrated in Figure A2 may be used to connect this plug to a 2-pole receptacle as shown
in Figure A2 if a properly grounded outlet is not available. The temporary adapter should
be used only until a properly grounded outlet (Figure A1) can be installed by a qualified
electrician. The green colored rigid ear, lug, or the like extending from the adapter must
be connected to a permanent ground such as a properly grounded outlet box cover.
Whenever the adapter is used, it must be held in place by a metal screw.
Figure A1
Figure A2
Figure 3