Adjusting the audio settings, Adjusting the advanced audio settings – Vizio E3D420VX User Manual
Page 27
18
5
E3D320VX / E3D420VX / E3D470VX
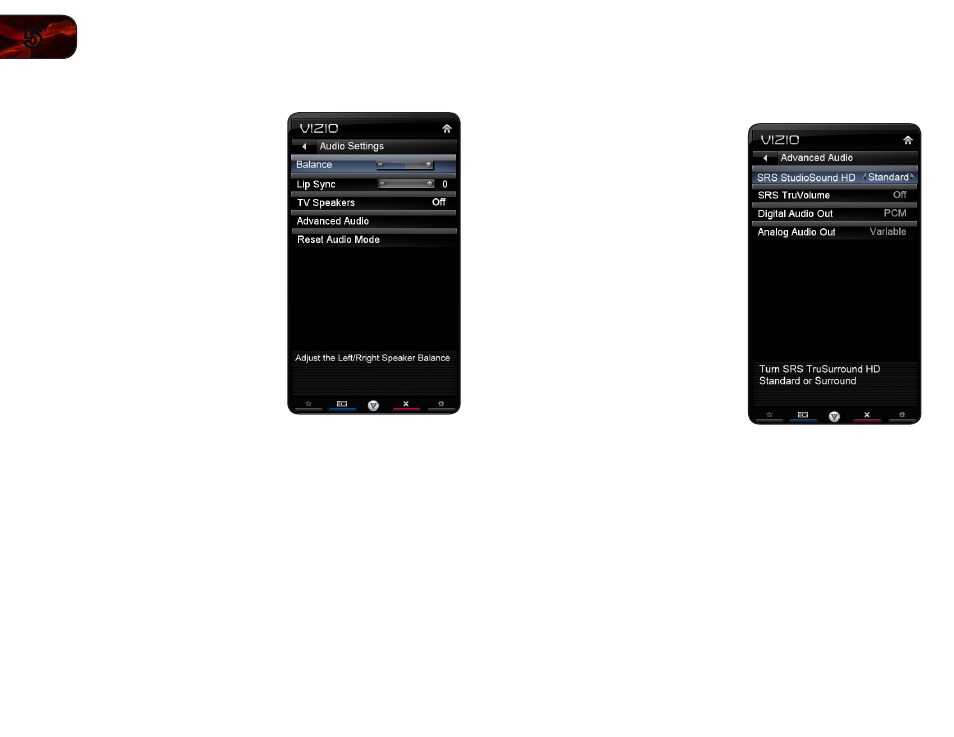
Adjusting the Audio Settings
To adjust the audio settings:
1. Press the
MENU button on the remote.
The on-screen menu is displayed.
2. Use the
Arrow buttons on the remote
to highlight
Audio and press OK. The
Audio Settings menu is displayed.
3. Use the
Arrow buttons to highlight
the setting you wish to adjust, then
press
Left/Right Arrow to change the
setting:
• Balance - Adjusts the loudness of
the audio output from the left and
right speakers.
• Lip Sync - Adjusts the synchroni-
zation between the display image
and the accompanying audio
track.
• TV Speakers - Turns the built-in
speakers on or off.
• Advanced Audio - See Adjusting the Advanced Audio Settings on
• Equalizer Settings - Adjusts the boost or attenuation of different
frequencies. (This setting is only available when SRS StudioSound
HD is set to
Standard.) Change the equalizer presets by selecting
Flat, Rock, Pop, Classical, or Jazz. To change the equalizer settings
yourself, highlight
EQ Mode and press OK.
• Reset Audio Mode - Restores the audio settings to the factory
defaults. See
Resetting the Audio Settings on page 19.
4. When you have finished adjusting the audio settings, press the
EXIT button
on the remote.
Adjusting the Advanced Audio Settings
To adjust the advanced audio settings:
1. From the Audio Settings Menu, use the
Arrow buttons to highlight Advanced
Audio, then press OK. The Advanced
Audio menu is displayed.
2. Use the
Arrow buttons to highlight
the setting you wish to adjust, then
press
Left/Right Arrow to change the
setting:
• SRS StudioSound HD -
StudioSound HD™ is a feature-rich
surround sound solution which
delivers an immersive surround
sound experience from the TV’s
internal speakers. Additionally,
StudioSound HD completes the
entertainment experience by
maintaining a steady volume
while watching programming and
movies, providing deep, rich bass,
and delivering crisp details and
clear, intelligible dialog. Select
Surround or Standard.
• SRS TruVolume - TruVolume™
intelligently normalizes volume
fluctuations due to television
commercials or channel changes.
Select On or Off.
• Digital Audio Out - Changes the type of processing for the Optical
output when connected to a home theater audio system. Select Dolby
Digital, PCM, or Off.
• Analog Audio Out - Sets the volume control properties for the analog
RCA (red/white) connectors when connected to a home theater audio
system. Select
Variable to control the external speakers’ volume
from the TV’s volume controls, or select
Fixed to control the external
speakers’ volume from your home theater system controls.
3. When you have finished adjusting the advanced audio settings, press the
EXIT button on the remote.