Connecting an av amplifier with a built-in decoder, Getting started – Yamaha DVD-S1200 User Manual
Page 7
7
Getting started
STANDBY
/ON
NATURAL SOUND AV RECEIVER RX–V3000
INPUT MODE
INPUT
VOLUME
SILENT
PHONES
SPEAKERS
B
A
PROCESSOR
DIRECT
BASS
EXTENSION
BASS
TREBLE
REC OUT/ZONE 2
VIDEO AUX
VCR 1
SAT
CABLE
D-TV/LD
DVD
SOURCE
/REMOTE
MD/TAPE
CD-R
TUNER
CD
PHONO
VCR 2/DVR
EFFECT
6CH
INPUT
TUNING
MODE
MEMORY
S VIDEO
VIDEO
L
R
OPTICAL
AUDIO
MAN'L/AUTO FM AUTO/NAN'L MONO
FM/AM
PRESET
/TUNING
DSP
PROGRAM
EDIT
VIDEO AUX
S VIDEO
AV1
AV2
AC IN
VIDEO
MIXED 2CH
COAXIAL
OPTICAL
PCM /
DIGITAL
DTS
1
L
2
VIDEO OUT
AUDIO OUT
6CH DISCRETE
SURROUND
MAIN
CENTER
SUBWOOFER
R
R
R
L
L
VIDEO
IN
»
A
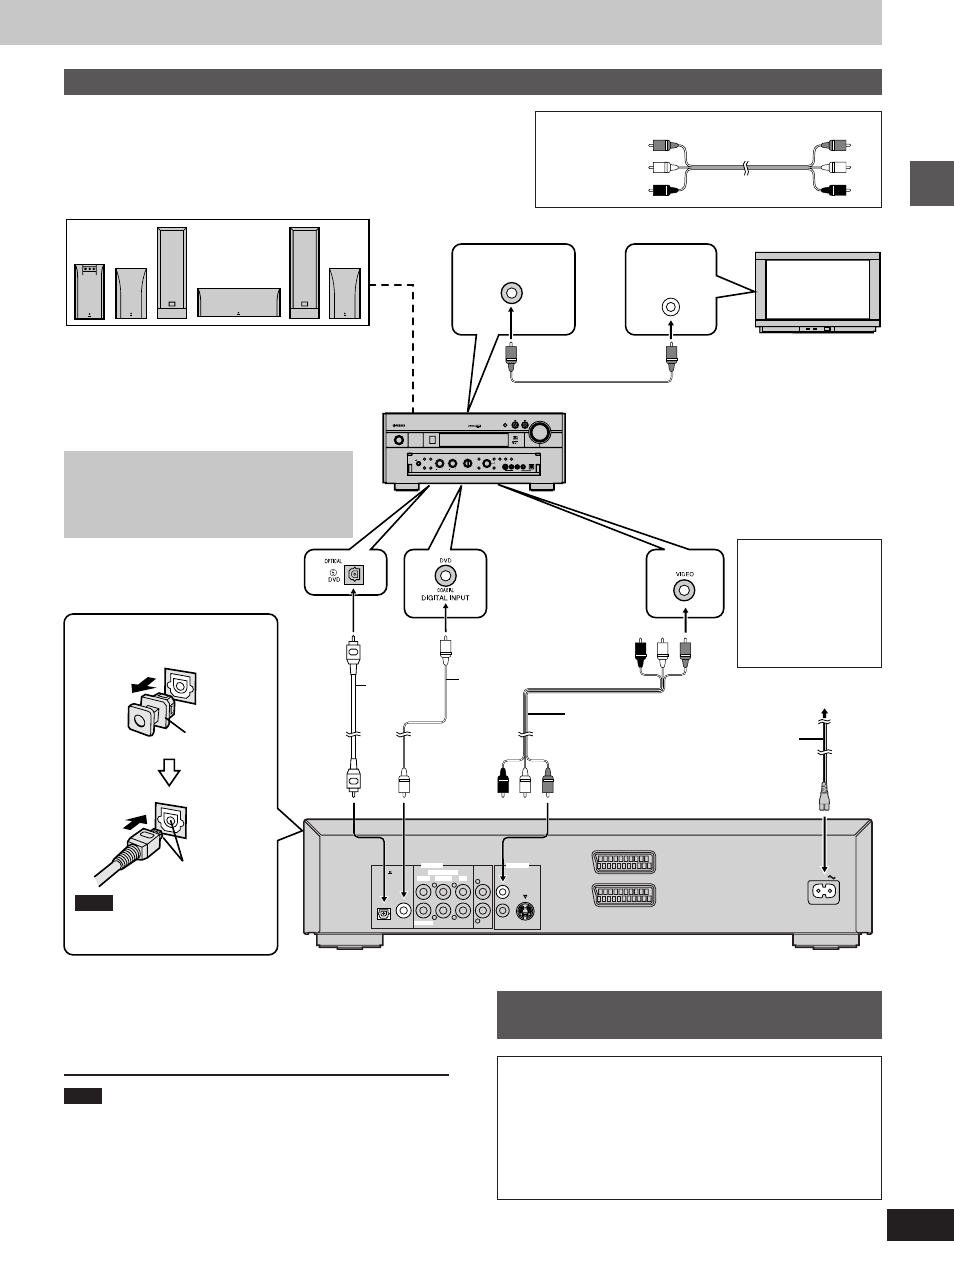
Connecting an AV amplifier with a built-in decoder
Before connection
³
Do not connect the AC mains lead until all other connections are complete.
³
Refer to the amplifier’s operating instructions.
Audio/video cable (included)
Yellow (VIDEO)
White (L)
Red (R)
Speakers
³
You can enjoy surround sound by connecting from
three to six speakers.
Example: Six speakers
³
If you do not connect a subwoofer, it is advisable to
connect main speakers (L/R) capable of producing
bass of less than 100 Hz.
MONITOR OUT
terminal
Television
Video cable
AV amplifier
VIDEO INPUT
terminal
Audio/video cable
(included)
To household mains socket
(AC 220–240 V, 50 Hz)
AC mains lead
(included)
Back of the unit
FOR UNITED KING-
DOM ONLY
READ THE CAU-
TION FOR THE AC
MAINS LEAD ON
PAGE 3 BEFORE
CONNECTION.
Do not connect the unit’s video output
through a video cassette recorder
The video from this unit may not be played correctly
due to copy-guards if you connect a video cassette
recorder between the unit and your television.
Change PCM Down Conversion, Dolby Digital, DTS
Digital Surround, and MPEG to suit the equipment
(
á
pages 24 and 28).
Note
You cannot use DTS Digital Surround decoders not suited to DVD-
Video.
»
C
Connection to digital audio
equipment without a decoder
You can still enjoy audio using the connections described
above. Make the following settings (
á
pages 24 and 28).
Digital Audio Output
Select “On”
PCM Down Conversion
Select “Yes”.
Dolby Digital/DTS Digital Surround/MPEG
Select “PCM”.
Optical
digital
audio cable
Do not bend
when
connecting.
DIGITAL INPUT
(OPTICAL) terminal
Note when connecting the
optical digital audio cable
Align the plug with
the terminal
Note
Keep the dust cap and reattach
when not using the terminal.
Coaxial
cable
DIGITAL INPUT
(COAXIAL) terminal
OR
Remove the
dust cap