Outlaw Audio 990 User Manual
Page 24
24
Outlaw Audio
Owner’s Manual
25
Model 990 7.1 Channel Preamp/Processor
Owner’s Manual
3. If you are configuring a video input, skip to the Step 4. If you wish
to configure an audio-only input (such as CD or Aux), press the
button until the onscreen narrow points to “Go to Audio Inputs,” then
press SET.
The Audio-Only Input Configuration Selection screen will appear:
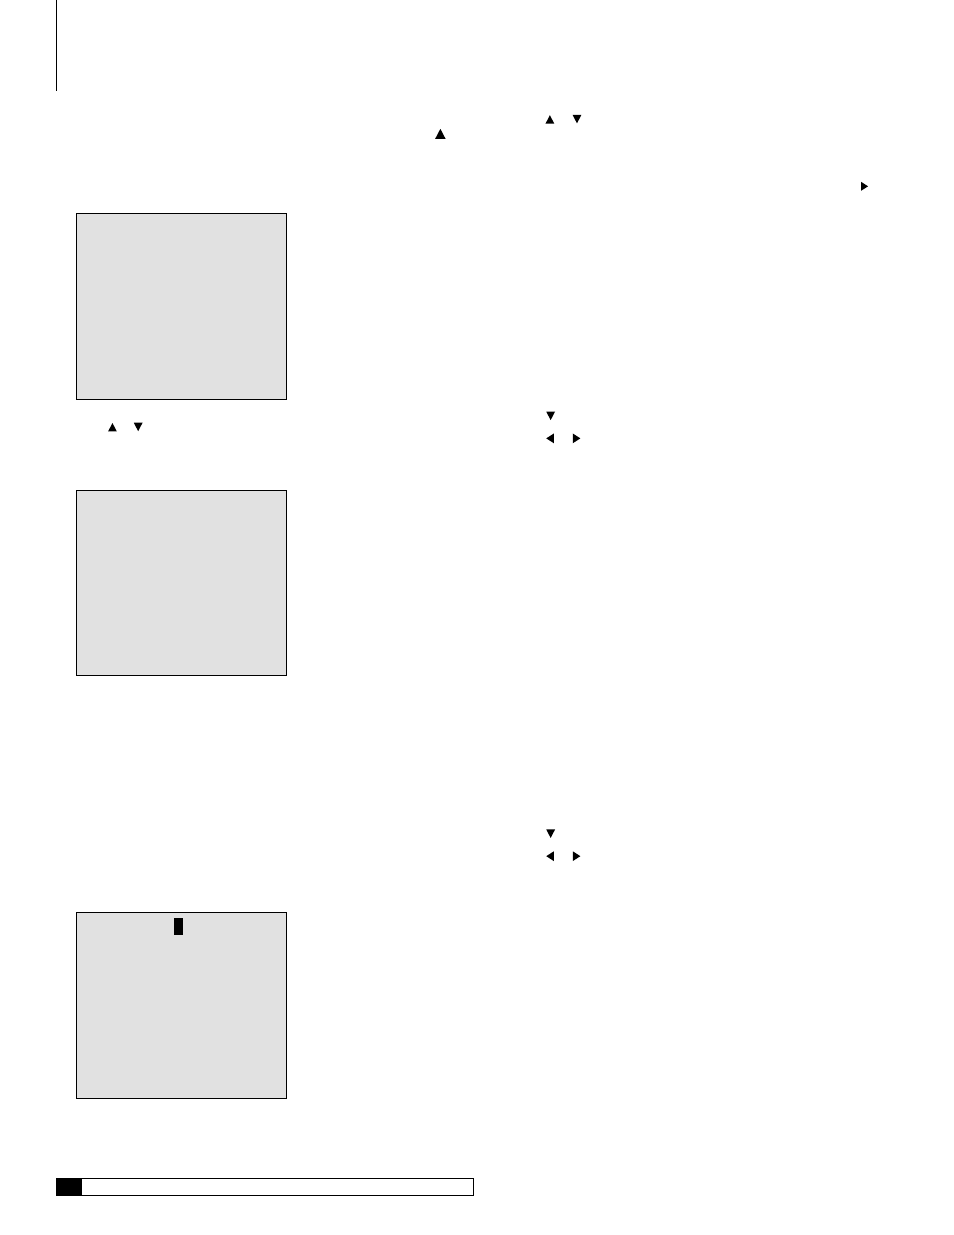
AUDIO INPUT CONFIG
> TUNER
CONFIG
CD
CONFIG
AUX
CONFIG
PHONO
CONFIG
TAPE
CONFIG
GO TO VIDEO INPUTS
RETURN TO MAIN MENU
4. Press or on the front panel or the remote to move the on-screen
arrow to the input you want to configure, then press SET.
The Configuration Screen for that input will appear:
DVD
CONFIG
> NAME:
DVD
AUDIO
:COAXIAL 1
VIDEO
:COMP 1
OSD MSG :ON
SURR MODE :UPSAMPLE
LIP SYNC DELAY:000mS
TRIGGER 2 : OFF
RETURN TO VIDEO INPUTS
RETURN TO MAIN MENU
Renaming Video Inputs
Although the Model 990’s video inputs are already named, you may rename
them to better reflect the identity of your video sources—for example, you might
rename the VIDEO 2 input to SATELLITE. Of course, you cannot rename the
input selector buttons on the remote control, but you can change the way the
names appear on the Model 990’s front panel and on-screen display.
To rename an input:
1. With the arrow pointing to NAME, press SET.
A cursor will start to flash above the first letter in the input name:
DVD
CONFIG
> NAME:
D
VD
AUDIO
:COAXIAL 1
VIDEO
:COMP 1
OSD MSG :ON
SURR MODE :UPSAMPLE
LIP SYNC DELAY:000mS
TRIGGER 2 : OFF
RETURN TO VIDEO INPUTS
RETURN TO MAIN MENU
2. Press or to find the letter, number, or symbol you want.
Uppercase and lowercase letters are available, as are numbers 0-9, vari-
ous punctuation symbols, and blank spaces.
3. Once you have selected the letter, number, or symbol, press to
move on to the next letter.
Repeat the process for each letter in the name.
4. When you are finished renaming the input, press SET to continue
configuring the input.
Audio Input Selection
Now you need to tell the Model 990 which audio input is used for the source
device you are configuring. You may want to reference the system chart you
filled out when you connected your source devices to the Model 990.
To select the audio input:
1. Press once to move the on-screen arrow to Audio.
2. Press or to scroll through the available audio inputs.
The input choices appear as follows as you scroll through them:
ANALOGCOAXIAL 1COAXIAL 2OPTICAL 1
OPTICAL 2OPTICAL 3OPTICAL 4OPTICAL 5
USB
If you connected the source to the analog inputs, select ANALOG.
If you connected the source to one of the optical inputs, select the
appropriate one by choosing OPTICAL 1-5.
If you connected the source to one of the coaxial inputs, select the
appropriate one by choosing COAXIAL 1 or 2.
If you connected the source to the USB input, select USB.
Video Input Selection
Now you need to tell the Model 990 which video input is used for the source
device you are configuring. You may want to reference the system chart you
filled out when you connected your source devices to the Model 990.
To select the video input:
1. Press once to move the on-screen arrow to Video.
2. Press or to scroll through the available video inputs.
The input choices appear as follows as you scroll through them:
DVI 1DVI 2COMP-DVDCOMP 1COMP 2
S-VIDEOCOMPOSITE
If you connected the source to the composite input for that source,
select COMPOSITE.
If you connected the source to the S-Video input for that source, select
S-VIDEO.
If you connected the source to one of the component inputs, select the
appropriate one by choosing COMP 1, COMP 2, or COMP-DVD.
If you connected the source to one of the DVI inputs, select the appropri-
ate one by choosing DVI 1 or DVI 2.
D
Input Configuration