Input configuration – Outlaw Audio 990 User Manual
Page 23
22
Outlaw Audio
Owner’s Manual
23
Model 990 7.1 Channel Preamp/Processor
Owner’s Manual
DC Trigger
The Model 990 has two DC TRIGGER OUT jacks.
DC TRIGGER OUT 1
is always used to turn on other devices when the Model
990 is powered on, and to turn them off when you turn off the Model 990.
We recommend this jack with a compatible power amplifier, such as those
available from Outlaw.
Use a cable tipped at each end with a 1/8-inch (3.5mm) mono phone plug
to connect the Model 990’s DC TRIGGER OUT 1 jack to the amplifier’s DC
Trigger Input jack.
DC TRIGGER OUT 2
is an assignable trigger that activate devices that you want
to use only with specific inouts. For example, you can activate DC TRIGGER
2 for video inputs, to lower a projection screen and turn on a video projector.
This way, your video system turns on automatically when you select a video
input on the Model 990. You can also use DC TRIGGER 2 to close motorized
drapes or shades, or dim automated lighting.
To select whether or not an input triggers DC TRIGGER OUT 2, see page 25.
Use a cable tipped at each end with a 1/8-inch (3.5mm) mono phone plug
to connect the Model 990’s DC TRIGGER OUT 2 jack to the DC Trigger Input
jack on the component you want to control. You may have to use an adapter,
depending on what type of input jack the other component uses.
RS-232 Port
The Model 990’s RS-232 port can be used to control the Model 990 through
a computer touchscreen remote, or to upload new software into the
Model 990.
NOTE: When making connections to the RS-232 port, be certain to use
a “straight-through” male-to-female serial cable with DB-9 connectors on
each end. DO NOT use a serial cable designed for “null madem” use.
Power Connection
Insert the supplied power cord into the AC input of the rear panel of the Model
990. Use only the supplied power cord—do not substitute a standard IEC type
power cord.
CAUTION: Before you plug the power cord into an AC wall outlet, con-
firm that oil connections to the Model 990 have been made correctly.
WARNING: Never disconnect the power cord from the Model 990
while the other end is plugged into on AC outlet. Doing so may cause
an electric shock. Always connect power by plugging into the AC outlet
last and disconnect by unplugging from the AC outlet first.
Input Configuration
Your first step in setting up the Model 990 is to configure its inputs. In this step,
you will tell the Model 990 which signals you are feeding it from each source
device. You can also customize each input, assigning it a new name, a default
surround mode, a default lip-synch delay, etc.
Before you begin input configuration, make sure all of the connections have
been made from your Model 990 to your source components, amplifier(s),
and speakers.
First, you turn on both the Model 990 and your video display.
To turn the Model 990 on:
1. Press the MASTER POWER ON/OFF button on the unit’s rear panel
in until it latches.
The Standby/On indicator on the front panel will glow amber.
2. Press the STANDBY button on the front panel, or any input select
button (such as DVD, VIDEO 1, or CD) on the remote control.
The Standby/On indicator will turn blue, and the front-panel display
will illuminate.
To configure an input:
1. Press the MENU button on the front panel or the remote to display
the Main Menu.
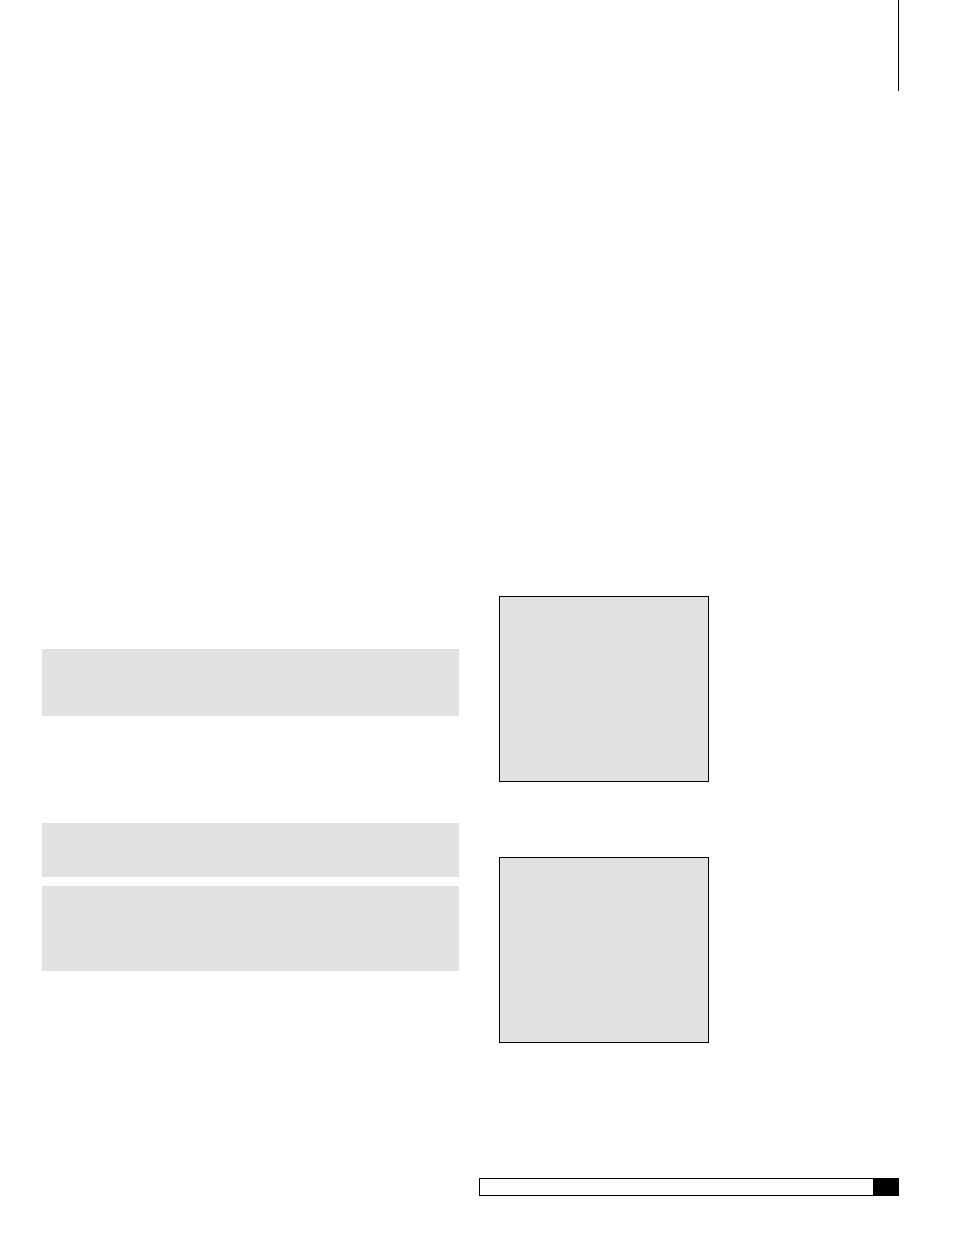
The Main Menu appears on-screen:
MAIN MENU
> INPUT
CONFIG
AUTO SETUP
SPEAKER
SIZE
SPEAKER
X-OVER
SURROUND CONFIG
CHANNEL
CALIBRATE
DELAY
ADJUST
SYSTEM
CONFIG
MULTI-ROOM CONFIG
2. Press SET on the front panel or the remote.
The Video Input Configuration Selection screen appears:
VIDEO INPUT CONFIG
> DVD
CONFIG
VIDEO 1
CONFIG
VIDEO 1
CONFIG
VIDEO 1
CONFIG
VIDEO 1
CONFIG
VIDEO 1
CONFIG
7.1 DIRECT CONFIG
GO TO AUDIO INPUTS
RETURN TO MAIN MENU
Input Configuration