Maintenance, Latch adjustment, Log replacement – Regency FIREGENIE FG37-NG User Manual
Page 23: Glass replacement
FG37 Regency Rear Flued Room Sealed Freestanding Gas Heater
23
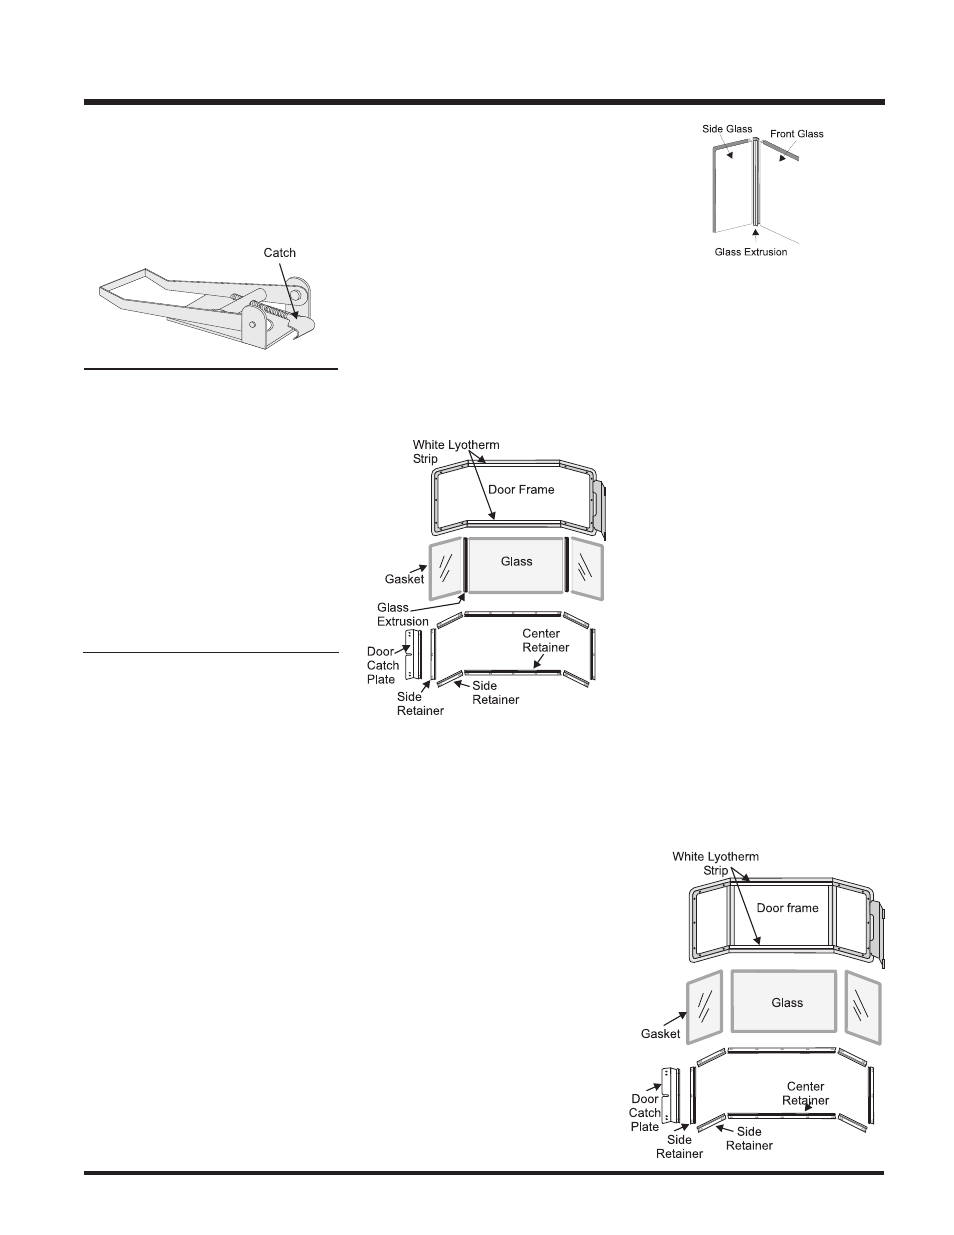
LATCH ADJUSTMENT
The door latch may require adjustment as the
door gasket material compresses after a few
fires and after glass replacement. Turn the
handle on the adjustable catch to tighten or
loosen the latch.
Installing Glass
1) Install both center and side glass onto
extrusions as per diagram.
2) Place glass assembly into door frame.
3) Install retainers by placing 1 drop of glue
where previously glued and put in place.
4) Install side retainers.
5) Install door catch plate.
6) Install the 24 nuts loosely, do not tighten
yet.
7) Tighten side panels nuts using the follow-
ing procedure:
a. tighten top & bottom outside corner
nuts (2)
b. tighten inside nuts (3)
c. tighten top & bottom inside corners (2)
PANEL DOOR
1) Remove the door from the unit and place on
a soft surface to prevent scratching.
2) Pull out the door gasket.
3) Remove the nuts holding the glass retain-
ers in place.
4) Remove the glass retainers (sides, top and
bottom) and the door catch plate.
5) Replace the glass. The glass must have
gasketing around it.
6) Reverse the previous steps, replace the
retainers and fasten with the nuts but do
not overtighten, as this can break the
glass. Note: the door catch plate fits on top
of the left side retainer.
7) Put gasket glue on the retainers, but do not
put glue on the screws. Replace the door
gasket, the two ends butt tight together on
the bottom edge of the door.
8) Replace door on the stove and check the
seal.
8) Tighten the 10 nuts on center glass retain-
er.
9) Repeat step 7 for other side panel.
10) Replace new gasket by gluing it in place.
11) Install door onto stove and check the seal.
MAINTENANCE
LOG REPLACEMENT
The unit should never be used with broken logs.
Turn off the gas valve and allow the unit to cool
before opening door to carefully remove the
logs. The pilot light generates enough heat to
burn someone. If for any reason a log should
need replacement, you must use the proper
replacement log. The position of these logs
must be as shown in the diagram under Log
Installation.
Note: Improper positioning of logs may
create carbon build-up and will al-
ter the units performance which
is not covered under warranty.
GLASS REPLACEMENT
Your Regency stove is supplied with high
temperature, 5 mm Neoceram ceramic glass
that will withstand the highest heat that your unit
will produce. In the event that you break your
glass, purchase your replacement from an
authorized Regency dealer only, and follow the
step-by-step instructions for replacement.
Never operate your unit with bro-
ken glass.
WARNING: Do not operate appli-
ance with the glass front removed,
cracked or broken. Replacement of
the glass should be done by a li-
censed or qualified service person.
MITRED DOOR
Removing Glass:
Note: Wearing gloves will protect your
hands while handling glass.
1) Remove the door from the unit and place on
a soft surface to prevent scratching.
2) Pull out the door gasket.
3) Remove the 24 nuts holding the glass retain-
ers in place. Do not remove the nuts under-
neath the retainers.
4) Remove the door catch plate.
5) Remove glass retainers on sides first (3
each side) then remove two center retain-
ers.
Note: Center glass retainers are glued
to center glass.
6) Remove glass from extrusions. When re-
moving center glass, leave white insulation
in place.