Raypak RayTemp Hot Water Energy Management Control User Manual
Page 4
4
WHAT COMES WITH THE CONTROL
Before arriving at the job site to begin the installation, it’s important to first inspect the system and
determine what materials you will need. Some parts are included with the control while the oth-
ers you will need to provide. Check the following list to verify that you received the following
parts.
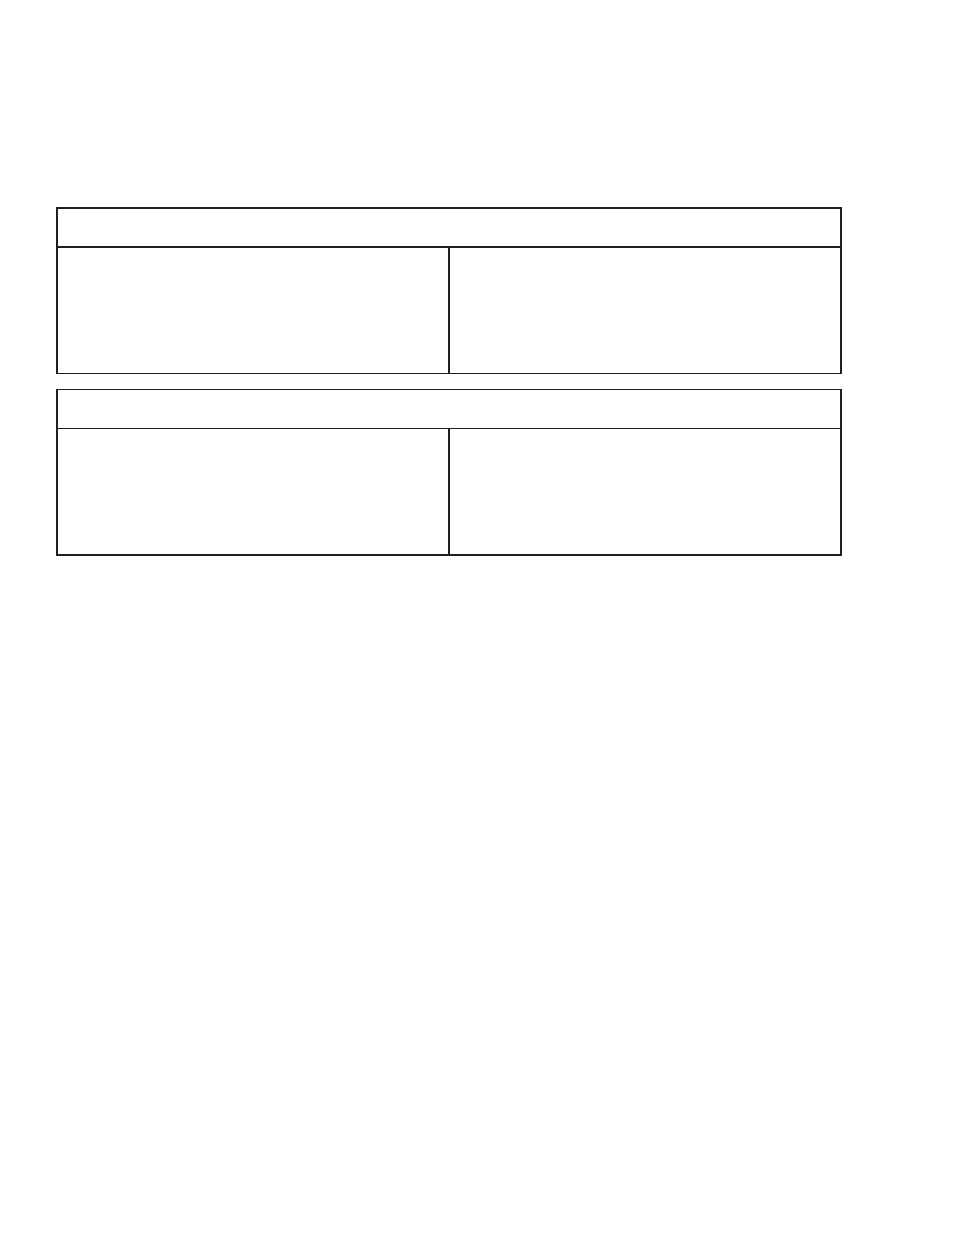
1 Control, 10.5” x 8” x 3.5”
1 Panel Cover, Metal, 4” x 7.5”
4 Mounting Screws, 3/4”
2 Temperature Sensors, Copper housing,10 K
Ohm at 25°C
4 Cable Ties,15”, black, -40ºF to 221ºF rated
2 Knockout Connectors, 1/2” to romex
1 Warranty Card
1 Manual
1 24v Grounded Transformer
Cable, twisted pair with shield, stranded, 18
AWG. Belden type 8208 (braid shield) or 9552
(2 twisted pairs, foil shield)
Thermal Insulation Tape
Cable Ties
Wire Nuts
Heat Conducting Paste
Section 2. INSTALLING THE CONTROL
The control should be mounted on a wall, preferably at eye level with AC power as close as pos-
sible. Consider the length of cable required for routing along walls, along pipes, and for connect-
ing the temperature sensors.
Notice on the bottom of the control that two of the five knockouts have been removed for rout-
ing of cables. If you want to use one or more of the other knockouts, these should be removed
before mounting the control onto the wall.
ATTACHING THE TEMPERATURE SENSORS
To get an accurate reading of the water temperatures, the sensors must be in good thermal con-
tact with the pipe. Follow this procedure when connecting the temperature sensors.
Procedure for Connecting Temperature Sensors to Pipes:
1. Remove any existing insulation.
2. Clean the pipe surface using sandpaper.
3. Apply thermal conducting paste to the pipe surface.
4. Fasten the sensor tightly to the pipe using the black cable tie.
5. Attach 18 AWG shielded cable to the 6 in. leads using wire nuts or electrical tape.
6. Fasten the cable to the pipe using a second black cable tie.
7. Replace the existing insulation or wrap thermal insulation tape around the pipe.
Overlap each turn and DO NOT STRETCH the tape.
Included in the box
Other parts you will need