RCA RCR412S User Manual
Page 2
3
2
Battery Installation
and Information
Your universal remote requires two AA Alkaline batteries
(batteries may or may not be included, depending on model).
To install the batteries:
Your universal remote control saves battery power by automatically turning
off if any key is pressed for more than 60 seconds. This saves your
batteries should your remote get stuck in a place where the keys remain
depressed, such as between sofa cushions.
1. Remove the battery compartment cover.
2. Insert the batteries, matching the
batteries to the (+) and (-) marks inside
the battery compartment.
3. Press and push the battery cover back
into place.
Note:
Reprogramming may be required
after batteries are replaced.
Congratulations on your purchase of this four-component universal
remote. This universal remote controls up to four electronic
components and makes juggling remote controls a thing of the past.
You can program your RCA brand universal remote to operate most
models of most brands of infrared, remote-controlled components
manufactured after 1990. (See the enclosed Code Lists for a complete
list of brands.) This remote is unusually versatile because it has a
VCR·AUX
key that you can program to control any video component.
The four-component universal remote is easy to use, easy to program
and gives you control at the touch of your fingertips.
TIP:
The four-component universal remote is already programmed
to operate most RCA, GE and PROSCAN branded TVs, VCRs, DVD
players and satellite receivers. Just press the corresponding key—DVD
key for a DVD player; TV key for a television; SAT·CBL for a satellite
receiver or a cable box; or the VCR·AUX key for a VCR.
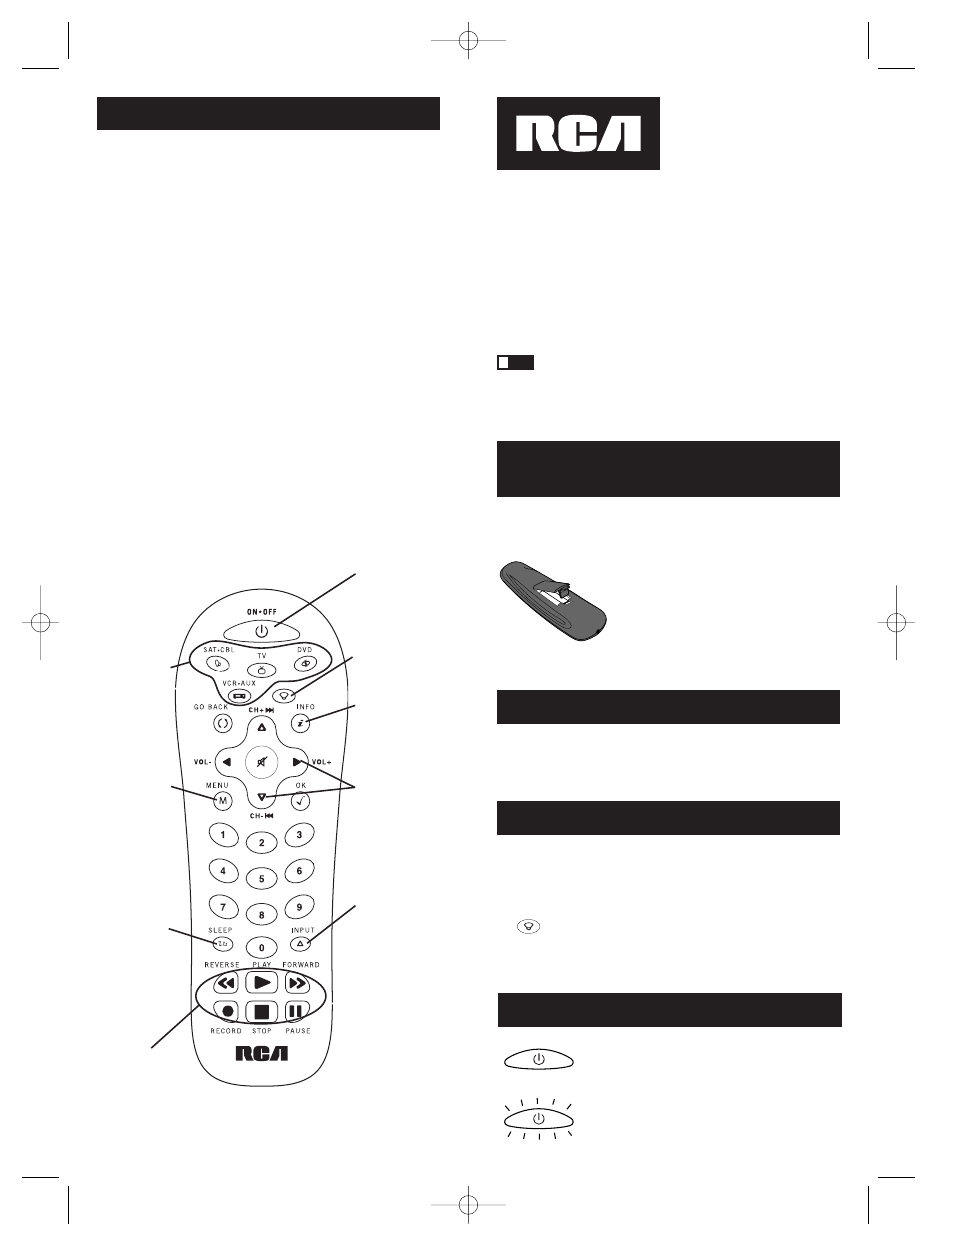
Component keys.
(
TV, DVD,
VCR·AUX,
SAT·CBL
)
CH
and
VOL
keys have dual
functions. They act
as navigation keys
(UP, DN, RT, LT
ARROW keys) in
menu systems.
INPUT
key –
Toggles through all
the video sources
connected to your TV,
when the remote is
in VCR mode, it
toggles between VCR
and TV input.
Dedicated
MENU
key for DVD disc
menus, satellite
receivers and
some TVs.
SLEEP
key – Allows
you to set a time to
turn off your TV
automatically.
Table of Contents
Product Diagram . . . . . . . . . . . . . . . . . . . . . . . . . . . . . . . . . . . . . . . . . .2
Introduction . . . . . . . . . . . . . . . . . . . . . . . . . . . . . . . . . . . . . . . . . . . . . .3
Battery Installation and Information . . . . . . . . . . . . . . . . . . . . . . . . . .3
Battery Saver . . . . . . . . . . . . . . . . . . . . . . . . . . . . . . . . . . . . . . . . . . . . .3
Backlighting . . . . . . . . . . . . . . . . . . . . . . . . . . . . . . . . . . . . . . . . . . . . . .3
Illuminated ON·OFF Key . . . . . . . . . . . . . . . . . . . . . . . . . . . . . . . . . . .3
Programming the Remote . . . . . . . . . . . . . . . . . . . . . . . . . . . . . . . . . . .4
Programming Methods . . . . . . . . . . . . . . . . . . . . . . . . . . . . . . . . . . . . .4
Brand Code Search and Entry . . . . . . . . . . . . . . . . . . . . . . . . . .4
Direct Code Entry . . . . . . . . . . . . . . . . . . . . . . . . . . . . . . . . . . .5
Manual Code Search and Entry . . . . . . . . . . . . . . . . . . . . . . . .7
Auto Code Search and Entry . . . . . . . . . . . . . . . . . . . . . . . . . . .8
Code Retrieval . . . . . . . . . . . . . . . . . . . . . . . . . . . . . . . . . . . . . . . . . . . .9
Using the Remote to Control Your Components . . . . . . . . . . . . . . . .10
On-screen Menus . . . . . . . . . . . . . . . . . . . . . . . . . . . . . . . . . . . . . . . . .11
Accessing and Selecting Menu Items . . . . . . . . . . . . . . . . . . .11
Exiting a Menu Mode . . . . . . . . . . . . . . . . . . . . . . . . . . . . . . . .11
Sleep Timer . . . . . . . . . . . . . . . . . . . . . . . . . . . . . . . . . . . . . . . . . . . . . .11
Programming the Sleep Timer . . . . . . . . . . . . . . . . . . . . . . . . .11
Troubleshooting . . . . . . . . . . . . . . . . . . . . . . . . . . . . . . . . . . . . . . . . . .12
Warranty . . . . . . . . . . . . . . . . . . . . . . . . . . . . . . . . . . . . . . . . . . . . . . . .39
Four-Component Universal Remote
BACKLIGHT
key –
Turns backlighting
on/off. (select
models only)
INFO
key –
Displays information
pertaining to the
component you are
currently controlling.
Illuminated
ON·OFF
key – Serves as an
indicator light to
provide feedback.
Actual model may vary from picture shown.
Battery Saver
Backlight illumination (available on select models only)
enables you to see the remote control keys better in the
dark. Backlight illumination is toggled on or off with
successive keypresses of the BACKLIGHT key. When
toggled on, the backlighting remains on as long as keys
are being pressed. The backlighting turns off six
seconds after the last keypress. Once the backlight time
has expired, any keypress will reactivate backlighting.
If the backlight illumination is on, and the BACKLIGHT
key is pressed, the backlight turns off.
Backlighting
!
Transport keys –
REVERSE, PLAY,
FORWARD, RECORD,
STOP
and
PAUSE
keys.
BACKLIGHT
The ON·OFF key powers components on and off.
It also lights up to serve as an indicator light,
providing feedback for various functions. When a
valid key is pressed, the illuminated ON·OFF key
remains lit as long as the key is pressed and turns
off when the key is released. The ON·OFF key also
blinks in Programming Mode or in Menu Mode to
provide feedback.
Illuminated ON·OFF Key
ON•OFF
ON•OFF
(BLINK)
RCR412S_NA_IB_REVA.qxd 5/21/04 1:03 PM Page 2