Entering text, Show enter name screen, Press [ ∫ ] (set) – Panasonic DMR-EH60 EN User Manual
Page 53: Co n ven ie nt fu n cti o n s
53
RQT8307
Co
n
ven
ie
nt
fu
n
cti
o
n
s
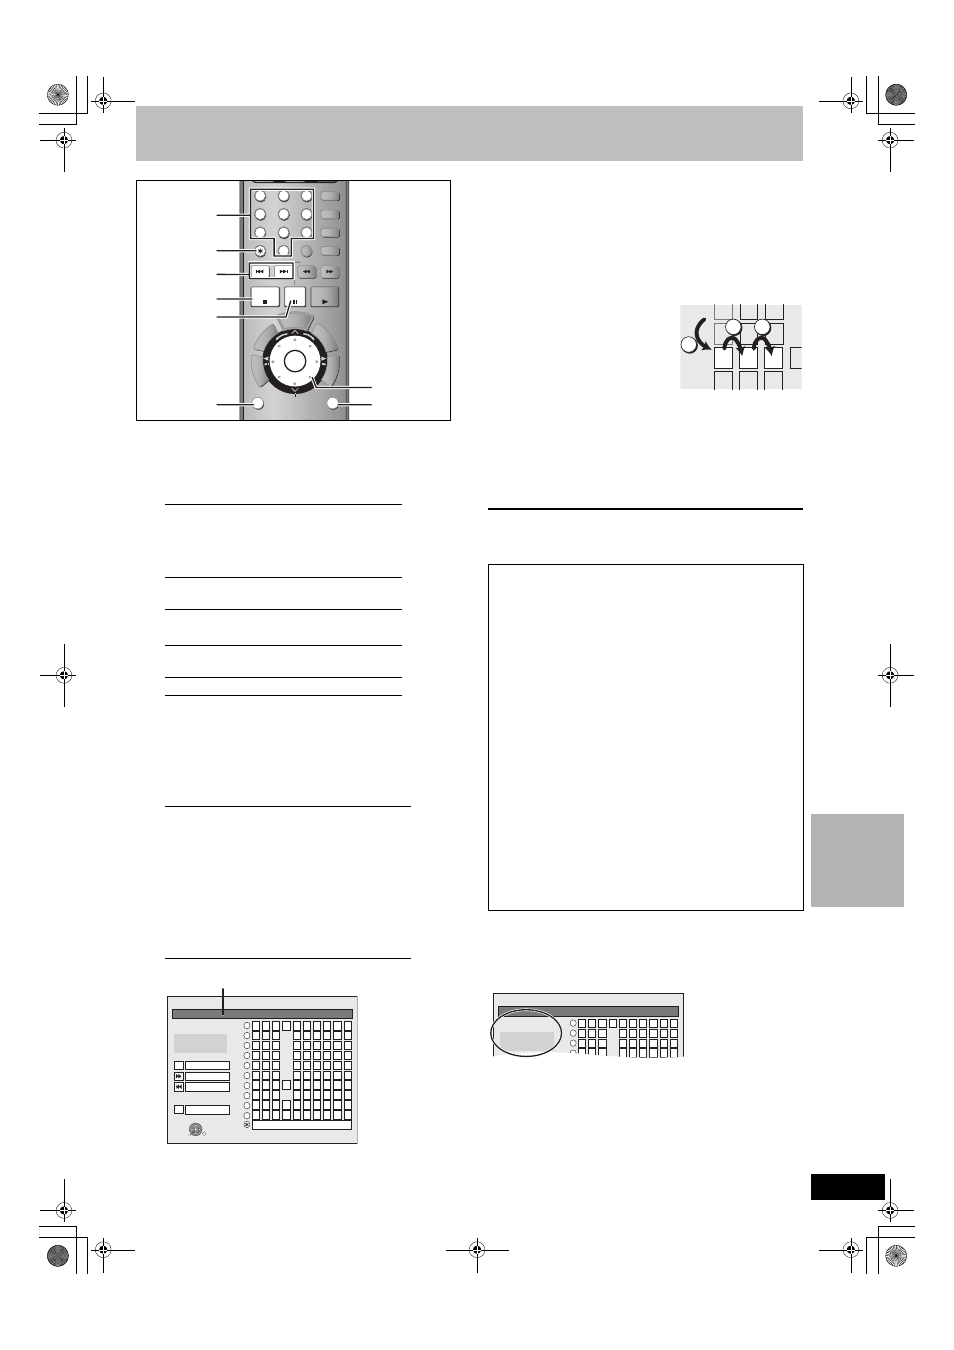
Entering text
[HDD] [RAM] [-R] [-RW‹V›] [+R] [SD]
You can give names to recorded titles, etc.
The maximum number of characters:
[Note]
If a name is long, parts of it may not be shown in some screens.
1
Show Enter Name screen.
2
Press [
3, 4, 2, 1] to select a
character and press [ENTER].
Repeat this step to enter other characters.
≥To erase a character
Press [
3, 4, 2, 1] to select the character in the name field
and press [
;]. (The selected characters are erased.)
≥Using the numbered buttons to enter characters
e.g., entering the letter “R”
1 Press [7] to move to the
7th row.
2 Press [7] twice to
highlight “R”.
3 Press [ENTER].
≥To enter a space
Press [
¢ CANCEL] and press [ENTER].
≥Save/recall phrases (
➡ below)
3
Press [
∫] (Set).
“Now writing.” appears then the screen returns to the Title
view screen and so on.
To end partway
Press [RETURN].
Text is not saved.
For your reference
If you enter a long name, only part of it is shown in the TOP MENU
after finalization (
➡ 52). When entering a title name, the name that
will appear in the TOP MENU can be previewed in “Top Menu
Preview (Finalized Disc)” window.
[HDD] [RAM]
Characters
Title
64
Playlist
64
Folder of still pictures
36
Disc (
[RAM])
64
[-R] [-RW‹V›] [+R]
Characters
Title
44
Disc
40
[SD]
Characters
Folder of still pictures
36
Title
Select “Title Name” in step 5 on page 38.
Playlist
Select “Playlist Name” in step 5 on page 41.
Disc
Select “Disc Name” in step 4 of “Providing a
name for a disc” on page 50.
Folder of still pictures
Select “Folder Name” in step
3 on page 42, “To
edit still picture folders”.
HDD
DVD
S
SD
1
2
3
4
5
6
7
8
9
FU
NC
TIO
N
S
TV GUIDE
SC
HE
DU
LE
CH
CH
SUB MENU
SUB MENU
TO
P
M
EN
U
S
DUBBING
DUBBING
DVD/TV
AUDIO
F Rec
SETUP
CANCEL
0
VCR Plus+
CM SKIP
SKIP
SLOW/SEARCH
STOP
STOP
PAUSE
PAUSE
PLAY/x1.3
ENTER
ENTER
RETURN
RETURN
CREATE
CREATE
CHAPTER
CHAPTER
Info
STATUS
STATUS
REC
REC MODE ERASE DISPLAY
D
IR
EC
T
N
AV
IG
AT
OR
TI
M
E
SL
IP
∫
RETURN
3,4,2,1
ENTER
SUB MENU
;
:,9
¢ CANCEL
Numbered
buttons
_
Title Name
1
2
3
4
5
A
B
C
a
D
E
F
d
G
H
I
N
O
g
J
K
L
j
M
m
6
7
8
9
0
b
c
i j
e
f
/
l %
h
i
fl $
*
&
k
l
O N @
n
]
_
o
[
Space
Set
Erase
P
Q
R
S
p
T
U
V
t
W
X
Y
Z
w
q
r
s
(
)
u
v
{
}
-
x
y
z
`
^
|
!
?
\
. ,
"
'
:
;
π
;
Top Menu Preview
(Finalized Disc)
ENTER
1
2
3
4
5
6
7
8
9
0
Phrase Save
Phrase List
Name field: shows the text you have entered
∫ To save phrases
You can save frequently used phrases and recall them later.
Maximum number of saved phrases: 20
Maximum number of characters per phrase: 20
After entering the phrase (step1–2)
1 Press [
3, 4, 2, 1] to select “Phrase Save” and press
[ENTER].
≥You can also press [9] to select “Phrase Save”.
2 Press [
2, 1] to select “Save” and press [ENTER].
≥Press [RETURN] to cancel.
∫ To recall a saved phrase
1 Press [
3, 4, 2, 1] to select “Phrase List” and press
[ENTER].
≥You can also press [:] to select “Phrase List”.
2 Press [
3, 4, 2, 1] to select the phrase to be recalled and
press [ENTER].
∫ To erase saved phrases
1 Press [
3, 4, 2, 1] to select “Phrase List” and press
[ENTER].
≥You can also press [:] to select “Phrase List”.
2 Press [
3, 4, 2, 1] to select the phrase to be erased.
3 Press [SUB MENU] to show “Erase Phrase” and press
[ENTER].
4 Press [
2, 1] to select “Erase” and press [ENTER].
5 Press [RETURN].
5
6
7
8
N
O
J
K
L
M
P
Q
R
S
T
U
V
7
7
7
Title Name
1
2
3
4
5
A
B
C
a
D
E
F
d
G
H
I
g
6
7
8
9
0
b
c
i j
e
f
/
l %
h
i
fl $
*
&
Top Menu Preview
(Finalized Disc)
1
2
3
4
Chapter 1
Chapter 1_
EH60English.book Page 53 Monday, July 4, 2005 10:39 AM