Manual programming, And 29) – Panasonic DMR-E30 User Manual
Page 29
29
Timer recording (continued)
Manual programming
[RAM] [DVD-R]
Remote control only
You can set your own programming conditions (up to 16
programmes).
Preparation
≥Switch [DVD, TV] (15) to “DVD”.
≥Ensure that this unit’s clock is set correctly.
≥Insert a disc for recording (make sure there is enough room for
the programme you are going to record plus a little extra).
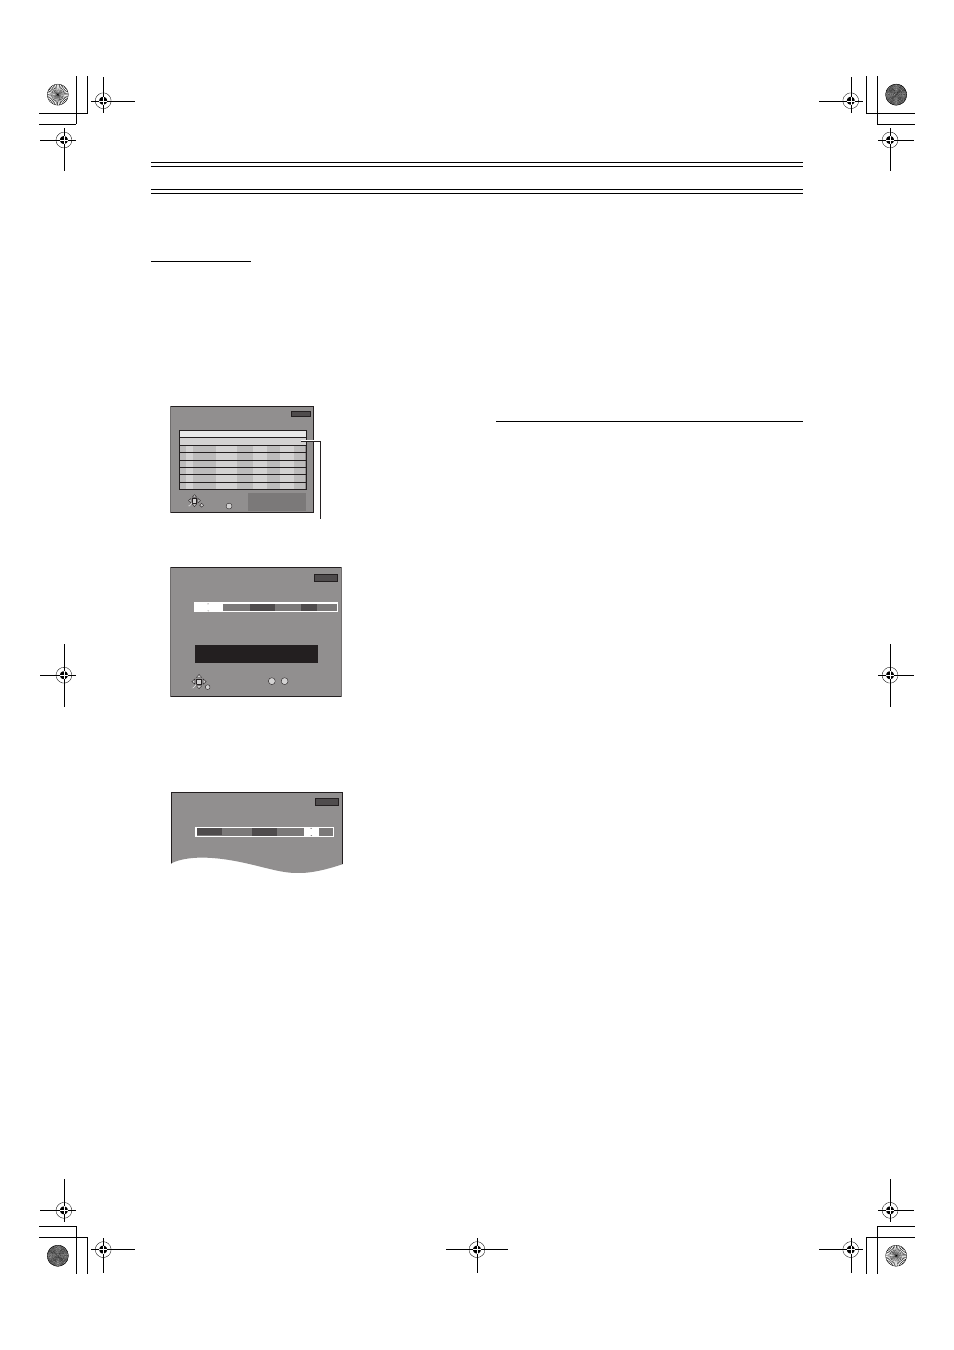
1
Press [PROG/CHECK]
(13).
≥The Timer Programme List screen appears.
A line that is ready for programming is highlighted.
2
Press [ENTER]
(10).
≥The Timer Programme Correction screen appears.
3
Use [
1] (10) to move through the items and change
the items with [
3, 4] (10).
≥The current settings are shown each time you press [1]
(10).
≥You may use the numeric buttons (4) to enter “Name”,
“Date”, “Start” and “Stop”.
≥Name (Programme Position/TV Station Name)
≥Date
Current date
>the day before one month later>
Daily (Sunday to Saturday)
>Daily (Monday to Saturday)>
Daily (Monday to Friday)
>Weekly (Sundays)>...>
Weekly (Saturdays)
≥Start (start time)/Stop (finish time)
The time increases or decreases in 30-minute increments if
you hold the button.
≥Mode (Recording mode)
XP
>SP>LP>EP>FR (page 21)
≥VPS/PDC (For Continental Europe)
ON
>OFF (
jjj
) (page 28)
4
Press [ENTER]
(10) when you have finished making
changes.
≥To continue programming:
Repeat steps 2, 3, and 4.
5
Press [PROG/CHECK]
(13) or [RETURN] (23).
To put the unit on recording standby
Press [
Á, TIMER] (12).
Ensure “
Á” lights on the unit’s display.
To change the timer recording programme
1) While the Timer Programme List Screen is being shown, use
[
3, 4] (10) to select the programme you want to change, and
press [ENTER]
(10) to show the Timer Programme Correction
screen.
≥You may also select programme by inputting a 2-digit
number using the numeric buttons
(4).
≥Use [2, 1] (10) to move to the page preceding or following
the one on display.
2) Move through the items with [
1] (10) and change the settings
with [
3, 4] (10) and press [ENTER] (10).
Note
≥The built-in clock employs 24-hour system.
≥The remaining time is not shown if you insert discs other than
DVD-RAM or DVD-R.
≥The remaining time displayed is calculated based on the current
recording mode.
≥If the disc is protected (pages 33, 70), the unit switches to
standby but does not go on standby for recording. Check the disc
carefully.
≥Recording is not possible unless you set “Disc Protection“ in
“DISC INFORMATION“ to “Off“. (page 33)
≥You cannot record to a disc if the write protect tab on a cartridge
disc is set to protect. Release this before operation (page 70).
≥Even if the unit is put in the timer recording standby mode or the
timer recording is being performed, you can play a programme.
≥If the unit is not put in the timer recording standby mode at the
latest 10 minutes before the programmed timer recording starting
time, the [
Á] flashes on the unit display. In this case, press the
[
Á, TIMER] (12) button to put the unit in the timer recording
standby mode.
≥When recording more than one programme in a row, for DVD-
RAM the first few seconds, and for DVD-R about the first 30
seconds of all programmes from the second one onwards will not
be recorded.
RETURN
SELECT
SP
OK
1:22
1:19
64 ABC 16/ 7 TUE
01
Mode
Disc
space
Stop
Start
No.
Name
Date
1:58 SP
TIMER
RECORDING
Remain
1:19:00 16.7 TUE
ENTER
New Timer Programme
CANCEL
OFF
VPS
PDC
RETURN
No.
SELECT
1:58 SP
TIMER
RECORDING
Remain
1:55:00 16.7 TUE
ENTER
--
0
9
--:-- --
----------
Mode
Stop
Start
Name
Date
--:-- --
SP
----
VPS
PDC
Please set Channel.
---
1:58 SP
TIMER
RECORDING
Remain
1:19:00 16.7 TUE
2:00
16/ 7 TUE
Mode
Stop
Start
Name
Date
SP
64 ABC
1:00
VPS
PDC
OFF