Manual tuning, Optional antenna connections, Press [input selector] to select “fm” or “am – Panasonic SC-HT692 User Manual
Page 23: Press [tune mode] to select “manual, Tune to the station ( ‹ above), Press [enter, Press the numbered buttons to select a channel
23
RQT7433
Th
e
r
a
di
o
Main unit only
1
Press [INPUT SELECTOR] to select “FM”
or “AM”.
2
Press [TUNE MODE] to select “MANUAL”.
3
Press [
X TUNING] or [TUNING W] to
select the frequency.
Press and hold [
X TUNING] or [TUNING W] until the
frequency starts scrolling to start automatic tuning. Tuning
stops when a station is found.
1
Tune to the station (‹ above).
2
Press [ENTER].
3
While “PGM” is flashing on the display
Press the numbered buttons to select a
channel.
Alternatively, press [
X CH] or [W CH], then press [ENTER].
The station occupying a channel is erased if another station is
preset to that channel.
∫ Allocation settings
Main unit only
Each country allocates broadcast bands according to their particular
system.
[For\U.S.A.,\Canada,\and\units\with\PX\printed\on\the\outer\packaging]
You can change the FM step. The step is factory-set to 0.2 MHz, but
you can change it to receive broadcasts allocated in 0.1-MHz steps.
[For\Latin\America]
You can change the AM step. The step is factory-set to 9 kHz, but
you can change it to receive broadcasts allocated 10-kHz steps.
1 Press [INPUT SELECTOR] to select “FM” (for either band).
2 Press and hold [INPUT SELECTOR].
After a few seconds the display changes to show the current
minimum frequency. Continue to hold the button down. The
minimum frequency changes and the step is changed.
To return to the original step, repeat the above steps.
[Note]
Any FM/AM frequencies preset in channels will be changed by this
procedure. Preset them again.
Use outdoor antennas if radio reception is poor.
≥Disconnect the antenna when the unit is not in use.
≥Do not use the outdoor antenna during an electrical storm.
Manual tuning
Presetting the channel one by one
PTY DISC
SLEEP
TTL GRP
D.MIX
PROG.
RND
SEQ
S.SR
TRCK
CHAP
P
D
PGM
RDS PS
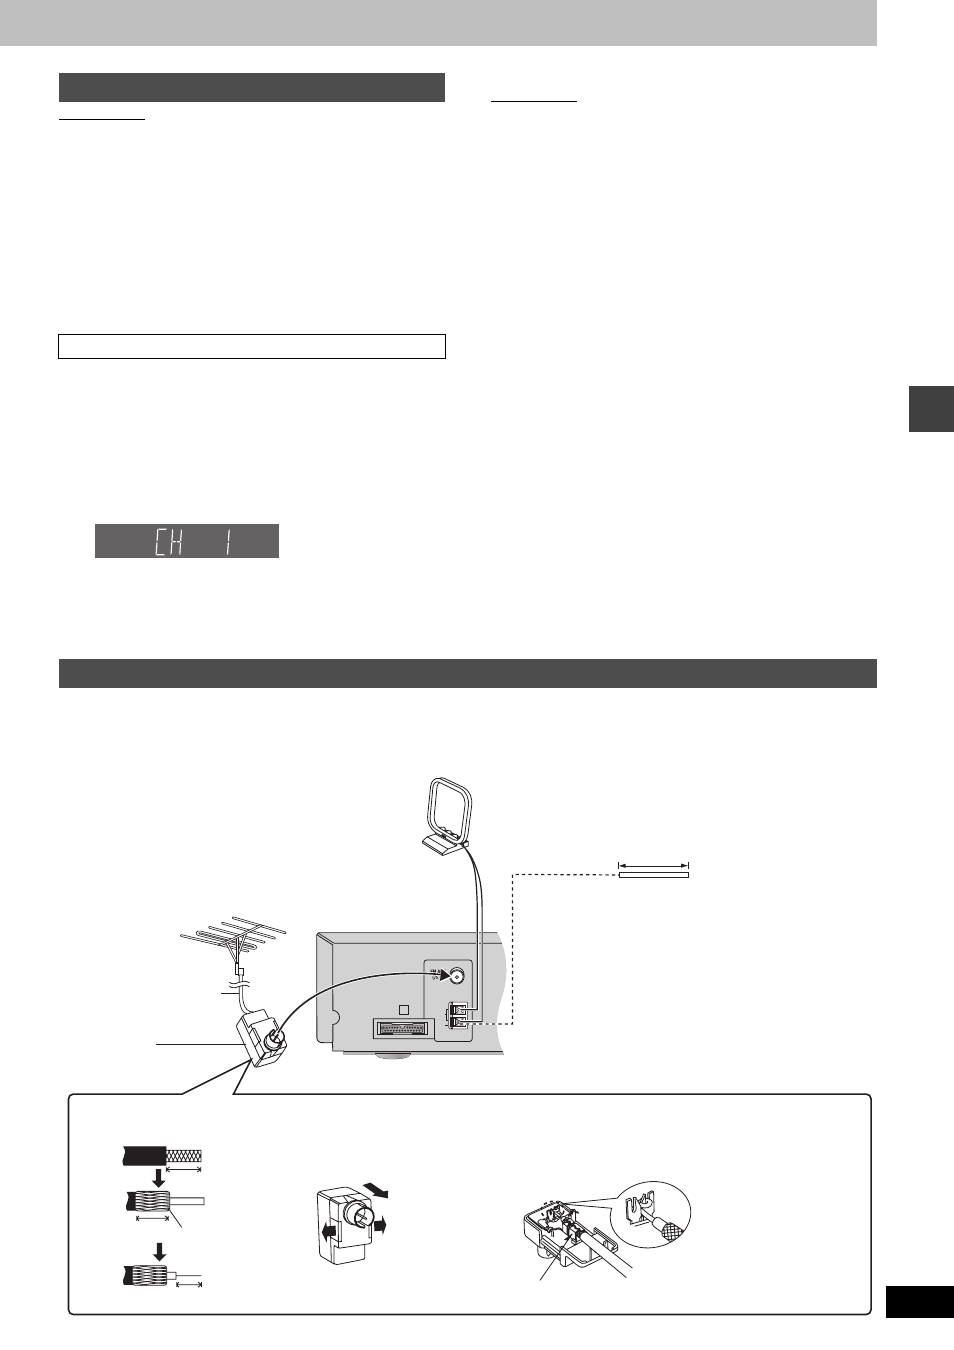
Optional antenna connections
L
R
EXT
LOOP
A
AM ANT
1
1
2
Leave the loop antenna connected.
AM outdoor antenna (Using a vinyl wire)
Run a piece of vinyl wire horizontally across a window or
other convenient location.
5–12 m
(16 – 39 feet)
FM outdoor antenna (Using a television
antenna)
≥Disconnect the FM indoor antenna.
≥The antenna should be installed by a competent
technician.
Rework your outdoor antenna’s 75
≠ coaxial cable as
follows (Except
\Latin[America]).
75
≠ coaxial cable
(not included)
1 Remove a piece of the
outer vinyl insulator.
2 Carefully pull the tabs apart to
remove the cover.
3 Install the coaxial cable.
Clamp the cable conductor,
and wind it on so that it does
not contact anything else.
7 mm (
9
/
32
z)
10 mm (
13
/
32
z) Peel back
4 Attach the cover.
Clamp with pliers
10 mm (
13
/
32
z)
Antenna plug
(included
\U.S.A.\and\Canada])
(Except
\Latin[America])