Powermate P1204 User Manual
Page 24
200-2667
24
Selection of the correct grade and type of engine oil
greatly affects the performance of the generator,
especially when starting. Before selecting replacement
oil for an oil change, consider the anticipated operating
conditions the generator may be exposed to. Choose the
appropriate weight of oil for anticipated temperatures
from Chart C. If temperatures are expected to fluctuate
between extremes prior to the next oil change interval,
use of synthetic oil is recommended. Use of oil meeting a
minimum American Petroleum Institute (API)
classification of SJ is advised.
Engine oil changes are recommended at the
maximum intervals given in the Periodic Maintance
Table. When operating in hot or dusty conditions shorter
change intervals may be necessary. To change the
engine oil and oil filter, the listed procedure is
recommended.
1. Warm up the engine oil by running a cold engine for
a few minutes, then shutting it off. Start and stop the
engine by pressing the MANUAL Mode button on the
control panel to manually start the generator then
press the OFF button to turn it off. Make sure that
the generator is off by pressing the OFF button on
the control panel before continuing the oil change.
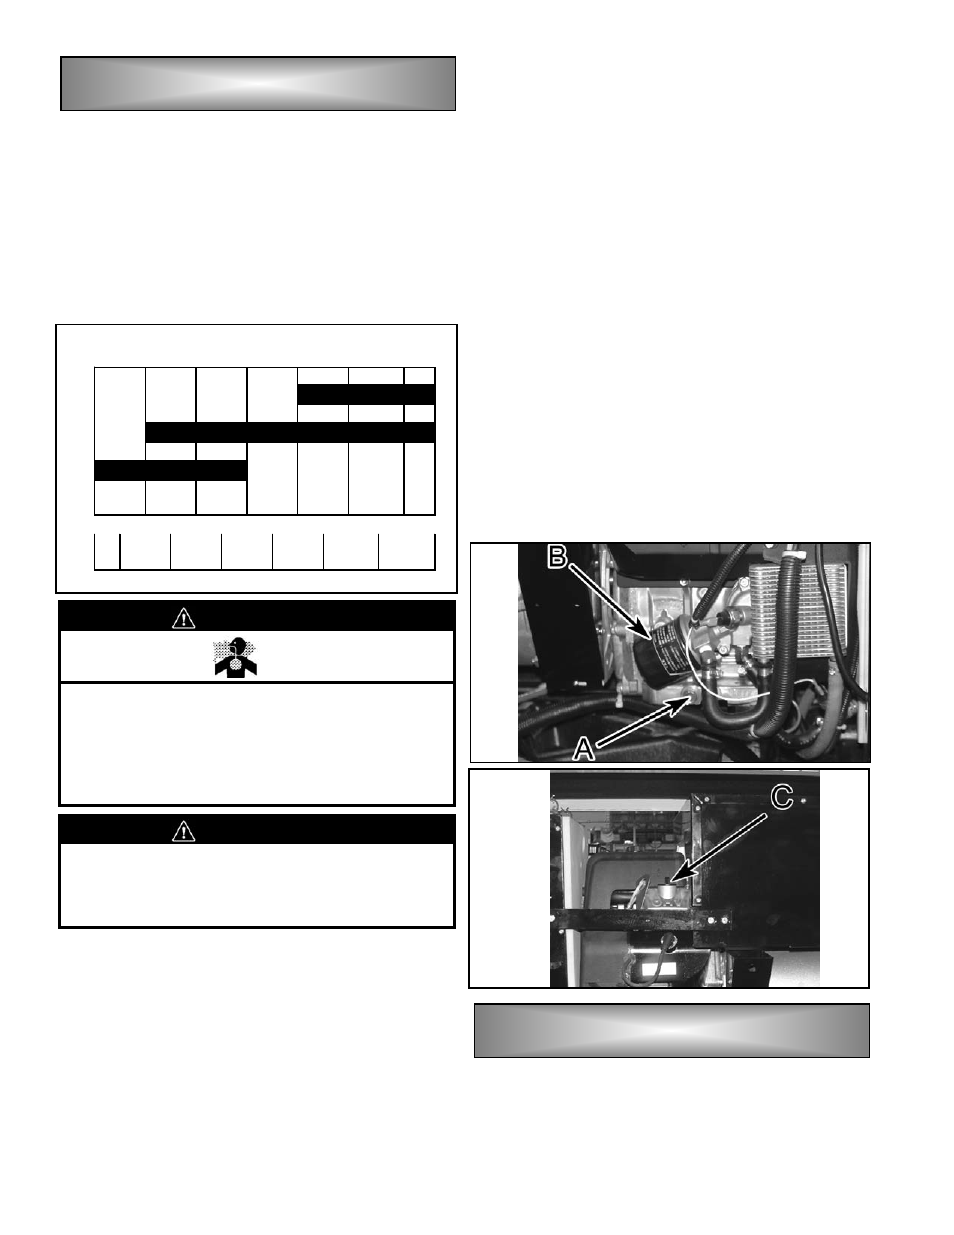
2. Place an oil drain pan under the oil drain plug (A).
3. Remove the drain plug (A) and place in a convenient
location. Allow the engine oil to completely drain
into the drain pan.
4. When the engine oil is completely drained, replace
the oil drain plug (A) and tighten.
5. Place the drain pan underneath the spin on oil filter
(B), then remove the filter by turning it
counterclockwise. Once loose, drain all of the oil
from the filter into the drain pan.
6. Apply a light film of oil to the gasket on the new oil
filter, then screw the filter onto the adaptor until the
gasket lightly touches the adaptor face. Tighten the
filter an additional ¾ to 1 turn.
7. Refill the engine with new engine oil through the
engine oil fill cap (C). Refer to the engine oil
recommendations on chart C for the proper grade of
oil and the specifications on page 6 for the oil
capacity. Replace the oil fill cap (C), then start the
engine and check for leaks.
8. Stop the engine and check the engine oil level as
outlined on page 23. Add oil as required to bring
the oil to the proper level on the dipstick.
At the intervals given in the maintenance schedule
table, check the oil cooler and lines for leaks. If leaks are
detected, replace clamps, fittings or hoses as necessary.
Also visually inspect the oil cooler for debris clogging the
cooler fins. If the cooler is blocked, use low pressure air
or water to dislodge the blocking material.
E
E
E
E
N
N
N
N
G
G
G
G
II
II
N
N
N
N
E
E
E
E
O
O
O
O
II
II
L
L
L
L
A
A
A
A
N
N
N
N
D
D
D
D
O
O
O
O
II
II
L
L
L
L
F
F
F
F
II
II
L
L
L
L
T
T
T
T
E
E
E
E
R
R
R
R
C
C
C
C
H
H
H
H
A
A
A
A
N
N
N
N
G
G
G
G
E
E
E
E
30
10W-30
5W-30
o
F
-20
0
20
40
60
80
100
o
C
-30 -20
-10
0
10
20
30
40
Chart C
W
WA
AR
RN
NIIN
NG
G
•
State and federal agencies have determined
that contact with used engine oil can cause
cancer or reproductive toxicity. Take care to
limit skin contact and breathing of vapors as
much as possible. Use rubber gloves and wash
exposed skin.
C
CA
AU
UT
TIIO
ON
N
•
Any attempt to crank or start the engine before
it has been properly serviced with the
recommended oil will result in an engine failure
that is not covered by warranty.
E
E
E
E
N
N
N
N
G
G
G
G
II
II
N
N
N
N
E
E
E
E
O
O
O
O
II
II
L
L
L
L
C
C
C
C
O
O
O
O
O
O
O
O
L
L
L
L
E
E
E
E
R
R
R
R
II
II
N
N
N
N
S
S
S
S
P
P
P
P
E
E
E
E
C
C
C
C
T
T
T
T
II
II
O
O
O
O
N
N
N
N
A
A
A
A
N
N
N
N
D
D
D
D
C
C
C
C
L
L
L
L
E
E
E
E
A
A
A
A
N
N
N
N
II
II
N
N
N
N
G
G
G
G