Cancelling a timer program, Checking a timer program, 1st program – Panasonic NV-FJ610PMP User Manual
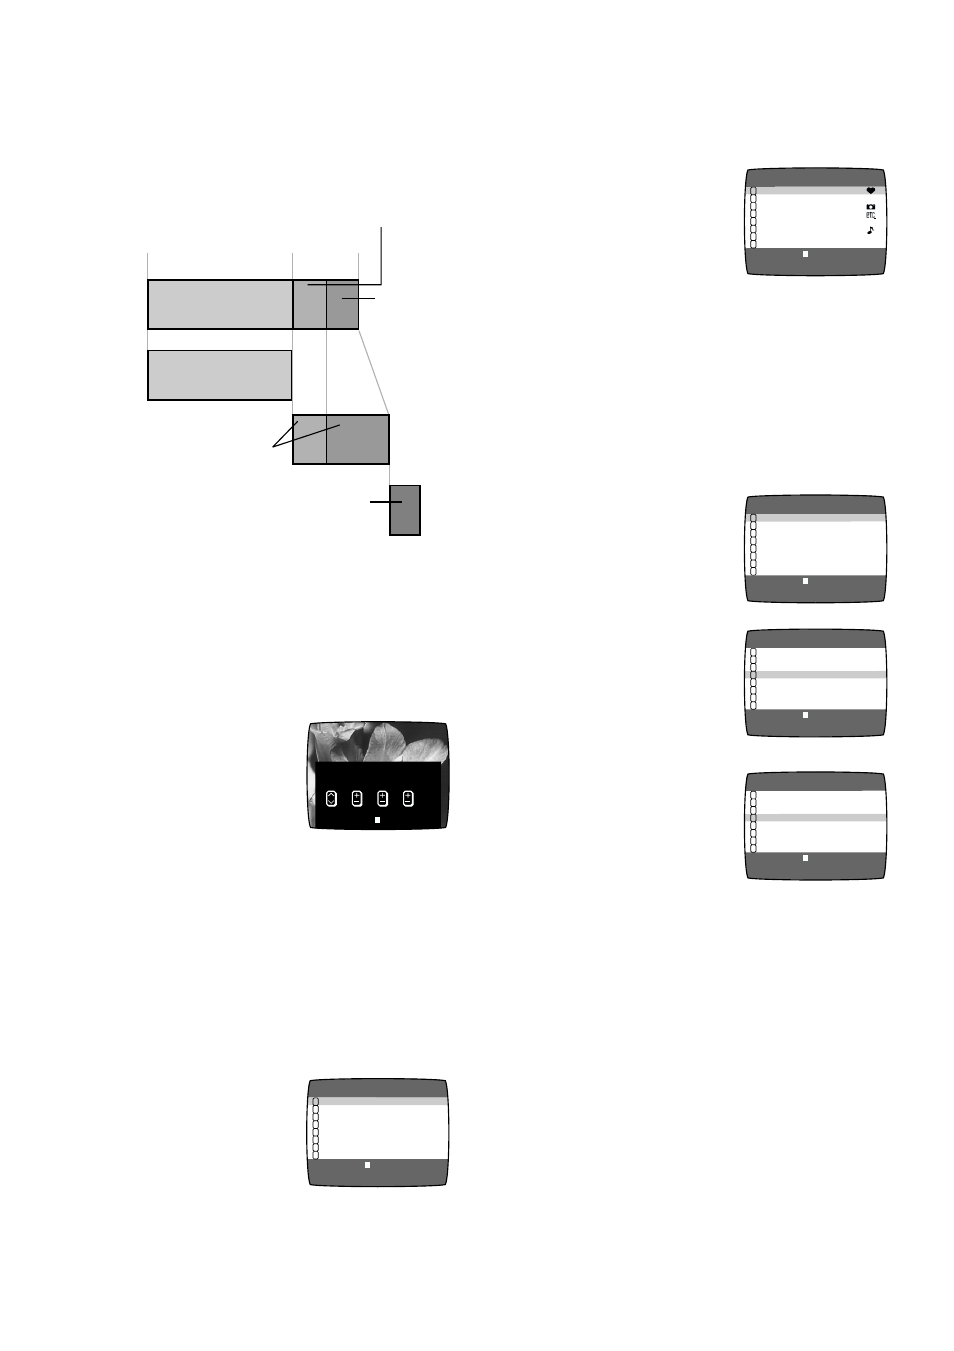
Page 32: 2nd program 15 min. recording by sp mode, 45 min. recording by ep mode, 90 min. recording by sp mode
32
≥
The tape length must be set correctly.
(See page 20.)
≥
Tapes except T30, -60, -90, -120, -140, -160,
-180 tapes may not work correctly.
To Activate the Auto SP/EP Change
Function:
Press SPEED to select A.
On Screen Display
3 Press 1 to display the
Category. (When JET
NAVIGATOR is set to
ON.) Press 1 again to
make the previous
display appear.
Cancelling a Timer Program
≥
The VCR must be turned on, or in timer
recording standby mode.
≥
Confirm that the TV is on and the VCR
viewing channel is selected.
1 Press PROG./CHECK twice.
2 Press VCR/TV to select
the VCR mode.
3 Press PROG./CHECK
repeatedly.
4 Press CANCEL.
Note:
≥
If timer recording is not completed (due to
insufficient tape or cancellation by the user),
the programed timer recording data will be
cancelled from the memory by 4 A.M. two
days later.
However, if the timer recording function is
activated at that time, the programed timer
recording data will not be cancelled.
Video
Tape
Timer
Program-
ming
90 min.
90 min. Recording
by SP mode
1st Program
(90 min.)
2nd Program
15 min. Recording
by SP mode
30 min.
45 min.
Recording
by EP
mode
(60 min.)
3rd Program will
not be recorded.
Example for T120 tape:
CH DATE ON
OFF
A
2
2 0 : 0 2 2 1 : 3 0
27SA
CATEGORY :
1
CH DATE
ON
OFF 1/2
2 2 7 W E 2 0 :0 2
2 1 :3 0 SP
125 S U - S A 1 0 :3 0
1 1 :0 0 A
14 S U
1 5 :0 0
1 6 :0 0 SP
5 1 9 T U
2 2 :1 5
2 3 :3 0 EP
A2 2 8 T H
2 0 :0 2
2 1 :3 0 SP
4 3 0 S A
1 9 :1 0
1 9 :5 5 EP
– – – – – –
– –:– – – –:– –
– – – – – –
– –:– – – –:– –
END:MENU
SELECT:
1
1
2
3
4
5
6
7
8
CH DATE
ON
OFF 1/2
2 2 7 W E 2 0 :0 2
2 1 :3 0 SP
125 S U - S A 1 0 :3 0
1 1 :0 0 A
14 S U
1 5 :0 0
1 6 :0 0 SP
5 1 9 T U
2 2 :1 5
2 3 :3 0 EP
A2 2 8 T H
2 0 :0 2
2 1 :3 0 SP
4 3 0 S A
1 9 :1 0
1 9 :5 5 EP
– – – – – –
– –:– – – –:– –
– – – – – –
– –:– – – –:– –
END:MENU
SELECT:
1
1
2
3
4
5
6
7
8
CH DATE
ON
OFF 1/2
2 2 7 W E 2 0 :0 2
2 1 :3 0 SP
125 S U - S A 1 0 :3 0
1 1 :0 0 A
14 S U
1 5 :0 0
1 6 :0 0 SP
– – – – – –
– –:– – – –:– –
A2 2 8 T H
2 0 :0 2
2 1 :3 0 SP
4 3 0 S A
1 9 :1 0
1 9 :5 5 EP
– – – – – –
– –:– – – –:– –
– – – – – –
– –:– – – –:– –
END:MENU
SELECT:
1
1
2
3
4
5
6
7
8
CH DATE
ON
OFF 1/2
2 2 7 W E 2 0 :0 2
2 1 :3 0
125 S U - S A 1 0 :3 0
1 1 :0 0
14 S U
1 5 :0 0
1 6 :0 0
5 1 9 T U
2 2 :1 5
2 3 :3 0
A2 2 8 T H
2 0 :0 2
2 1 :3 0
4 3 0 S A
1 9 :1 0
1 9 :5 5
– – – – – –
– –:– – – –:– –
– – – – – –
– –:– – – –:– –
END:MENU
SELECT:
1
1
2
3
4
5
6
7
8
≥
Every time you press SPEED, the indication
changes in the following order:
SP
>EP>A>SP
Checking a Timer Program
≥
The VCR must be turned on, or the timer
recording indicator “Á” lit.
≥
Confirm that the TV is on and the VCR
viewing channel is selected.
1 Press PROG./CHECK
twice.
≥
Every time you press
PROG./CHECK, the
program shifts below.
2 Press VCR/TV to select
the VCR mode.
CH DATE
ON
OFF 1/2
2 2 7 W E 2 0 :0 2
2 1 :3 0 SP
125 S U - S A 1 0 :3 0
1 1 :0 0 A
14 S U
1 5 :0 0
1 6 :0 0 SP
5 1 9 T U
2 2 :1 5
2 3 :3 0 EP
A2 2 8 T H
2 0 :0 2
2 1 :3 0 SP
4 3 0 S A
1 9 :1 0
1 9 :5 5 EP
– – – – – –
– –:– – – –:– –
– – – – – –
– –:– – – –:– –
END:MENU
SELECT:
1
1
2
3
4
5
6
7
8