Video config, Main menu, Continued) – Panasonic BT-LH2600WE User Manual
Page 19
19
The underlined values are factory preset setting values.
*1 During 2 screen display, the changes are not reflected in the still image of the main window.
*2 When “RGB-COMP.” is selected in “YP
B
P
R
/RGB” in the “INPUT SELECT” menu (J page 27), this does not operate.
*3 The following sharpness values can each be set,
1) VIDEO system input line (VIDEO,Y/C)(Factory settings are SHARPNESS MODE : LOW, SHARPNESS H/V : 0)
2) any other input line’s HD (Factory settings are SHARPNESS MODE : HIGH, SHARPNESS H/V : 0)
3) any other input line’s SD (Factory settings are SHARPNESS MODE : LOW, SHARPNESS H/V : 0)
and the setting values for the selected input signal from within this group is displayed. The adjustment status is
displayed in the bottom right when selected.
*4 When “VAR1”, “VAR2” or “VAR3” is selected, the monitor switches to WB adjustment mode (J page 20).
*5 When selecting USER0–63
1) Push [ENTER] (USER changes to blue).
2) Select 0–63 with [
,
], and push [ENTER].
*6 When using “SUB WINDOW” function (J page 24),
1) change the setting after releasing “SUB WINDOW” function.
2) we recommand “MODE2” for the image with a fast movement.
*7 During Anamo size display, “SCAN” change is not reflected.
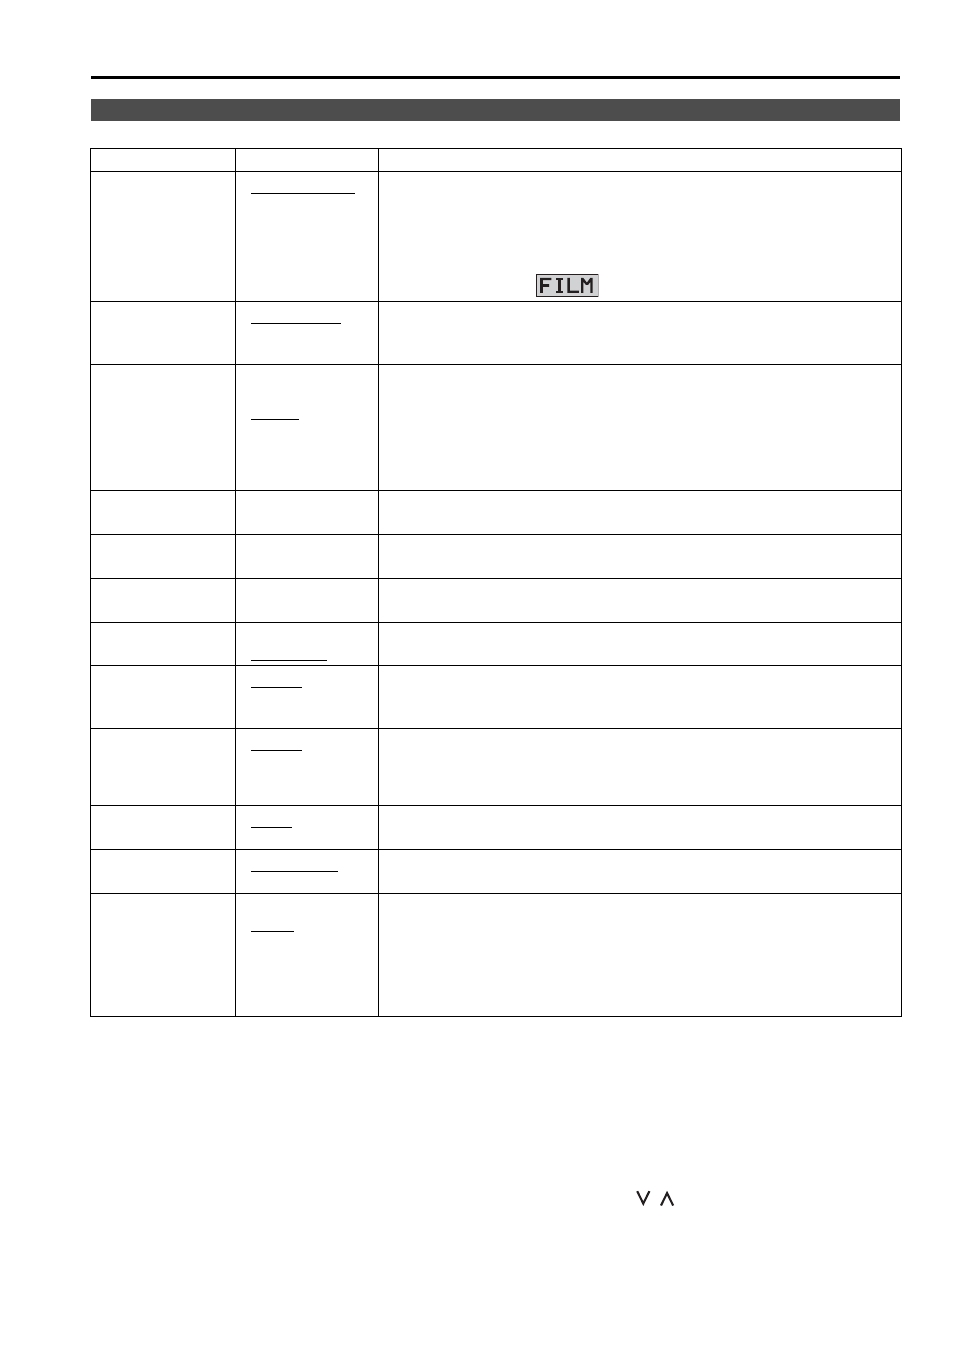
VIDEO CONFIG
Sub menu
Settings
Explanation
GAMMA
SELECT
*1*2
Used to select the gamma curve.
which shades are valued more than the contrasts, it is suitable for
use by the studio and the post production, etc. )
When FILM is selected,
mark is displayed in the top left of the screen.
FILM GAMMA
*2
Used to select the type of FILM gamma mode.
When using other types than VARICAM
COLOR TEMP.
*5
Used to select the color temperature.
*4
*4
*4
SHARPNESS
MODE
*2
*3
Used to select the width of the sharpness edge.
Thin edge
Thick edge
SHARPNESS H
*2
<0–30>
*3
Used to set the sharpness in the horizontal direction.
When adjusting, the item display moves to the lower part of the screen.
SHARPNESS V
*2
<0–30>
*3
Used to set the sharpness in the vertical direction.
When adjusting, the item display moves to the lower part of the screen.
I-P MODE
*2*6
Used to select IP conversion mode. (J page 20 : About IP Mode)
Field Interpolation
Frame Interpolation
MONO
*2
Used to switch between color and monochrome (MONO).
Monochrome
* When this is ON, the picture adjusting knob [CHROMA] setting is fixed at 0.
ANAMO
*2*7
If an Anamo lens has been used on the camera, and input through
SDI 720/60P, 59.94P, the picture is resized to Anamo size
magnification. (a vertically compressed signal can be amplified
vertically and corrected when it is displayed.)
SD ASPECT
*2
<4:3>
<16:9>
Used for setting the aspect ratio settings when using SD signal input.
<4:3> 4:3 display
<16:9> 16:9 display
SCAN
*2
Used to set under-scan and normal display.
NOISE WIPE
*2
This is especially effective for continuously changing the contrast of
the source signal or CG signal when the S/N is very high.
Noise reduction mode. Depending on the camera, this mode can
be especially effective for dark scenes. We recommend leaving
this setting “ON” under normal conditions.
Main Menu
(continued)