Point hook-up, Danger, Table of contents 3-point hook-up – Land Pride Rear Blades RBT4096 User Manual
Page 11
9
Section 1: Assembly & Set-Up
RBT4084, RBT4096 & RBT40108 Rear Blades 301-206M
6/12/13
3-Point Hook-Up
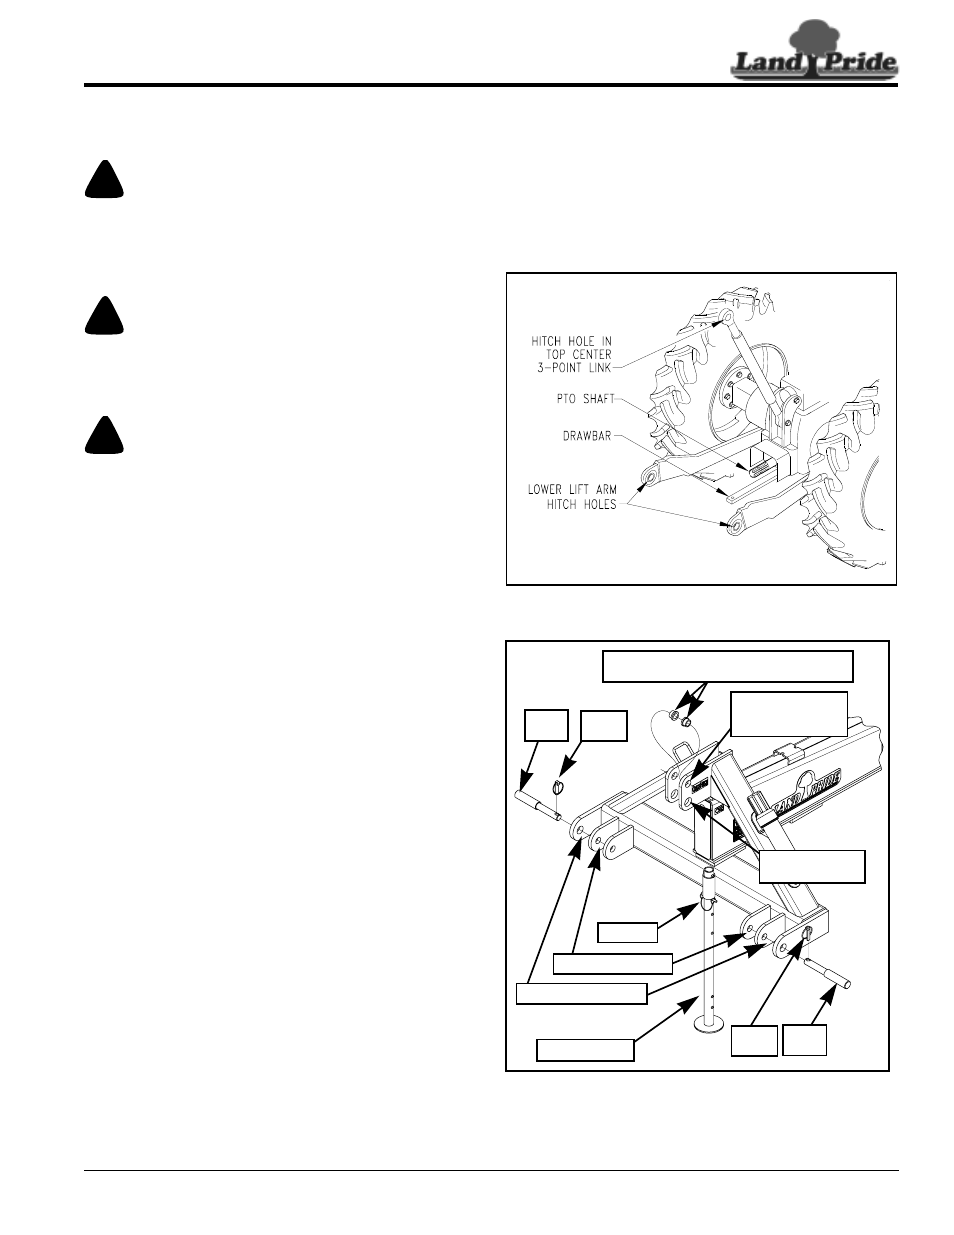
Refer to Figure 1-2 & Figure 1-3:
!
DANGER
A Crushing Hazard exists when hooking-up equipment to a
tractor. Do not allow anyone to stand between tractor and
implement while backing-up to implement. Do not operate
hydraulic 3-point lift controls while someone is directly
behind the tractor or near the implement.
!
DANGER
Always set tractor transmission in park, engage park brake,
shut tractor engine off and remove switch key before allowing
anyone including operator to hook-up and unhook Rear Blade
from tractor.
!
DANGER
Always check all hardware for tightness before using or
working around the blade. The moldboard will fall if blade
pivot bolt(s) securing pivot shaft to mainframe or blade tilt
bolt(s) securing tilt pin to moldboard carrier are loose or
missing.
A 3-Point Category I or II hitch is required. The lower
3-Point arms of the 3-Point hitch must be stabilized to
prevent side-to-side movement. Most tractors have sway
blocks or adjustable chains for this purpose.
1.
Shorten or remove tractor drawbar to keep it from
interfering with the Rear Blade blade.
2.
Ensure lower arms are stabilized to prevent
excessive side movement.
3.
Slowly back tractor up to the 3-Way Rear Blade while
using 3-Point hydraulic control to align hitch holes in
the lower arms with clevis pin holes on the
implement.
4.
Engage tractor park brake, shut engine off, and
remove key before dismounting from tractor.
5.
With tractor’s lower arms aligned and positioned in
the clevises, insert hitch pins through clevis lugs and
lower arm hitch holes. Secure hitch pins with linch
pins.
6.
Ensure lower arms are stabilized to prevent
excessive side movement.
7.
Raise support stand all the way up to transport
position and secure in place with wire retaining pin.
8.
Connect tractor’s top center link to the upper hitch
mounting hole using customer supplied hardware:
•
Cat I hitch: Two step bushings and 3/4" clevis pin
with linch pin. Step bushings are available through
your nearest Land Pride dealer. Refer Figure 1-3
for step bushing part number.
•
Cat II hitch: 1" clevis pin and linch pin.
9.
Return to tractor and slowly operate controls up and
down to check for clearance. Make certain Rear
Blade does not interfere with tractor hitch, tires, and
drawbar. Move or remove the drawbar if it interferes.
10. Manually adjust one of the two lower lift arms up or
down to level the Rear Blade from left to right.
11. Manually adjust the length of the top center link to
level the Rear Blade from front to rear.
Tractor 3-Point Hitch
Figure 1-2
Rear Blade 3-Point Hitch
Figure 1-3
23998
30324
Cat. I Hitch Points
Wire Pin
Cat. II Hitch Points
Support Stand
Linch
Pin
Quick Hitch
Mounting Holes
Cat. I & II
Top Center Link
Mounting Holes
Hitch
Pin
Customer Supplied Cat. I Step Bushings
Land Pride Part No. 827-071C
Linch
Pin
Hitch
Pin