Kawasaki Band Saw User Manual
Page 8
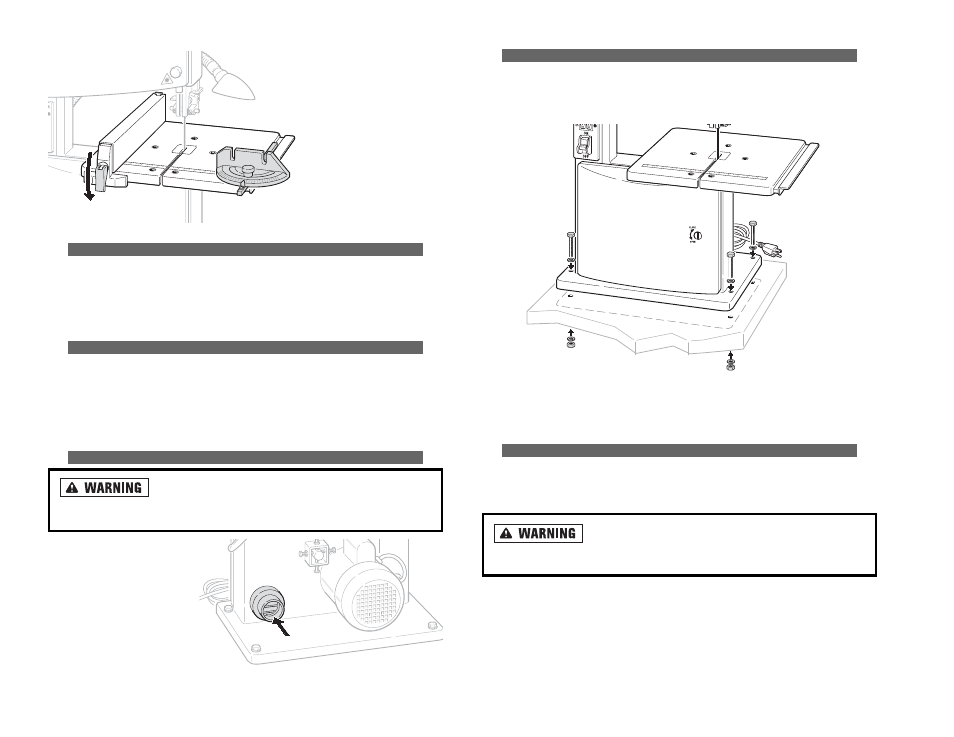
M
MO
OU
UN
NT
TIIN
NG
G T
TH
HE
E S
SA
AW
W T
TO
O A
A W
WO
OR
RK
KB
BE
EN
NC
CH
H
The band saw has four predrilled holes in the base for mounting to a workbench. It
is best to attach the band saw to a firm, stable surface at a convenient working
height. A workbench is ideal.
1. Drill four holes in the workbench to match the four holes in the base of the saw.
2. Attach the band saw to the work bench using bolts (inserted from the top), lock
washers and nuts.
O
OP
PE
EN
NIIN
NG
G T
TH
HE
E H
HO
OU
US
SIIN
NG
G D
DO
OO
OR
RS
S
The upper and lower housing doors protect the operator and shield the moving
parts of the band saw drive and power source. The doors must remain closed while
the band saw is in use.
A
Allw
waayyss rreem
mo
ovvee p
po
ow
weerr tto
o tth
hee ssaaw
w,, b
byy ttu
urrn
niin
ng
g tth
hee p
po
ow
weerr
ssw
wiittcch
h o
offff aan
nd
d tth
heen
n u
un
np
pllu
ug
gg
giin
ng
g iitt,, b
beeffo
orree m
maakkiin
ng
g aan
nyy aad
djju
ussttm
meen
nttss.. FFaaiillu
urree tto
o
d
do
o sso
o ccaan
n rreessu
ulltt iin
n sseevveerree iin
njju
urryy o
orr d
deeaatth
h..
14
13
IIN
NS
ST
TA
AL
LL
LIIN
NG
G T
TH
HE
E W
WO
OR
RK
KL
LIIG
GH
HT
T
1. Insert a maximum 15 watt bulb into the socket of the light housing.
2. The light is located on a flexible tube allowing the worklight to be positioned
onto the work area.
O
OP
PE
ER
RA
AT
TIIN
NG
G T
TH
HE
E W
WO
OR
RK
KL
LIIG
GH
HT
T
1. To turn the worklight on press the light ON/OFF switch to the “I” position.
2. To turn the worklight off press the light ON/OFF switch to the “O” position.
3. To adjust the direction of the light move the worklight tube to the most suitable
position.
C
CO
ON
NN
NE
EC
CT
TIIN
NG
G T
TH
HE
E D
DU
US
ST
T C
CO
OL
LL
LE
EC
CT
TO
OR
R
C
Co
on
nttrro
oll w
wo
oo
od
d d
du
usstt aan
nd
d cch
hiip
pss iin
n aa cco
on
nffiin
need
d aarreeaa aan
nd
d
g
gu
uaarrd
d aag
gaaiin
nsstt aallll p
po
ossssiib
bllee iig
gn
niittiio
on
n sso
ou
urrcceess.. FFaaiillu
urree tto
o d
do
o sso
o ccaan
n rreessu
ulltt iin
n ffiirree
aan
nd
d ccaau
ussee p
peerrsso
on
naall iin
njju
urryy o
orr d
deeaatth
h..
Connect the dust extraction
equipment to the port on the
back of the band saw.
8. Attach the rip fence to the
table and secure it by
pushing down the rip
fence locking handle.
9. Attach the miter gauge to
the table by sliding it into
the miter gauge slot.