Kawasaki Band Saw User Manual
Page 12
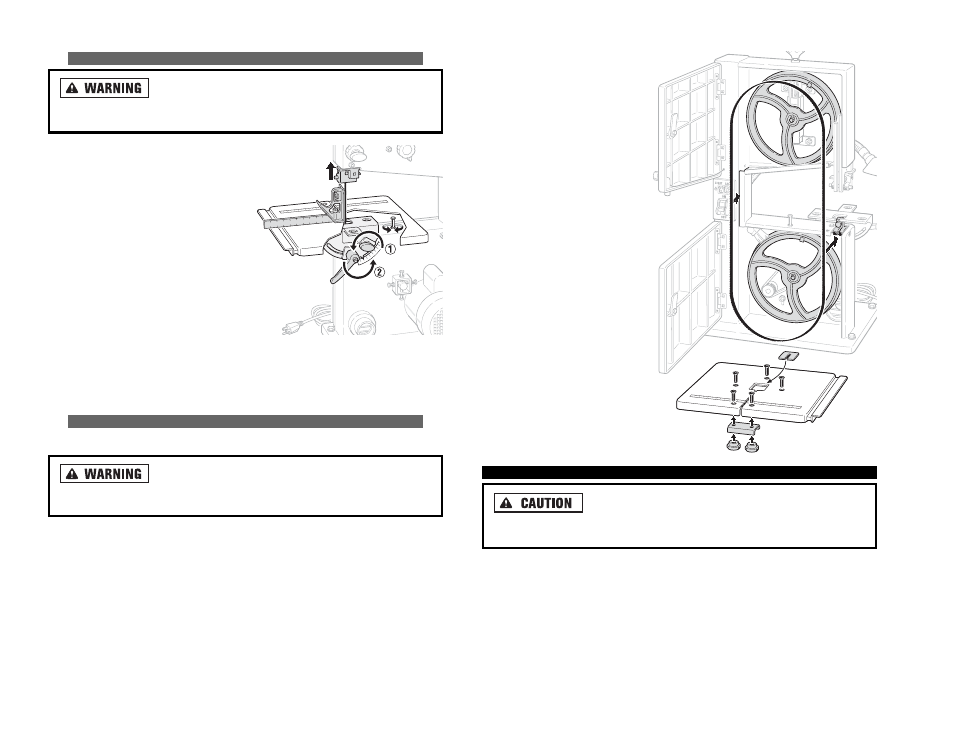
6. Fit the new blade in place,
ensuring that the teeth point
toward the front of the saw
(doors).
7. Apply tension to the new blade
by rotating the blade tension
knob.
8. Center the band saw blade on
the band saw wheel.
9. Turn the upper wheel by hand
to ensure the blade is centered
on the wheels.
10.Adjust saw blade tracking as
needed (see procedure).
11.Close both housing doors.
12.Swing the lower blade guide
back into position.
13.Attach the (U-clamp) under the
work table with two screws
provide and two thumb nuts.
14.Attach the rip fence to the
table and secure it by pushing
the locking handle down.
L
LA
AS
SE
ER
R G
GU
UIID
DE
E
Use of controls or procedures, or performance of proce-
dures other then those specified herein may result in hazardous radiation
exposure.
22
21
S
SE
ET
TT
TIIN
NG
G T
TH
HE
E T
TA
AB
BL
LE
E S
SQ
QU
UA
AR
RE
E W
WIIT
TH
H T
TH
HE
E B
BL
LA
AD
DE
E
A
Allw
waayyss rreem
mo
ovvee p
po
ow
weerr tth
hee ssaaw
w,, b
byy ttu
urrn
niin
ng
g tth
hee p
po
ow
weerr
ssw
wiittcch
h o
offff aan
nd
d tth
heen
n u
un
np
pllu
ug
gg
giin
ng
g iitt,, b
beeffo
orree m
maakkiin
ng
g aan
nyy aad
djju
ussttm
meen
nttss.. FFaaiillu
urree tto
o
d
do
o sso
o ccaan
n rreessu
ulltt iin
n sseevveerree iin
njju
urryy o
orr d
deeaatth
h..
1. Fully raise the upper blade guide.
2. Check that the band saw tension is
correct.
3. Loosen the table locking knob and
table setting lever.
4. Using a square, adjust the work table
at a right angle to the blade.
5. Tighten the table locking knob and
table setting lever.
6. Loosen the locking nut located beneath
the work table and adjust the screw
stop until it touches the work table.
7. Tighten the locking nut to secure the screw stop in position.
8. Check that the blade is 90 degrees to the table by making a practice cut on a
scrap piece of similar wood and checking that it is square.
IIN
NS
ST
TA
AL
LL
LIIN
NG
G T
TH
HE
E B
BA
AN
ND
D S
SA
AW
W B
BL
LA
AD
DE
E
This band saw is equipped with a general-purpose wood cutting blade.
A
Allw
waayyss rreem
mo
ovvee p
po
ow
weerr tto
o tth
hee ssaaw
w,, b
byy ttu
urrn
niin
ng
g tth
hee p
po
ow
weerr
ssw
wiittcch
h o
offff aan
nd
d tth
heen
n u
un
np
pllu
ug
gg
giin
ng
g iitt,, b
beeffo
orree iin
nssttaalllliin
ng
g tth
hee b
bllaad
dee.. FFaaiillu
urree tto
o d
do
o
sso
o ccaan
n rreessu
ulltt iin
n sseevveerree iin
njju
urryy o
orr d
deeaatth
h..
1. Remove the rip fence from the table.
2. Remove the bracket from under the work table by loosening the two knobs.
3. Open both housing doors.
4. Loosen the blade tension knob to remove tension from the blade.
5. Remove the blade by guiding it through the slot in the work table, the upper
blade guide and the blade cover on the saw housing.
NOTE: Use only recommended blades for the job.