Kawasaki Band Saw User Manual
Page 14
M
MA
AIIN
NT
TE
EN
NA
AN
NC
CE
E A
AN
ND
D C
CL
LE
EA
AN
NIIN
NG
G
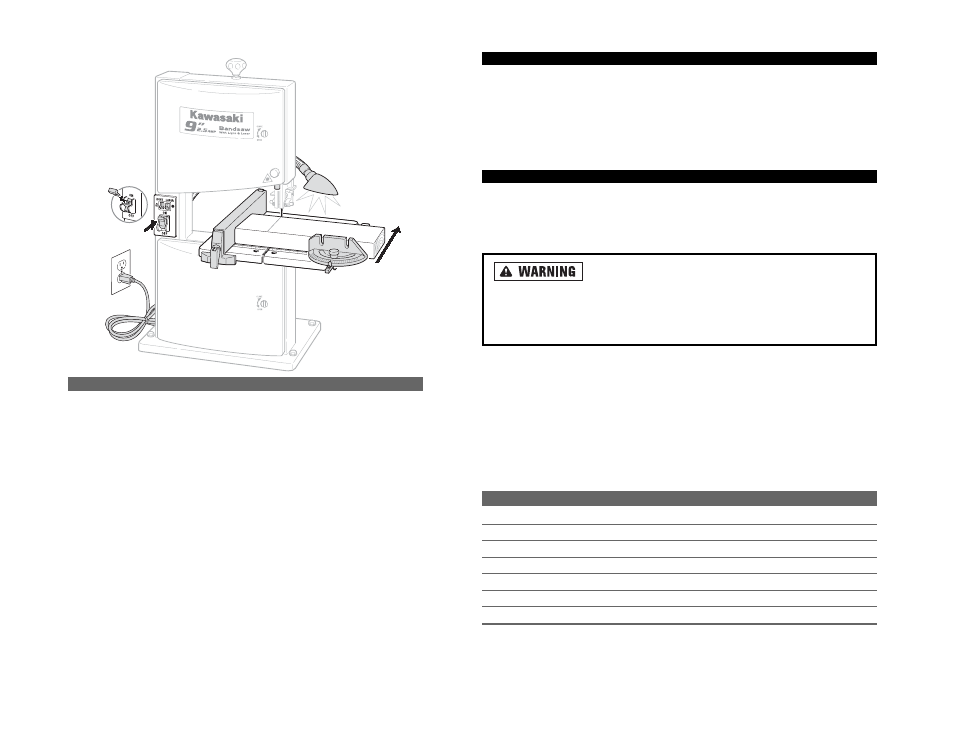
It is important to keep your band saw in perfect operating condition.
C
CL
LE
EA
AN
NIIN
NG
G
After every use of the band saw, the saw and surrounding area should be cleaned
thoroughly to remove any buildup of metal filings. Use an air hose or soft bristled
brush to clean the saw components. Sweep around the saw or use a shop vacuum
to remove the debris from the floor.
A
AC
CC
CE
ES
SS
SO
OR
RIIE
ES
S
O
Op
pttiio
on
naall aacccceesssso
orriieess ffo
orr tth
hee b
baan
nd
d ssaaw
w can include wire-brush wheels that can be
used for cleaning and layered cloth wheels that can be used for polishing and buff-
ing. Contact A
AL
LL
LT
TR
RA
AD
DE
E C
Cu
usstto
om
meerr S
Seerrvviiccee at 1
1--8
80
00
0--5
59
90
0--3
37
72
23
3 ((tto
ollll ffrreeee)) to find out
what accessories are available for the band saw.
O
On
nllyy u
ussee aacccceesssso
orriieess tth
haatt aarree d
deessiig
gn
need
d tto
o ffiitt yyo
ou
urr p
paarrttiicc--
u
ullaarr b
baan
nd
d ssaaw
w.. T
Th
heessee aacccceesssso
orriieess ssh
ho
ou
ulld
d b
bee ssp
peecciiffiiccaallllyy llaab
beelleed
d tto
o m
maattcch
h
tth
hee ssp
peeeed
d aan
nd
d aarrb
bo
orr ssiizzee o
off tth
hee b
baan
nd
d ssaaw
w.. FFaaiillu
urree tto
o u
ussee tth
hee p
prro
op
peerr aacccceess--
sso
orriieess cco
ou
ulld
d rreessu
ulltt iin
n p
prro
op
peerrttyy d
daam
maag
gee,, d
daam
maag
gee tto
o tth
hee b
baan
nd
d ssaaw
w,, aan
nd
d sseerrii--
o
ou
uss p
peerrsso
on
naall iin
njju
urryy tto
o tth
hee o
op
peerraatto
orr..
A
Allw
waayyss aattttaacch
h g
grro
ou
un
nd
deed
d ((3
3--p
prro
on
ng
g)) eexxtteen
nssiio
on
n cco
orrd
dss tto
o g
grro
ou
un
nd
deed
d ((3
3--h
ho
ollee)) o
ou
uttlleettss..
IIff tth
hee b
baan
nd
d ssaaw
w m
mu
usstt b
bee u
usseed
d o
ou
uttssiid
dee,, u
ussee aan
n eexxtteen
nssiio
on
n cco
orrd
d llaab
beelleed
d ““W
W--A
A”” o
orr
““W
W..”” These extension cords are rated for outdoor use and reduce the chances of
electrical shock.
IIff yyo
ou
u m
mu
usstt u
ussee aan
n eexxtteen
nssiio
on
n cco
orrd
d,, b
bee ssu
urree tth
haatt tth
hee g
gaau
ug
gee iiss llaarrg
gee een
no
ou
ug
gh
h tto
o ccaarrrryy
tth
hee aam
mo
ou
un
ntt o
off ccu
urrrreen
ntt n
neecceessssaarryy ffo
orr yyo
ou
urr p
po
ow
weerr tto
oo
oll.. If not, your tool may experi-
ence a loss of power, excessive voltage drop or overheating. The smaller the gauge
number, the heavier the cord (see table on below).
R
RE
EC
CO
OM
MM
ME
EN
ND
DE
ED
D S
SIIZ
ZE
ES
S O
OFF E
EX
XT
TE
EN
NS
SIIO
ON
N C
CO
OR
RD
DS
S 1
12
20
0 V
VO
OL
LT
T A
AC
C 6
60
0 H
HZ
Z T
TO
OO
OL
LS
S
T
TO
OO
OL
L C
CU
UR
RR
RE
EN
NT
T R
RA
AT
TIIN
NG
G
C
CO
ON
ND
DU
UC
CT
TO
OR
R S
SIIZ
ZE
E IIN
N A
A..W
W..G
G
AMPERE
10FT.
25FT.
50FT.
100FT.
3-6
18
18
18
18
6-8
18
18
18
16
8-10
18
18
18
14
10-12
16
16
14
14
12-16
14
12
12
-
16-20
12
12
12
-
26
25
FFE
EE
ED
DIIN
NG
G W
WO
OR
RK
K IIN
NT
TO
O T
TH
HE
E S
SA
AW
W
1. Ensure that the lighting is adequate.
2. Adjust the upper guide to just clear the work piece.
3. Inspect the work piece and remove all nails and other foreign objects before
beginning sawing.
4. Hold the work piece firmly against table.
5. Feed the piece work into the blade against the direction of rotation of the blade.
6. Should the blade become jammed, immediately turn the machine switch OFF and
wait for the blade to come to a full and complete stop. Unplug the saw from the
power source and then proceed to gently disengage the piece from the blade.