Kawasaki Band Saw User Manual
Page 4
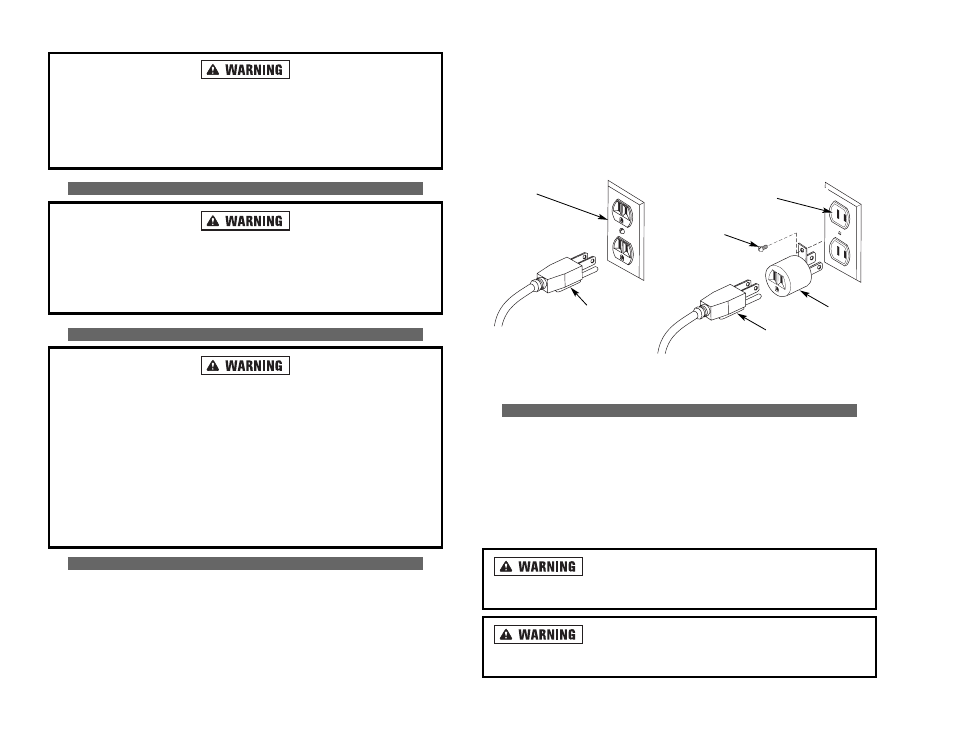
If the power cord will not fit into the wall plug, an approved adapter can be used as
long as it is connected to the center screw in the wall plate. N
Neevveerr m
mo
od
diiffyy tth
hee eelleecc--
ttrriiccaall p
pllu
ug
g by cutting off the grounding prong so it will fit into unapproved, un-
grounded electrical receptacles.
If you have questions about hooking up the band saw, contact a
certified electrical contractor to install the proper circuitry acceptable for this and
other power tools you use. Repair or replace any damaged electrical wiring
IIM
MM
ME
ED
DIIA
AT
TE
EL
LY
Y..
E
EX
XT
TE
EN
NS
SIIO
ON
N C
CO
OR
RD
D U
US
SA
AG
GE
E
Extension cords, if used, must be properly grounded with a 3-prong plug on one and a
3-hole receptacle on the other. D
DO
O N
NO
OT
T u
ussee g
grro
ou
un
nd
diin
ng
g aad
daap
ptteerrss w
wiitth
h aan
n eexxtteen
nssiio
on
n cco
orrd
d..
Extension cords must be UL listed and use a minimum of 18 A.W.G. wiring. Extension
cords should never exceed 25 feet in length. Extension cords, that are too long, cause a
voltage drop over the extra distance causing the grinder motor to run slower with the pos-
sibility of causing damage to the motor. Using extension cords with smaller than the rec-
ommended wire gauge run the risk of getting too hot, melting, and/or causing fires. See
table, ““E
Exxtteen
nssiio
on
n C
Co
orrd
d S
Sp
peecciiffiiccaattiio
on
nss””,, on page 26.
U
Ussee p
prro
op
peerr g
grro
ou
un
nd
diin
ng
g tteecch
hn
niiq
qu
ueess.. IIm
mp
prro
op
peerr cco
on
nn
neeccttiio
on
n
o
off tth
hee eeq
qu
uiip
pm
meen
ntt g
grro
ou
un
nd
diin
ng
g cco
on
nd
du
ucctto
orr ccaan
n rreessu
ulltt iin
n aa rriisskk o
off eelleeccttrriicc ssh
ho
occkk
rreessu
ullttiin
ng
g iin
n p
peerrsso
on
naall iin
njju
urryy o
orr d
deeaatth
h..
IIff rreep
paaiirr o
orr rreep
pllaacceem
meen
ntt o
off tth
hee eelleeccttrriicc cco
orrd
d o
orr p
pllu
ug
g iiss
n
neecceessssaarryy:: D
DO
O N
NO
OT
T cco
on
nn
neecctt tth
hee eeq
qu
uiip
pm
meen
ntt g
grro
ou
un
nd
diin
ng
g cco
on
nd
du
ucctto
orr tto
o aa lliivvee tteerr--
m
miin
naall.. FFaaiillu
urree tto
o d
do
o sso
o ccaan
n rreessu
ulltt iin
n p
peerrsso
on
naall iin
njju
urryy o
orr d
deeaatth
h..
M
MA
AK
KE
E S
SU
UR
RE
E T
TH
HE
E P
PO
OW
WE
ER
R S
SW
WIIT
TC
CH
H IIS
S IIN
N ““O
OFFFF”” P
PO
OS
SIIT
TIIO
ON
N before plugging in
to prevent unintentional starting.
U
US
SE
E O
ON
NL
LY
Y R
RE
EC
CO
OM
MM
ME
EN
ND
DE
ED
D A
AC
CC
CE
ES
SS
SO
OR
RIIE
ES
S.. See the table provided.
N
NE
EV
VE
ER
R L
LE
EA
AV
VE
E T
TH
HE
E E
EQ
QU
UIIP
PM
ME
EN
NT
T R
RU
UN
NN
NIIN
NG
G U
UN
NA
AT
TT
TE
EN
ND
DE
ED
D.. T
TU
UR
RN
N P
PO
OW
WE
ER
R O
OFFFF..
Don’t leave the work area until it comes to a complete stop.
E
EL
LE
EC
CT
TR
RIIC
CA
AL
L S
SA
AFFE
ET
TY
Y
U
US
SE
E P
PR
RO
OP
PE
ER
R G
GR
RO
OU
UN
ND
DIIN
NG
G techniques in accordance with A
AL
LL
L local codes and
ordinances.
D
DO
O N
NO
OT
T M
MO
OD
DIIFFY
Y the plug provided. If it will not fit the outlet, have the proper
outlet installed by a qualified electrician.
R
RE
EP
PA
AIIR
R O
OR
R R
RE
EP
PL
LA
AC
CE
E damaged or worn cords immediately.
A
AD
DD
DIIT
TIIO
ON
NA
AL
L S
SA
AFFE
ET
TY
Y R
RU
UL
LE
ES
S FFO
OR
R B
BA
AN
ND
D S
SA
AW
WS
S
D
DO
O N
NO
OT
T S
ST
TA
AR
RE
E into the laser beam.
N
NE
EV
VE
ER
R A
AIIM
M the laser beam at any person or an object other than the work piece.
N
NE
EV
VE
ER
R A
AIIM
M the laser beam at a work piece with a reflective surface.
W
WE
EA
AR
R E
EA
AR
R P
PR
RO
OT
TE
EC
CT
TIIO
ON
N. Wear a breathing mask. Wear eye protection.
D
DO
O N
NO
OT
T R
RE
EM
MO
OV
VE
E jammed cutoff pieces until the blade has stopped.
M
MA
AIIN
NT
TA
AIIN
N P
PR
RO
OP
PE
ER
R A
AD
DJJU
US
ST
TM
ME
EN
NT
T of blade tension, blade guides, and thrust bearings.
P
PE
ER
RIIO
OD
DIIC
CA
AL
LL
LY
Y C
CH
HE
EC
CK
K that all nuts, bolts and other fixings are properly tightened.
D
DO
O N
NO
OT
T S
ST
TO
OR
RE
E materials or equipment above a machine in such a way that
they could fall into it Ensure that your work is always on the table. Never make
a cut with the work off the table.
G
GR
RO
OU
UN
ND
DIIN
NG
G IIN
NS
ST
TR
RU
UC
CT
TIIO
ON
NS
S
The electrical power source for this band saw M
MU
US
ST
T be grounded in order prevent
possible electric shock or even death should the tool malfunction or breakdown.
Grounding provides a path of least resistance for electric current thus reducing the
risk of electrical shock. The power source must also use a minimum 20A service
and not used if other power tools on the same circuit are in use.
This band saw is equipped with a grounded 3-wire power cord with a 3-prong plug.
5
FIGURE 1. CONNECTING THE BAND SAW TO THE AC POWER RECEPTACLE
UNGROUNDED AC RECEPTACLE
GROUNDED RECEPTACLE
GROUNDING ADAPTER
POWER CORD
POWER CORD
COVERPLATE
MOUNTING SCREW