Sea t assembl y – Sears 831.159460 User Manual
Page 14
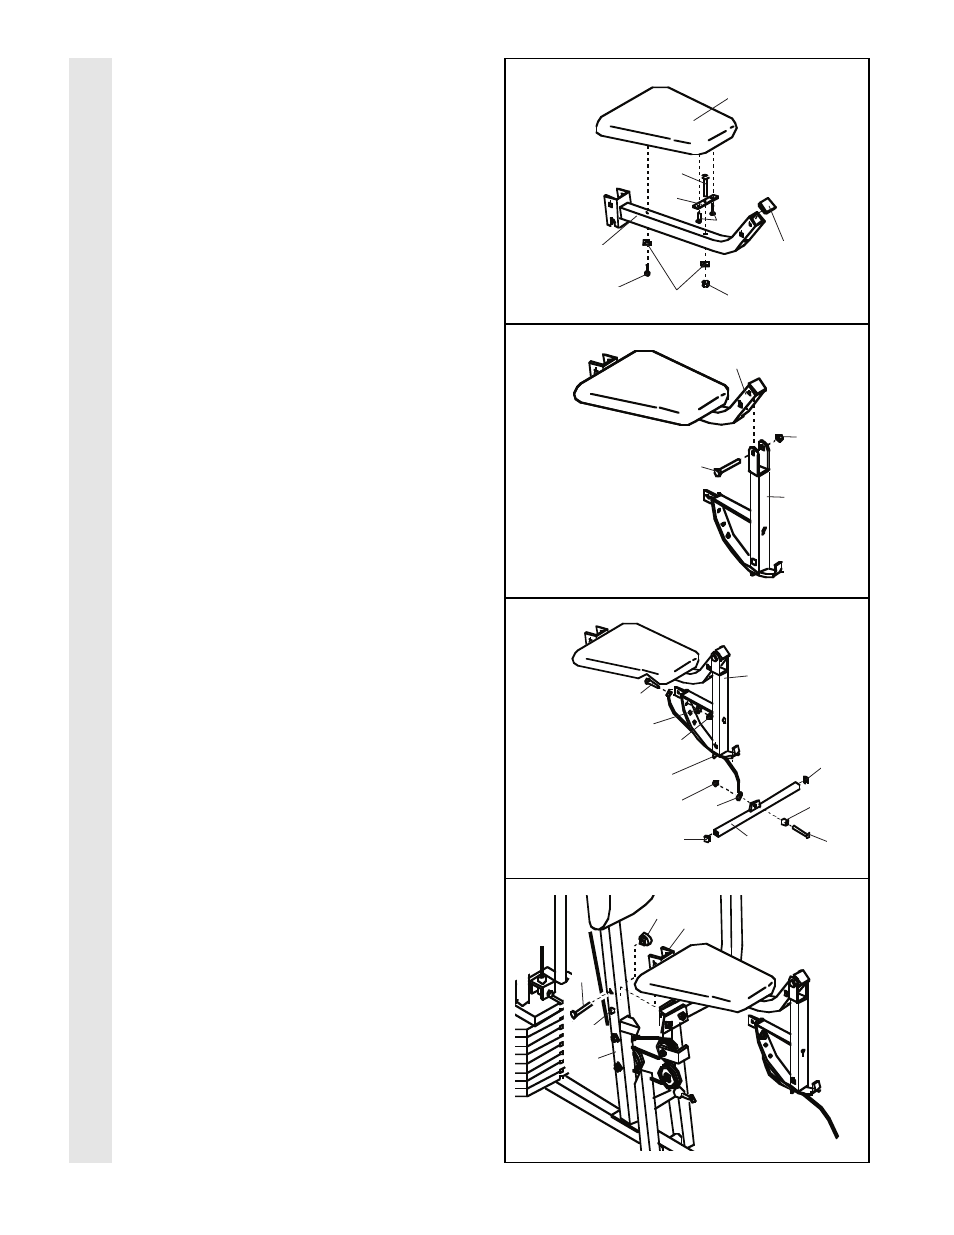
29. Press a 1 1/2” Square Inner Cap (32) into the
Seat Frame (36).
Insert the 1/4” x 2” Carriage Bolt (38) into the
center hole in the Seat Plate (37). Attach the
Seat Plate to the Seat (13) with two 1/4” x
1/2” Screws (18).
Insert the 1/4” x 2” Carriage Bolt (38) into the
indicated hole in the Seat Frame (36).
Tighten a 1/4” Nylon Locknut (2) with a 1/4”
Flat Washer (10) onto the Carriage Bolt.
Attach the other end of the Seat (13) to the
Seat Frame (36) with a 1/4” Flat Washer (10)
and a 1/4” x 2” Screw (24).
30. Lubricate the 5/16” x 2 1/4” Bolt (33). Attach
the Leg Lever (29) to the Seat Frame (36)
with the 5/16” x 2 1/4” Bolt and a 5/16” Nylon
Locknut (3).
31. Attach the Short Cable (35) to one of the
three holes in the Leg Lever (29) with a 5/16”
x 3/4” Bolt (89), a 5/16” Washer (8), and a
5/16” Nylon Locknut (3).
Note: The three
holes are for cable adjustment. Insert the
Short Cable between the welded rod and the
Leg Lever.
Press a 1” Round Inner Cap (49) into each
end of the Curl Bar (86). Slide the 1/2” x 3/8”
Bushing (91), the Curl Bar, and the Short
Cable (35) onto the 5/16” x 1 1/4” Carriage
Bolt (90). Hand tighten a 5/16” Nylon Locknut
(3) onto the Carriage Bolt.
32. Rest the Seat Frame (36) on the indicated pin
in the Front Upright (42). Attach the Seat
Frame to the Front Upright with a 5/16” x
2 3/4” Carriage Bolt (14) and the Seat Knob
(40).
14
SEA
T ASSEMBL
Y
29
10
18
24
2
36
38
32
13
30
3
33
Lubricate
29
36
31
29
3
8
89
37
32
40
36
86
14
42
Pin
49
49
35
90
91
Welded Rod
3