About equalization – Samson VX2510 User Manual
Page 13
11
About Equalization
IN
OUT
+15
+12
+9
+6
+3
+2
-2
-3
-6
-9
-12
-15
+15
0
-15
8KHz
5KHz
3KHz
2KHz
1KHz
500Hz
250Hz
125Hz
64Hz
30Hz
8KHz
5KHz
3KHz
2KHz
1KHz
500Hz
250Hz
125Hz
64Hz
30Hz
GRAPHIC EQUALIZER
IN
OUT
+15
+12
+9
+6
+3
+2
-2
-3
-6
-9
-12
-15
+15
0
-15
8KHz
5KHz
3KHz
2KHz
1KHz
500Hz
250Hz
125Hz
64Hz
30Hz
8KHz
5KHz
3KHz
2KHz
1KHz
500Hz
250Hz
125Hz
64Hz
30Hz
GRAPHIC EQUALIZER
IN
OUT
+15
+12
+9
+6
+3
+2
-2
-3
-6
-9
-12
-15
+15
0
-15
8KHz
5KHz
3KHz
2KHz
1KHz
500Hz
250Hz
125Hz
64Hz
30Hz
8KHz
5KHz
3KHz
2KHz
1KHz
500Hz
250Hz
125Hz
64Hz
30Hz
GRAPHIC EQUALIZER
To find out how each graphic equalizer slider affects the sound of your particular
bass, start with all ten bands flat (that is, all ten sliders at their detented “0” center
position). Then, one by one, raise and lower each slider, listening carefully to the
effect of each. If you don’t specifically need to utilize the ten-band graphic equaliz-
er, bypass it by setting the In/Out switch to its “Out” position. Alternatively, you can
preset a custom graphic equalization curve (for example, for a feature solo) and acti-
vate it simply by pressing the switch when needed. Note that turning all EQ con-
trols up the same amount will have virtually the same effect as simply turning up
the Master Volume; conversely, turning them all down the same amount will have
virtually the same effect as turning down the Master Volume. Both approaches are
pointless (after all, that’s why we gave you a Master Volume control!)
In many instances, the best way to deal with equalization is to think in terms of
which frequency areas you need to attenuate, as opposed to which ones you need
to boost. Be aware that boosting a frequency area also has the effect of boosting
the overall signal; specifically, too much low frequency EQ boost can actually cause
overload distortion or even harm a connected speaker, though the Model 2500’s
compression circuitry—if on—will act to some extent to prevent this from occur-
ring. In general, if you’re going to apply a fair amount of low frequency EQ boost,
it’s a good idea to keep Compression on, if only to protect your speakers from
potential damage.
The specific EQ you will apply to your bass signal is very much dependent upon
your particular instrument and personal taste and playing style. However, here are
a few general suggestions:
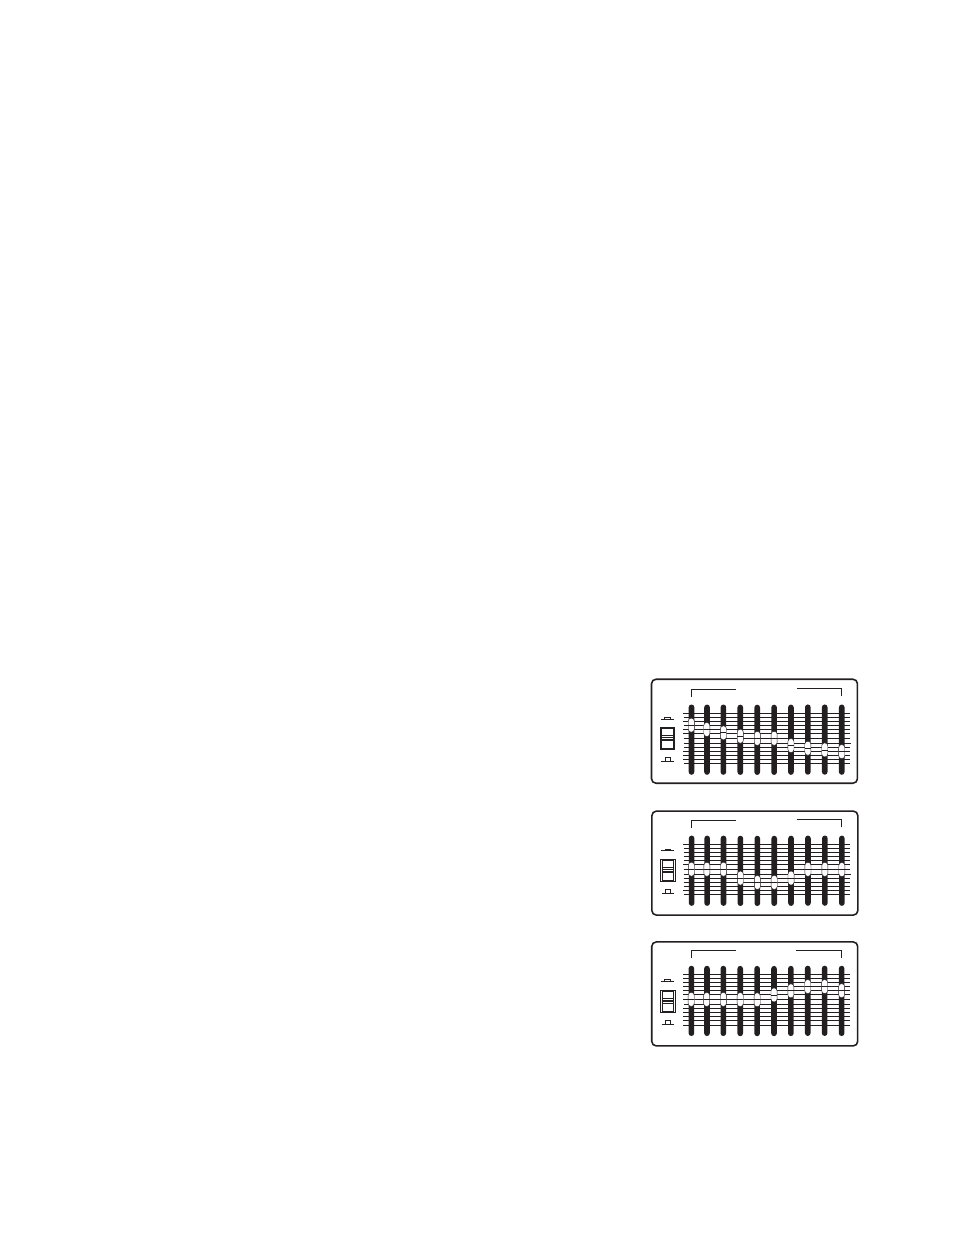
•
For that super-deep reggae or Motown sound, boost low frequencies
slightly while attenuating the highest ones (leave mid-range frequencies
flat or slightly attenuated), as shown in the illustration on the right.
•
To remove boxiness and make your instrument sound more “hi-fi,” try
attenuating mid-range frequencies while leaving low and high frequency
settings flat, as shown in the illustration on the right.
•
For a twangy, cutting sound, try boosting the high and high mid-range
frequencies, as shown in the illustration on the right (putting new round-
wound strings on your bass will help a lot also!)
•
Whenever you get a really good EQ setting for a particular instrument or
song, write it down (you’d be amazed how easy it is to forget these things!).
Finally, as you experiment with the EQ controls of the Model 2500, don’t forget that
your bass also provides EQ controls in the form of its tonal settings—this can be
particularly effective in instruments that have active circuitry. Also, try various EQ
settings with different Pre-Amp blends and with and without Compression. For
more information, see the “About Compression” section on the following page.