Hi temp/flue and trim indicators, Dc operation - building a fire and start-up – Sierra Products EF-4001B User Manual
Page 9
9
Figure 12
Figure 13
HI TEMP/FLUE AND TRIM INDICATORS:
W hen the H i-Te m p/Flu e indic ator ligh t com es o n (red lite
beneath control button) it means that the flue is obstructed
or you have a re verse draft and gase s c an no t ex it prop erly.
Maintenance is required and a thorough cleaning and pipe
check m ust be performed.
TRIM button : Underneath the control button you will find a
sm all ro un d butto n th at w ill turn fo rward and rev erse . This
bu tton can con trol the fee d m oto r in th e LOW positio n only.
By turning the button clockwise you can increase the feed
on LOW and by turning it counterclockwise you can
decrease the feed in the LOW position.
M ove this button carefully! It is designed to fine tune
your L OW setting in the e ven t you ch ang e bra nds of pe llets
and/or live at a higher elevation.
DC OPERATION - BUILDING A FIRE AND
START-UP
IMPO RTANT (Gold Units O nly): Gold is a soft metal and
therefore a fra gile surfa ce . Prior to th e first b urn it is important
to use W index™ or co m para ble produ ct with a soft clean cloth
to wipe any marks off all gold surfaces.
If not cleaned prior to first burn, the heat may cause the marks
to rem ain in the surface perm an en tly.
Always clean the gold surface when the heater is COOL.
1. Filling the Hopper and Start-Up:
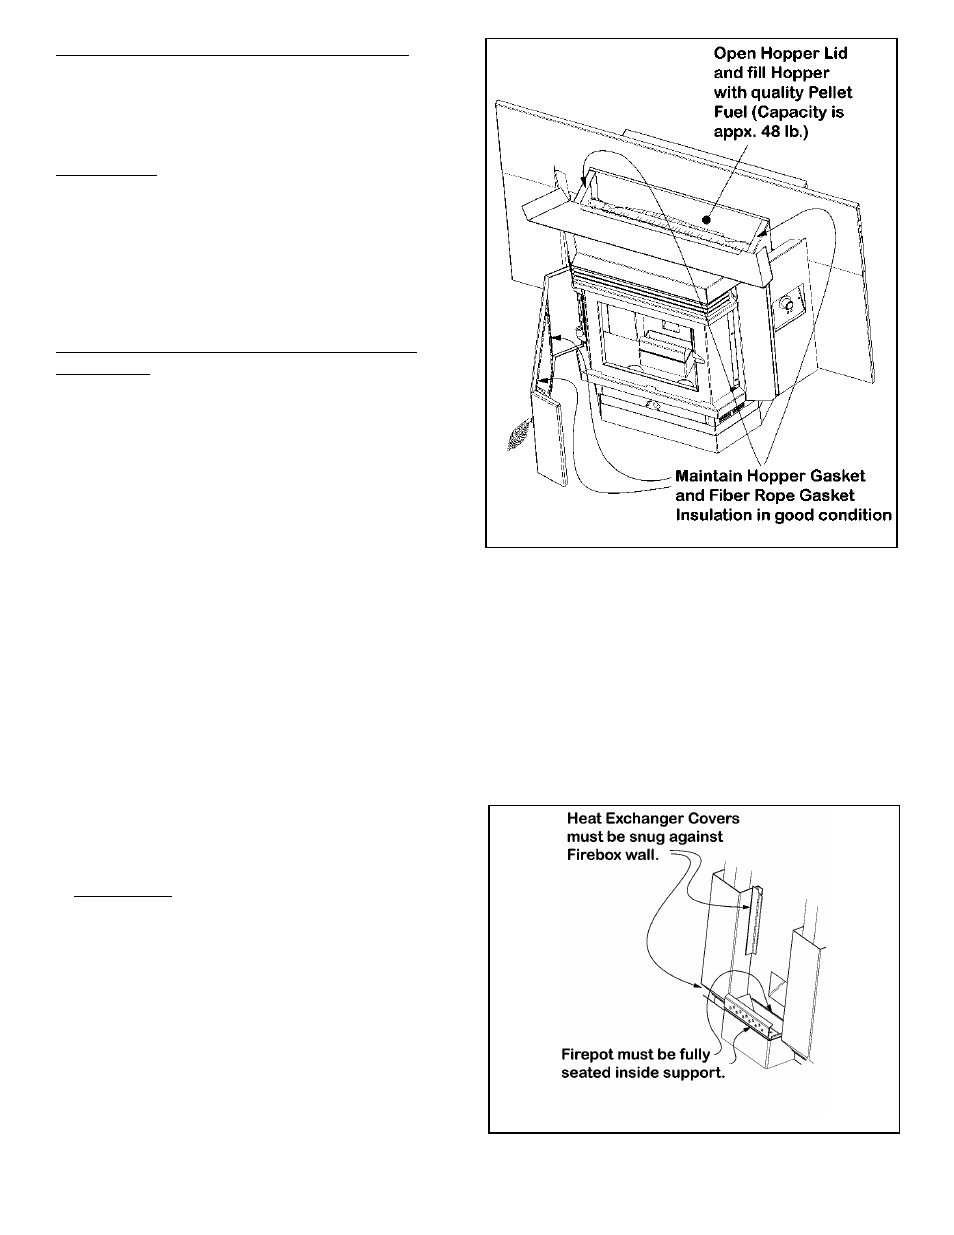
CAUTION: Fuel hopper lid m ust be closed be fore
operating unit. Maintain hopper seal in good condition.
DO NOT OVERFILL HOPPER! The EAS YF IRE w ill hold
about 35 lbs. to 50 lbs. of pellets depending on hopp er
heigh t.
Open the top lid and fill the hopper with pellets (Figure 9).
The quality of pellet fue l varies from bra nd to b rand . This
will affect the efficiency of your heater. W e suggest that you
try several brands until you find one that gives you a clean eff i-
cient burn. Poor quality pellets will burn rich with black soot
and ash will accu m ulate quickly. Quality pellets will burn clean
an d ash build up w ill be m inim al.
Mak e sure hop per lid is fully closed. Ope n the front door.
Fill th e F ire Po t with pellet fue l.
IMPORTANT: The Fire Pot must be seated flush and
must sit even in the pot tray. Air leaking around the Fire Pot
will create a poor burn (Figure 10). Light the pellets in Fire
Pot using any approved lighter fluid.
Allo w p ellets to burn for approx im ate ly 1 m inute, o r un til
pellet ign ition has be en a chieved . Clo se d oo r and turn the
control knob to the "FAN" position. Allow fire to burn for
several minutes. W hen the pellets are well lit, turn the
control knob to "L OW " for approximately 10 minutes then
turn up to "HI". W e recomm end that you run the heater on
“Medium” or "HI" for about 30 minutes in order to get the
he at e xc ha ng er hot be fore turning it to "LO W ". Yo u w ill
need to burn the heater for a few hours before deciding
which setting is best for your particular needs.