Press the [menu] button, Press [menu] to end setting, Connect the monitor to the [video out] ter- minal – JVC VR-716E User Manual
Page 35: The display returns to the normal screen
35
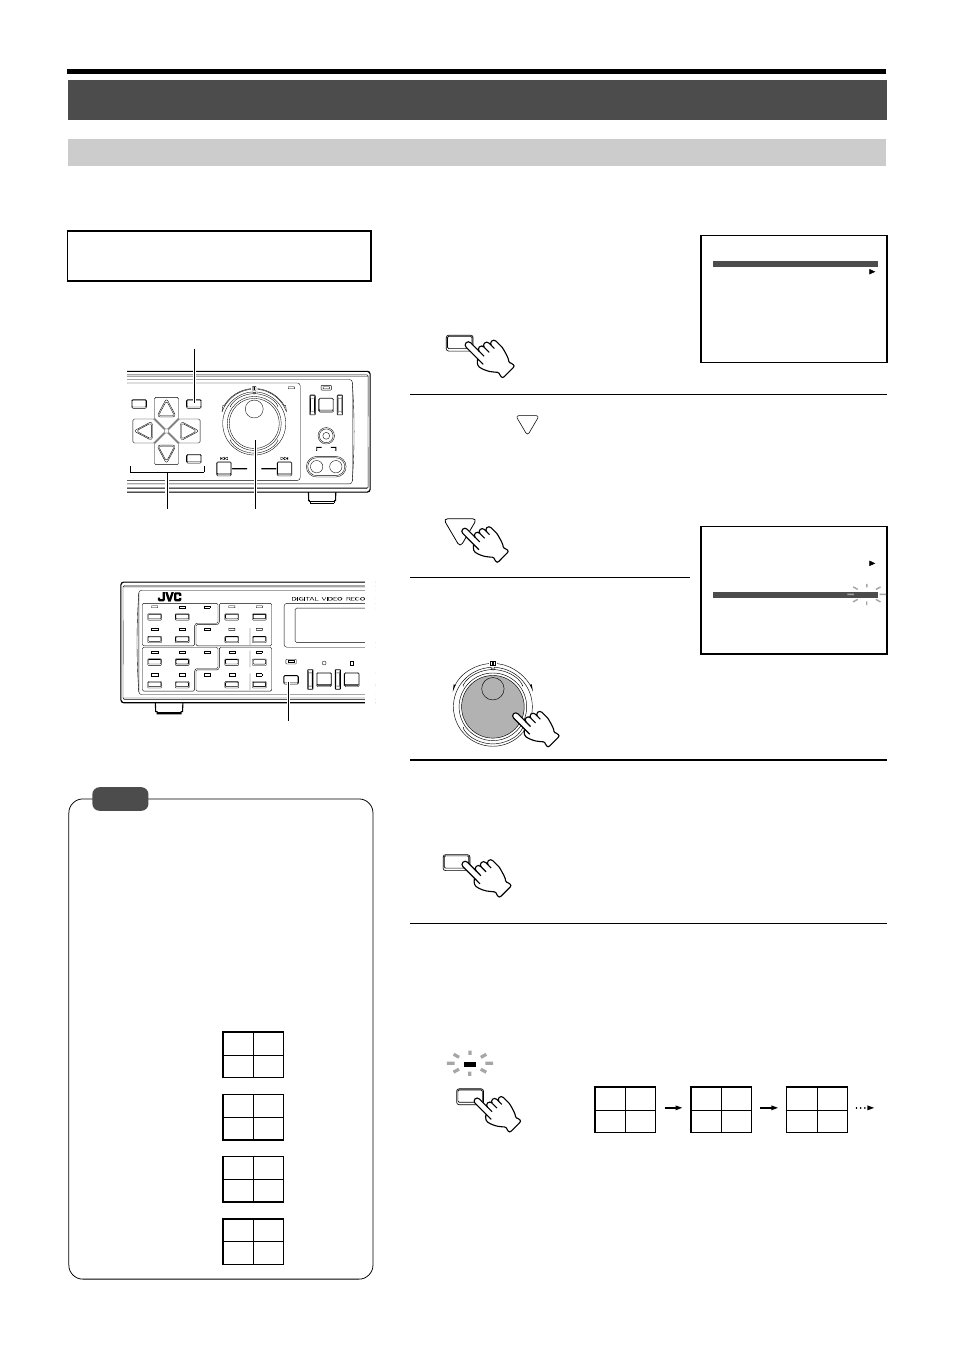
Setting Time Interval for Switching Displays in the Quad Picture Mode
• Display in the Quad Picture mode is possible
only when multiple cameras are set to “ON” in
the corresponding block of the “REC MODE”
Menu (
☞ page 24) and the “QUAD PICTURE
MODE” item in the “MONITOR DISPLAY”
Menu (
☞ page 26) is not set to “OFF”. Moni-
tor will display in the single picture if only one
camera is set to “ON” in the block.
• Camera images for each block are displayed
in the layout as follows:
Connect the monitor to the [VIDEO OUT] ter-
minal.
1.
Press the [MENU] button
• Follow procedures in ‘Changing Menu
Settings’ on page 22 to display the
“MONITOR DISPLAY” Menu.
2.
Press [
] to select a block under the “QUAD
PICTURE MODE” item
• Move the cursor to the camera block no. for which monitor display time
is to be altered.
3.
Turn the jog dial to select
the monitor display time
4.
Press [MENU] to end setting
• The display returns to the normal screen.
5.
Press [SEQUENCE MULTI] to select the Quad
Picture mode
• Monitor starts to switch its display automatically in quad picture.
• LED lights up in green.
“QUAD PICTURE MODE”
Notes
Monitor will display images of each block (“BLOCK 1”: “CAMERA 1” ~ “CAMERA 4”, “BLOCK 2”: “CAMERA 5” ~ “CAMERA 8”,
“BLOCK 3”: “CAMERA 9” ~ “CAMERA 12”, “BLOCK 4”: “CAMERA 13” ~ “CAMERA 16”) in quad picture by switching from one block
to another.
“BLOCK 1”:
“BLOCK 2”:
“BLOCK 3”:
“BLOCK 4”:
DISPLAY
CANCEL
SEARCH
MENU
REV
SKIP
FWD
HDD
OPERATE
LOCK
VIDEO
AUDIO
OUT
EXECUTE
TIMER
1.4.
3.
2.
ALARM
SENSOR
SEQUENCE
MULTI
REC
STOP
P
ALARM
SENSOR
ALARM
SENSOR
ALARM
SENSOR
11
1
9
10
3
4
1
2
7
8
5
6
13
14
15
16
5.
CAMERA 1 CAMERA 2
CAMERA 3 CAMERA 4
CAMERA 5 CAMERA 6
CAMERA 7 CAMERA 8
CAMERA 9 CAMERA 10
CAMERA 11 CAMERA 12
CAMERA 13 CAMERA 14
CAMERA 15 CAMERA 16
MENU
REV
FWD
SEQUENCE
MULTI
MENU
CAMERA 1 CAMERA 2
CAMERA 3 CAMERA 4
CAMERA 5 CAMERA 6
CAMERA 7 CAMERA 8
CAMERA 9 CAMERA 10
CAMERA 11 CAMERA 12
1.EE OUT 1-4/-16
2.SINGLE PICTURE MODE
3.QUAD PICTURE MODE
BLOCK 1
BLOCK 2
BLOCK 3
BLOCK 4
4.ALARM/SENSOR SWITCH
5.SPLIT SCREEN BORDER COLOR
MONITOR DISPLAY
1-4
1SEC
1SEC
1SEC
1SEC
OFF
BORDER 3
1.EE OUT 1-4/-16
2.SINGLE PICTURE MODE
3.QUAD PICTURE MODE
BLOCK 1
BLOCK 2
BLOCK 3
BLOCK 4
4.ALARM/SENSOR SWITCH
5.SPLIT SCREEN BORDER COLOR
MONITOR DISPLAY
1-4
1SEC
1SEC
3SEC
1SEC
OFF
BORDER 3