Pg. 14, Initial settings (cont.), Perform auto set up – JVC HR-XVS20E User Manual
Page 14: Confirm/set video channel, Attention
Filename [XVS20EX_06Index.fm]
Masterpage:Left+
14
EN
Page 14
February 10, 2003 1:07 pm
INITIAL SETTINGS (cont.)
C
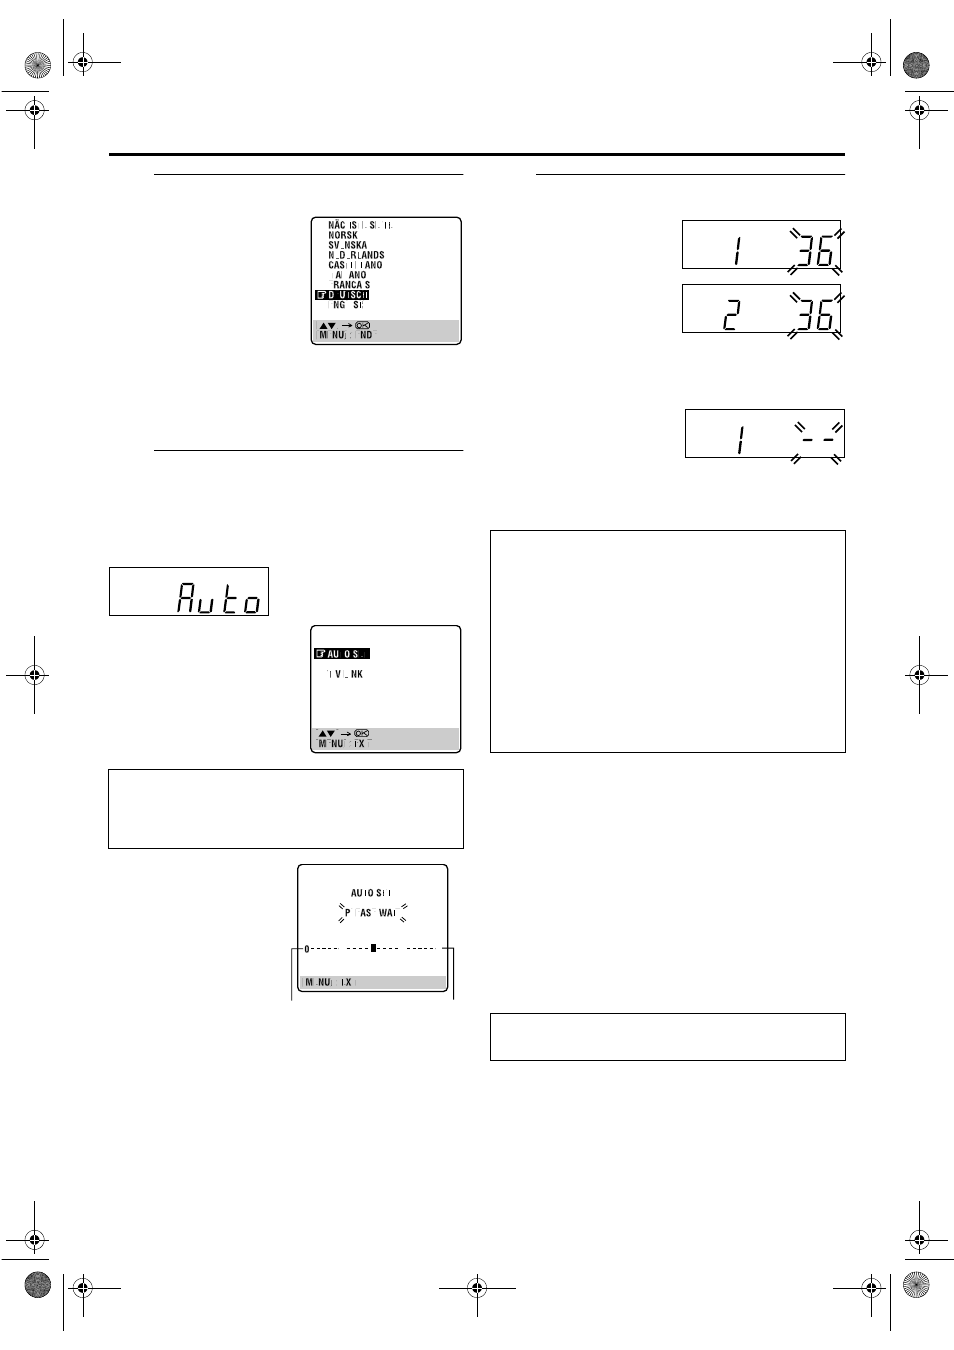
Select the language.
NOTE:
The selected language is only available on the screen for S-VHS
deck.
Set manually the on-screen language for the DVD deck.
(
D
Perform Auto Set Up.
Press OK. The AUTO SET/T-V LINK display appears on
the front display panel and/or on the TV screen.
On the front display panel
Press rt to select “Auto” and press OK or e.
● When you have connected the unit to a TV offering T-V Link
via a fully-wired 21-pin SCART cable (
pg. 12) and the TV is
turned on, the unit automatically performs the Preset
Download (
pg. 15) even if you select “Auto” or “AUTO
SET” for Auto Set Up function.
E
Confirm/Set video channel.
With RF Connection
The video channel that is
shown on the display panel is
your video channel. Press OK.
● If you have selected
MAGYARORSZÁG, CESKÁ
REPUBLIKA, POLSKA or
OTHER EASTERN EUROPE in
step
instead of “1”.
● To view picture signals from the unit, set your TV to the video
channel.
With AV Connection
Press PR – until the display
panel shows “1 – –” (or
“2 – –”). Now the video
channel is set to off. Then press OK.
● To view picture signals from the unit, set your TV to its AV
mode.
NOTES:
● In the area where no TV station transmits a PDC (Programme
Delivery Control) signal, the unit can perform neither Auto
Clock Set nor Auto Guide Program Number Set.
● If there is a power cut, or if you press 1 or SET UP MENU
while Auto Set Up is in progress, Auto Set Up will be
interrupted; be sure to turn off the unit power once and try
again from step
A.
● Auto Clock Set may not function properly depending on the
reception condition.
● If no sound accompanies the picture or the audio sounds
unnatural on some channels that have been stored by Auto Set
Up, the TV system setting for those channels may be incorrect.
Select the appropriate TV system for those channels.
(
Press OK. The Language Set
display appears on the TV
screen.
Press rt to move the
highlight bar (pointer) to the
language of your choice.
(Example) DEUTSCH is selected.
On the on-screen display
Press rt to move the
highlight bar (pointer) to
“AUTO SET” and press OK or
e.
“Auto” blinks on the front display panel; do NOT press
any button on the unit or remote control until the front
display panel shows either the display as illustrated in
step
E or “– –:– –” as illustrated on page 16.
● If you are using the on-screen
display, the AUTO SET
screen will appear. As Auto
Set Up progresses, the “q”
mark on the TV screen
moves from left to right.
Beginning
End
ATTENTION
Once you have performed Auto Set Up, even if the unit’s
memory backup has expired, all the stored stations and their
Guide Program numbers remain in the unit’s memory and the
unit will not perform Auto Set Up again. The unit performs
only Auto Clock Set when the unit is turned on.
If you have moved to a different area, perform each setting as
required.
● Video channel setting (for RF connection users)
● Tuner setting
● Clock setting
If a new station starts broadcasting in your area, perform
tuner setting (
pg. 78) and, if necessary, video channel
setting (
After “Auto Set Up” is completed, perform “Monitor
Set (DVD deck)” on page 17.
XVS20EX_01.book Page 14 Monday, February 10, 2003 1:07 PM