Manual channel set, Subsidiary settings – JVC ShowView LPT1100-001A User Manual
Page 75
Masterpage:Right+
EN
75
Filename [DX5SEU_13Subsidiary.fm]
SUBSIDIARY SETTINGS
Page 75Thursday, 1 September 2005 13:26
8
View the Confirmation screen.
AAUTO SET COMPLETEDB or ASCAN COMPLETEDB is
displayed on the TV screen. Select
AOKB.
9
Press SET UP to complete the setting.
●
Using the Confirmation screen, you can skip or add channel
positions, enter station names and perform other operations.
Refer to pages 75 – 76 for the procedures.
●
Depending on reception conditions, the stations may not be
stored in order, and the station names may not be stored
correctly.
●
For information on scrambled broadcasts, refer to
Receiving A Scrambled Broadcast (HDD & DVD Deck Only)
NOTES:
●
Fine tuning is performed automatically during Auto Channel Set.
If you want to perform tuning manually, refer to
●
If you perform Auto Channel Set when the aerial cable is not
connected properly,
ASCAN COMPLETED –NO SIGNAL–B
appears on the TV screen in step 8. In such a case, make sure of
the aerial connection and press ENTER; Auto Channel Set will
start again.
●
If no sound accompanies the picture or the audio sounds
unnatural on some channels that have been stored by Auto Set
Up, the TV system setting for those channels may be incorrect.
Select the appropriate TV system for those channels. (A pg. 76,
AINFORMATIONB)
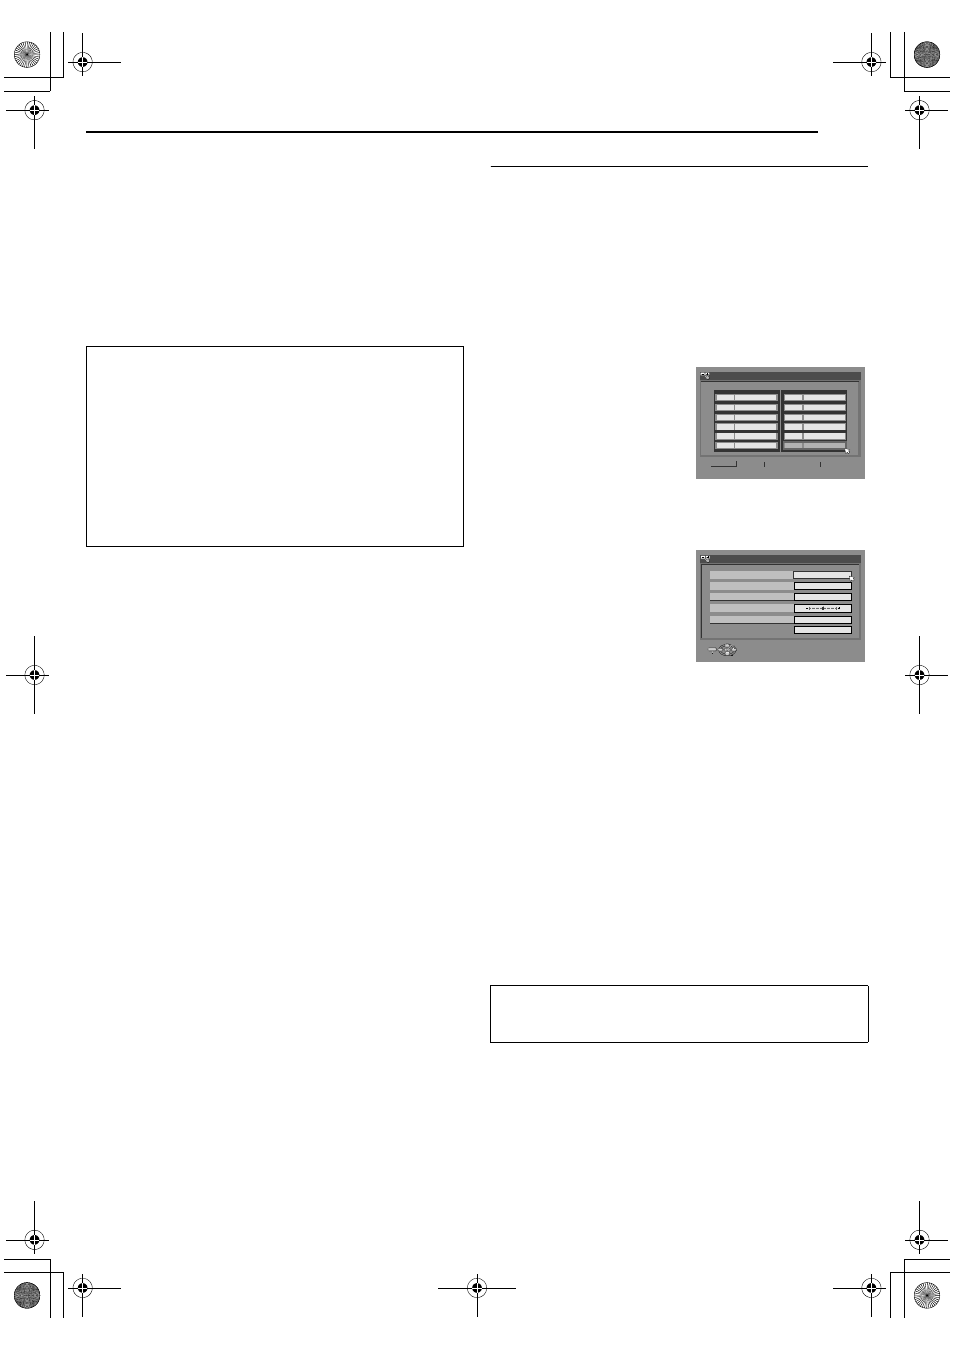
Manual Channel Set
Store channels that were not stored during Auto Set Up
(A pg. 17), Preset Download (A pg. 18) or Auto Channel Set
(A pg. 74).
1
Press SET UP to access the Main Menu screen.
2
Press selection keys to select
AINITIAL SET UPB, then press
G.
3
Press selection keys to select
ATUNER SETB, then press G.
4
Press selection keys to select
AMANUAL CH SETB, then press
ENTER. The Manual Channel Set screen appears.
5
Press selection keys to select
AEDITB, then press ENTER.
6
Press selection keys to select
a blank position in which you
want to store a channel, then
press ENTER. The
Confirmation screen appears.
7
Press selection keys to select
ABANDB, then press ENTER.
8
Press selection keys to
change the band between CH
(regular) and CC (cable), then
press ENTER.
9
Press selection keys to select
ACHB, then press ENTER.
10
Press selection keys to
input the channel number
you want to store.
●
To enter the registered station name (A pg. 88), press
selection keys to select
AIDB, then press ENTER. Press F G.
●
For fine tuning adjustment, press selection keys to select
AFINEB, then press ENTER. Press F G to perform fine-tuning.
●
When storing a channel that sends scrambled broadcasts,
press selection keys to select
ADECODERB, then press
ENTER. Press selection keys to set
ADECODERB to AONB
(
AOFFB is the default setting).
●
When
AL-2 SELECTB is set to AVIDEOB, AS-VIDEOB, ASAT
VIDEO
B or ASAT S-VIDEOB, the ADECODERB setting cannot
be changed. (A pg. 63)
11
Press ENTER to enter new channel information. The
Confirmation screen appears.
12
Press SET UP or RETURN to close the Confirmation screen.
●
To change positions, see
AChange Station Channel PositionB
●
If you wish to set station names other than the ones registered
in your unit, see
ASet Stations (B)B (A pg. 76).
IMPORTANT:
●
In certain reception conditions, station names may not be
stored correctly, and Auto Guide Programme Number Set may
not work properly. When the Guide Programme numbers are
not set properly, the programme that you do not intended to
record will be timer recorded by the S
HOW
V
IEW
system of the
unit. When programming the timer using the S
HOW
V
IEW
system, be sure to check the desired channel is selected
correctly. (A pg. 44)
●
Your unit memorises all receivable stations even if reception of
some of them is poor. You can delete those stations with an
unacceptable picture from the list. (A pg. 76,
ATTENTION:
Guide Programme numbers are not set when channels are
stored manually. (A pg. 74,
(Example) To store in position 12.
The programme currently
received on the selected channel
position appears behind the
confirmation screen.
<
>
PR
PR
01
C01
----
02
02
CTEA
03
05
1000
04
C79
3SAT
05
01
9LIV
06
04
AB3
07
----
08
----
09
----
10
----
11
----
12
----
MOVE
INITIAL SET UP > MANUAL CH SET
EDIT
RETURN
CH
ID
CH
ID
2
----
ENTER
SELECT
SET UP
EXIT
INITIAL SET UP > MANUAL CH SET
BAND
CH
ID
FINE
DECODER
RETURN
CH
OFF
SELECT WITH @ THEN PRESS [ENTER]
PRESS [SET UP] TO EXIT
DX5SEU_00.book Page 75 Thursday, September 1, 2005 1:26 PM